React 组件设计模式详解
December 19, 2024 (1y ago)
这里讲解的是react组件的设计模式的解读
这个也是面试中经常遇见的问题,就是如何设计react组件,实际上考查了我们是否了解react组件的设计模式
你有没有发现在工程实践中,如果你没有一个指导性的设计模式,而直接开发,往往代码都会是很凌乱
- 将一个页面写成一个组件
- 一个组件包含了2,3k行的代码
事实上,这些问题及就是缺乏组合思想,缺少指导性的设计指导,于是我创建了这样的主题:“如何设计React组件”
前言
我这里讨论主要有两个维度,一个:基于场景的设计分类。一个是基于技术实现的设计分类,再有一个是基于最新技术种类社区广泛流行的实现方案,
当然学海无涯,吾身有涯。还有更多的设计模式,这里就不做解读了,我们仅从上面的三个大的分类来解析react的组件的设计模式,其它的设计模式大多数也是类似的思想,希望大家可以触类旁通,越来越厉害!
请跟我默念三遍:
没有最佳的设计模式,只有做合适的设计模式,
没有最佳的设计模式,只有做合适的设计模式,
没有最佳的设计模式,只有做合适的设计模式
基于场景的设计分类。可以把组件分为2个大的部分
- 把只作展示、独立运行、不额外增加功能的组件,称为哑组件,或无状态组件,还有一种叫法是展示组件;(复用性更强)
- 把处理业务逻辑与数据状态的组件称为有状态组件,或灵巧组件,灵巧组件一定包含至少一个灵巧组件或者展示组件。(专注与业务的本身)
基于技术实现的分类主要是把组件分成了如下的几类
- 函数组件
- render props模式
- HOC模式
- 组合模式
- 提供者模式
- State reducer模式
- hook
基于最新技术种类社区广泛流行的实现方案,主要是分析一下使用ts时候的组件设计,这有利于我们阅读antd的源码
基于场景的设计分类
目录结构组织方式的讨论
如果把文件夹src比喻成一个房间,我们及其不提倡,不建议 ,把组件直接放在房间里,就像你把你的衣服不整理直接丢在房间里一样
我认识的一个朋友,目前就职于360公司,属于奇舞团前端团队的成员,他给我分享了一下他们的文件组织方式
- [x] 所有的组件都自己封装一遍
- [x] 在component下以 “基于场景”的分类,把组件进行拆分
- [x] 在page下进行页面的拆分
当然啦,我们几个前端的同事目前还有我们目前终结的的目录组织模式如下
- 通用组件都直接丢在component
- 根据页面级进行拆分
分类1-展示组件
展示组件内部没有状态管理,就像是装饰物一样,完全受控于外部的props的控制,通用性和复用性及其强,与当前项目关联性弱,甚至可以跨项目的复用,.
代理组件
代理组件常用于封装常用属性,减少重复代码。
比如说下面的代码
import { Button as AntdButton } from from 'antd'
const Button = props =>
  <AntdButton size="small" type="primary" {...props}>

export default Button
这样做看起来麻烦但是还是有好处的:
- 但切断了外部组件库的强依赖特性、内聚性高,聚在当前的 Button 组件中
- 如果当前组件库不能使用了,是否能实现业务上的无痛切换
- 如果需要批量修改基础组件的字段
样式组件
基于同样的思想,我们还可以衍生出,样式组件,
import classnames from "classnames";

const StyleButton = ({ className, primary, isHighLighted,  ...props }) => (
  <Button
    type="button"
    className={classnames("btn", {
     btn-primary: primary,
     highLight: isHighLighted,
}, className)}
    {...props}
  />
);
省去了编写“面条”代码的逻辑。
基于样式组件的优化设计
class Layout extends React.Component {
  shouldComponentUpdate() {
    return false;
  }
  render() {
    <div>
      <div>{this.props.NavigationBar}</div>
      <div>{this.props.Article}</div>
      <div>{this.props.BottomBar}</div>
    </div>
  }
}
该案例的特点
- [x] shouldComponentUpdate 的返回值直接阻断渲染过程,提升性能,易于维护
分离2-灵巧组件
灵巧组件,面向业务。相比于展示组价来说,功能更加的丰富,复杂性更加的高,复用度更加的低。
展示组件专注于组件本身特性,灵巧组件更专注于组合组件和业务耦合。
容器组件
最常见的是 容器组件,容器组件几乎没有复用性,它主要用在两个方面:拉取数据与组合组件
const CardList = ({ cards }) => (
  <div>
    {cards.map(card => (
      <CardLayout
        header={<Avatar url={card.avatarUrl} />}
        Content={<Card {...card} />}
      />
        {comment.body}-{comment.author}
    ))}
  </div>
);


// 获取
class CardListContainer extends React.Component {
  state = { cards: [] }

  async componentDidMount() {
    const response = await fetch('/api/cards')
    this.setState({cards: response})
  }

  render() {
    return <CardList cards={this.state.cards} />
  }
}
解析一下,
- 首先这样的代码分割,使得容器组件十分的干净,没有多余的样式逻辑处理
- 这是编程思想:关注点分离思想,的最佳提现,
高阶组件
高阶组件是基于class类组件的一种设计模式。主要是把更复杂的逻辑,抽离复用,说白了就是套娃
套:高阶组价
娃:被套的组件
看下面的两个案例,
- 登录态逻辑的判断
const checkLogin = () => {
  return !!localStorage.getItem('token')
}
const checkLogin = (WrappedComponent) => {
          return (props) => {
              return checkLogin() ? <WrappedComponent {...props} /> : <LoginPage />;
          }
// 函数写法
class RawUserPage extends  React.Component {
  ...
}
const UserPage = checkLogin(RawUserPage)
// 装饰器写法
@checkLogin
class UserPage extends  React.Component {
  ...
}
@checkLogin
class OrderPage extends  React.Component {
  ...
}- 页面的埋点统计分析
const trackPageView = (pageName) = {
   // 发送埋点信息请求
   ...
}
const PV = (pageName) => {
  return (WrappedComponent) => {
    return class Wrap extends Component {
      componentDidMount() {
        trackPageView(pageName)
      }

      render() {
        return (
          <WrappedComponent {...this.props} />
        );
      }
    }
  };
}
@PV('用户页面')
class UserPage extends  React.Component {
  ...
}
@PV('购物车页面')
class CartPage extends  React.Component {
  ...
}
@PV('订单页面')
class OrderPage extends  React.Component {
  ..
}

// 装饰器还可以进行 链式调用
// 函数调用方式
class RawUserPage extends React.Component {
  ...
}
const UserPage = checkLogin(PV('用户页面')(RawUserPage))
// 装饰器调用方式
@checkLogin
@PV('用户页面')
class UserPage extends  React.Component {
  ...
}- 渲染劫持以及其缺陷 (无侵入二次开发方案,的最佳实践)
// 阻断渲染,显示loading
function withLoading(WrappedComponent) {
    return class extends WrappedComponent {
        render() {
            if(this.props.isLoading) {
                return <Loading />;
            } else {
                return super.render();
            }
        }
    };
}

// 缺陷1,由于被包裹了一层,所以静态函数在外层是无法获取的。如下面的案例中 getUser 是无法被调用的
// UserPage.jsx
@PV('用户页面')
export default class UserPage extends  React.Component {
  static getUser() {
      ...
  }
}
// page.js
import UserPage from './UserPage'
UserPage.checkLogin() // 调用失败,并不存在。


// 解决方案1
const PV = (pageName) => {
  return (WrappedComponent) => {
    class Wrap extends Component {
      componentDidMount() {
        trackPageView(pageName)
      }

      render() {
        return (
          <WrappedComponent {...this.props} />
        );
      }
    }
     Wrap.getUser = WrappedComponent.getUser;
     return Wrap;
  };
 }


// 解决方案, hoist-non-react-statics 来处理,可以自动复制所有静态函数。
import hoistNonReactStatics from 'hoist-non-react-statics';
const PV = (pageName) => {
  return (WrappedComponent) => {
    class Wrap extends Component {
      componentDidMount() {
        trackPageView(pageName)
      }

      render() {
        return (
          <WrappedComponent {...this.props} />
        );
      }
    }
     hoistNonReactStatics(Wrap, WrappedComponent);
     return Wrap;
  };
 }


// 缺陷2 refs 属性不能透传,解决方案
function withLog(Component) {
  class LogProps extends React.Component {
    componentDidUpdate(prevProps) {
      console.log('old props:', prevProps);
      console.log('new props:', this.props);
    }
    render() {
      const {forwardedRef, ...rest} = this.props;
      // 将自定义的 prop 属性 “forwardedRef” 定义为 ref
      return <Component ref={forwardedRef} {...rest} />;
    }
  }
  // 注意 React.forwardRef 回调的第二个参数 “ref”。
  // 我们可以将其作为常规 prop 属性传递给 LogProps,例如 “forwardedRef”
  // 然后它就可以被挂载到被 LogProps 包裹的子组件上。
  return React.forwardRef((props, ref) => {
    return <LogProps {...props} forwardedRef={ref} />;
  });
}
总结
React 组件应从设计与工程实践两个方向进行探讨。
从设计上而言,社区主流分类的方案是展示组件与灵巧组件。
展示组件内部没有状态管理,仅仅用于最简单的展示表达。展示组件中最基础的一类组件称作代理组件。代理组件常用于封装常用属性、减少重复代码。很经典的场景就是引入 Antd 的 Button 时,你再自己封一层。如果未来需要替换掉 Antd 或者需要在所有的 Button 上添加一个属性,都会非常方便。基于代理组件的思想还可以继续分类,分为样式组件与布局组件两种,分别是将样式与布局内聚在自己组件内部。
灵巧组件由于面向业务,其功能更为丰富,复杂性更高,复用度低于展示组件。最经典的灵巧组件是容器组件。在开发中,我们经常会将网络请求与事件处理放在容器组件中进行。容器组件也为组合其他组件预留了一个恰当的空间。还有一类灵巧组件是高阶组件。高阶组件被 React 官方称为 React 中复用组件逻辑的高级技术,它常用于抽取公共业务逻辑或者提供某些公用能力。常用的场景包括检查登录态,或者为埋点提供封装,减少样板代码量。高阶组件可以组合完成链式调用,如果基于装饰器使用,就更为方便了。高阶组件中还有一个经典用法就是反向劫持,通过重写渲染函数的方式实现某些功能,比如场景的页面加载圈等。但高阶组件也有两个缺陷,第一个是静态方法不能被外部直接调用,需要通过向上层组件复制的方式调用,社区有提供解决方案,使用 hoist-non-react-statics 可以解决;第二个是 refs 不能透传,使用 React.forwardRef API 可以解决。
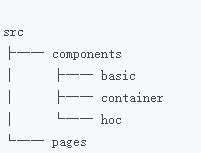
从工程实践而言,通过文件夹划分的方式切分代码。我初步常用的分割方式是将页面单独建立一个目录,将复用性略高的 components 建立一个目录,在下面分别建立 basic、container 和 hoc 三类。这样可以保证无法复用的业务逻辑代码尽量留在 Page 中,而可以抽象复用的部分放入 components 中。其中 basic 文件夹放展示组件,由于展示组件本身与业务关联性较低,所以可以使用 Storybook 进行组件的开发管理,提升项目的工程化管理能力
基于技术的设计分类主要是把组件分成了如下的几类
函数组件
` 很简单,纯UI组件,不包含状态
const Hello = props => <div>Hello {props.name}</div>;

const App = props => <Hello name={"world"} />;
优点:
- 可读性好
- 逻辑简单
- 测试简单
- 代码量少
- 容易复用
- 解耦
Render Props
render props 提高了组件的复用性和灵活性, 只需要父组件传入props就能完成UI渲染和逻辑交互
const Hello = props => <div>{props.children({ name: "World" })}</div>;

const App = props => <Hello>{props => <h1>Hello {props.name}</h1>}</Hello>;

//复用
const App2 = props => <Hello>{props => <h1>Hey {props.name}</h1>}</Hello>;
HOC
省略,与上文保存一致。
组合组件
在程序设计中有一条铁律就是:“组合优于继承”,
我们来看下面的一段代码,这就是组合组件的实践
class List extends Component {
  static Item = ({ children, index }) => (
    <li>
      {index} {children}
    </li>
  );

  render() {
    return (
      <ul>
        {React.Children.map(this.props.children, (child, index) =>
          React.cloneElement(child, {
            index: index
          })
        )}
      </ul>
    );
  }
}

const App = props => (
  <List>
    <List.Item>apple</List.Item>
    <List.Item>banana</List.Item>
  </List>
);
Provider Pattern模式,
这东西主要是实现深层次高度复杂的组件传值问题,但是不推荐使用,而是推荐使用状态管理入reducer或者Mbox或者dva。
Hook
就是在函数组件内部有了自己的state,这里的设计思想依然可以沿用或者组合上面的任意的设计模式,但是建议最多不组合两种以上的设计模式,因为只有你能看得懂这样的代码了!
这里对常用的hook就不做过多的说明了。只分析不常见的hook。目的在于启发大家更多的设计方式和探讨
useContext
// 该hook和Context保持一致,作用也保持一致,需要注意的就是性能问题,
const themes = {
  light: {
    foreground: "#000000",
    background: "#eeeeee"
  },
  dark: {
    foreground: "#ffffff",
    background: "#222222"
  }
};

const ThemeContext = React.createContext(themes.light);

function App() {
  return (
    <ThemeContext.Provider value={themes.dark}>
      <Toolbar />
    </ThemeContext.Provider>
  );
}

function Toolbar(props) {
  return (
    <div>
      <ThemedButton />
    </div>
  );
}

function ThemedButton() {
  const theme = useContext(ThemeContext);
  return (
    <button style={{ background: theme.background, color: theme.foreground }}>
      I am styled by theme context!
    </button>
  );
}
useReducer
// 注意,如果你希望了解该内容,那么你需要先来了解Redux ,该hook是是使用是特殊场景下的useState替代方案
// 该案例使用惰性加载,好处就是:将用于计算 state 的逻辑提取到 reducer 外部,这也为将来对重置 state 的 action 做处理提供了便利:

function init(initialCount) {
  return {count: initialCount};
}

function reducer(state, action) {
  switch (action.type) {
    case 'increment':
      return {count: state.count + 1};
    case 'decrement':
      return {count: state.count - 1};
    case 'reset':
      return init(action.payload);
    default:
      throw new Error();
  }
}

function Counter({initialCount}) {
  const [state, dispatch] = useReducer(reducer, initialCount, init);
  return (
    <>
      Count: {state.count}
      <button
        onClick={() => dispatch({type: 'reset', payload: initialCount})}>
        Reset
      </button>
      <button onClick={() => dispatch({type: 'decrement'})}>-</button>
      <button onClick={() => dispatch({type: 'increment'})}>+</button>
    </>
  );
}
useCallback
// 这个东西做优化的时候非常有用。具体的用法如下,仅仅有a,b这些依赖,发生变化时采取调用函数


const memoizedCallback = useCallback(
  () => {
    doSomething(a, b);
  },
  [a, b],
);
useMemo
// 同样的,这个hook作为优化手段也是有奇效,
// 该函数会在render期间 执行, 不能在这个函数中做其他与渲染进程无关的操作。返回的是 一个值,这个值它可以是组件


const memoizedValue = useMemo(
  () => computeExpensiveValue(a, b),
  [a, b]);
useRef
// 一个令人头疼的问题在于,fn组件中,ref是不能传递的,要使用ref就要挂载到指定的dom上

function TextInputWithFocusButton() {
  const inputEl = useRef(null);  // 返回一个不可变的ref对象
  const onButtonClick = () => {
    // `current` 指向已挂载到 DOM 上的文本输入元素
    inputEl.current.focus();
  };
  return (
    <>
      <input ref={inputEl} type="text" />
      <button onClick={onButtonClick}>Focus the input</button>
    </>
  );
}
useImperativeHandle
// 可以让你在使用 ref 时,自定义暴露给父组件的实例值。

function FancyInput(props, ref) {
  const inputRef = useRef();
  useImperativeHandle(ref, () => ({
    focus: () => {
      inputRef.current.focus();
    }
  }));
  return <input ref={inputRef} ... />;
}
FancyInput = forwardRef(FancyInput);

// 在父组件上,父组件就能调用,子组件的focus方法
inputRef.current.focus()。
useDebugValue
// 可用于在 React 开发者工具中显示自定义 hook 的标签,我们不推荐你向每个自定义 Hook 添加 debug 值。当它作为共享库的一部分时才最有价值。当然了再deBug时也有奇效

function useFriendStatus(friendID) {
  const [isOnline, setIsOnline] = useState(null);

  // ...

  // 在开发者工具中的这个 Hook 旁边显示标签
  // e.g. "FriendStatus: Online"
  useDebugValue(isOnline ? 'Online' : 'Offline');

  return isOnline;
}