前置说明
你好我是 无双-Joney ,我们接着说RN的拆包方案,延续上篇的话题,你将在这篇文章中看到下面的内容,为了给大家带来更好的阅读体验哈,我们对原理这一块不做深入的说明(有Native也有C++),想细看的可以前往我的github 仓库里面有非常详细的说明,连接在下文
| 项目 | Android | IOS |
|---|---|---|
| 初步的拆包方案 | ✅ 完成 | ✅ 完成 |
| 优化拆包方案 common + bu = runtime | ✅ 完成 | ✅ 完成 |
| 容器的缓存复用 | ✅ 完成 | ✅ 完成(bridge 复用) |
另外我在11月5日有一场掘金社区联合举办的 Light Talk 👏 欢迎来看 https://www.yuque.com/yufe/blog/lg84su


JS 侧
分包 实际上就是将一个build 的bundle 以模块化的方式 ,拆成多个分开的bundle, 然后在加载的时候不需要加载一个 巨大无比的bundle ,只需要载入业务代码就好了,通常而言 业务代码合理划分module ,最大也不会超过2MB ,然后在加载的时候 只载入 bundle 包,就能达到更快的加载的效果,如果是启动的时候,因为不需要加载全量的bundle ,App 的启动速度也可以得到优化,经过 各种调研,我最终采用了下面的拆包方案
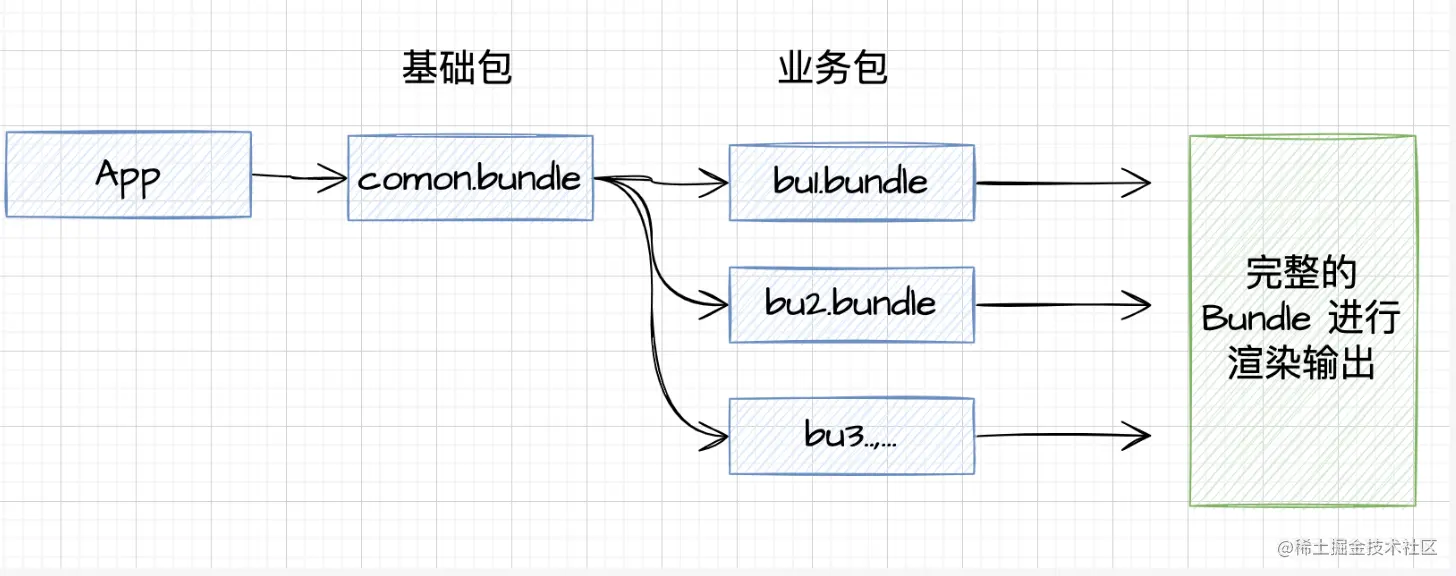
好有了这样的分析,那么我们现在就来实现它
CLI build 构建分析 和产物bundle
- 首先我们来 看一下build 和 bunlde 的构成
npx react-native bundle
    --platform android
    --dev false
    --entry-file index.js
    --bundle-output ./android/app/src/main/assets/index.android.bundle
    --assets-dest ./android/app/src/main/res/

# 上面的platform 等参数这里不详细的说明了,在metro中都有详细的说明,其中比较重要的参数是
# 指定平台 不同平台构建出来的bunlde 会不一样 然后是 --config 它可以指定一个配置文件来产出
# 特定的bunlde
在聊CLI的执行逻辑之前,我们先来看看bundle 的构成是什么
一个 包 (bundle) 说白了 就说 一些js 代码,只不过后缀叫 bundle ,它实际上是一些js 代码,只不过这些代码的运行 环境在RN 提供的环境 不是在浏览器,通过这些代码RN 引擎可以使用 Native 组件 渲染 出你想要的UI ,好 这就是 包 bundle。一个rn 的bundle 主要由三部分构成
- 环境变量 和 require define 方法的预定义 (polyfills)
- 模块代码定义 (module define)
- 执行 (require 调用)
从一个简单的 RNDemo 分析 一个 简单的bundle 的构建。 在根目录 下有一个RNDemo =>
import { StyleSheet, Text, View, AppRegistry } from "react-native";

class BU1 extends React.Component {
render() {
  return (
    <View style={styles.container}>
      <Text style={styles.hello}>BU1 </Text>
    </View>
  );
}
}

const styles = StyleSheet.create({
// -----省略
});

AppRegistry.registerComponent("Bu1Activity", () => BU1);
执行build 之后 ,我们来看看bundle 长什么样
首先我们前面说过 个rn 的bundle 主要由三部分构成 (polyfills、defined、require )
先看第一部分 polyfills 它从第 1行 一直到 第 799 行
// 第一句话
var __BUNDLE_START_TIME__=this.nativePerformanceNow?nativePerformanceNow():Date.now(),
   __DEV__=false,
   process=this.process||{},
   __METRO_GLOBAL_PREFIX__='';
   process.env=process.env||{};
   process.env.NODE_ENV=process.env.NODE_ENV||"production";
//可以看到 它定义了 运行时的基本环境变量 __BUNDLE_START_TIME__、__DEV__、__METRO_GLOBAL_PREFIX__..... 其作用是给RN 的Native 容器识别的 ,我们这里不深入,你只需要 知道没有这个 RN 的Native 容器识别会异常! 报错闪退


// 解析来 是三个闭包立即执行 函数 ,重点是第一个 它定义了 __r ,__d, 这两个函数 就说后面 模块定义 和 模块执行的关键函数
global.__r = metroRequire;
global[__METRO_GLOBAL_PREFIX__ + "__d"] = define;
metroRequire.packModuleId = packModuleId;
var modules = clear();
function clear() {
 modules = Object.create(null);
 return modules;
}
var moduleDefinersBySegmentID = [];
var definingSegmentByModuleID = new Map();

// 下面的说 __r  的主要定义
function metroRequire(moduleId) {
   var moduleIdReallyIsNumber = moduleId;
   var module = modules[moduleIdReallyIsNumber];
   return module && module.isInitialized ? module.publicModule.exports : guardedLoadModule(moduleIdReallyIsNumber, module);
 }
 // 可以看到上述函数 的作用是 从 module(在下称它为 模块组册表 )看看 是否已经初始化 了 ,如果是 就导出 (exports) 如果没有就 加载一次 (guardedLoadModule)

 function guardedLoadModule(moduleId, module) {
   if (!inGuard && global.ErrorUtils) {
     inGuard = true;
     var returnValue;

     try {
       returnValue = loadModuleImplementation(moduleId, module);
     } catch (e) {
       global.ErrorUtils.reportFatalError(e);
     }

     inGuard = false;
     return returnValue;
   } else {
     return loadModuleImplementation(moduleId, module);
   }
 }
 // 上述函数 最重要的事情 就是 执行 loadModuleImplementation 函数,传递 moduleId 和 module


 function loadModuleImplementation(moduleId, module) {
   if (!module && moduleDefinersBySegmentID.length > 0) {
     var _definingSegmentByMod;

     var segmentId = (_definingSegmentByMod = definingSegmentByModuleID.get(moduleId)) !== null && _definingSegmentByMod !== undefined ? _definingSegmentByMod : 0;
     var definer = moduleDefinersBySegmentID[segmentId];

     if (definer != null) {
       definer(moduleId);
       module = modules[moduleId];
       definingSegmentByModuleID.delete(moduleId);
     }
   }

   var nativeRequire = global.nativeRequire;

   if (!module && nativeRequire) {
     var _unpackModuleId = unpackModuleId(moduleId),
         _segmentId = _unpackModuleId.segmentId,
         localId = _unpackModuleId.localId;

     nativeRequire(localId, _segmentId);
     module = modules[moduleId];
   }

   if (!module) {
     throw unknownModuleError(moduleId);
   }

   if (module.hasError) {
     throw moduleThrewError(moduleId, module.error);
   }

   module.isInitialized = true;
   var _module = module,
       factory = _module.factory,
       dependencyMap = _module.dependencyMap;

   try {
     var moduleObject = module.publicModule;
     moduleObject.id = moduleId;
     factory(global, metroRequire, metroImportDefault, metroImportAll, moduleObject, moduleObject.exports, dependencyMap);
     {
       module.factory = undefined;
       module.dependencyMap = undefined;
     }
     return moduleObject.exports;
   } catch (e) {
     module.hasError = true;
     module.error = e;
     module.isInitialized = false;
     module.publicModule.exports = undefined;
     throw e;
   } finally {}
 }
// 上述 重要的函数就是  factory(global, metroRequire, metroImportDefault, metroImportAll, moduleObject, moduleObject.exports, dependencyMap); 。它复杂执行模块的代码 ,好了 到这里为止我们就够了,现在不用分析太深入,要特别注意的是 factory  不是 定义好的函数,而是传入 的函数 ! factory = _module.factory, 具体点来说,它的执行是依据每个模块 的传入参数来执行的


// 然后我们来看看 __d define  ,这个东西就比较的简单了
function define(factory, moduleId, dependencyMap) {
   if (modules[moduleId] != null) {
     return;
   }

   var mod = {
     dependencyMap: dependencyMap,
     factory: factory,
     hasError: false,
     importedAll: EMPTY,
     importedDefault: EMPTY,
     isInitialized: false,
     publicModule: {
       exports: {}
     }
   };
   modules[moduleId] = mod;
 }
 // 可以看到这个非常的简单,就是在 组册表(modules)中 添加 对应的 模块
我们再来看看 重要的 一个 module 的定义是如何实现的
// 为了方便起见 我们直接找到  BU1 组件的声明  通过全局搜索🔍 我们找到了这个 定义,他在 802 -> 876 行

// 我们先看他 __d 参数部分 ,它 的执行器 factory = fn,模块id = 0 , 依赖模块的Map(别的依赖模块的 moduleId) = [1,2,3,4,6,9,10,12,179]
__d(fn,0,[1,2,3,4,6,9,10,12,179])

__d(function (global, _$$_REQUIRE, _$$_IMPORT_DEFAULT, _$$_IMPORT_ALL, module, exports, _dependencyMap) {
  var _interopRequireDefault = _$$_REQUIRE(_dependencyMap[0]);

  var _classCallCheck2 = _interopRequireDefault(_$$_REQUIRE(_dependencyMap[1]));

  var _createClass2 = _interopRequireDefault(_$$_REQUIRE(_dependencyMap[2]));

  var _inherits2 = _interopRequireDefault(_$$_REQUIRE(_dependencyMap[3]));

  var _possibleConstructorReturn2 = _interopRequireDefault(_$$_REQUIRE(_dependencyMap[4]));

  var _getPrototypeOf2 = _interopRequireDefault(_$$_REQUIRE(_dependencyMap[5]));

// 下面三个模块 是 react -> react-native -> jsxRuntime 的重要模块 !分包负责 核心加载 RN 以来,JSXruntime 解析
  var _react = _interopRequireDefault(_$$_REQUIRE(_dependencyMap[6]));

  var _reactNative = _$$_REQUIRE(_dependencyMap[7]);

  var _jsxRuntime = _$$_REQUIRE(_dependencyMap[8]);

  function _createSuper(Derived) { var hasNativeReflectConstruct = _isNativeReflectConstruct(); return function _createSuperInternal() { var Super = (0, _getPrototypeOf2.default)(Derived), result; if (hasNativeReflectConstruct) { var NewTarget = (0, _getPrototypeOf2.default)(this).constructor; result = Reflect.construct(Super, arguments, NewTarget); } else { result = Super.apply(this, arguments); } return (0, _possibleConstructorReturn2.default)(this, result); }; }

  function _isNativeReflectConstruct() { if (typeof Reflect === "undefined" || !Reflect.construct) return false; if (Reflect.construct.sham) return false; if (typeof Proxy === "function") return true; try { Boolean.prototype.valueOf.call(Reflect.construct(Boolean, [], function () {})); return true; } catch (e) { return false; } }

// BU1 组件编译后的渲染就是 这一坨
  var BU1 = function (_React$Component) {
    (0, _inherits2.default)(BU1, _React$Component);

    var _super = _createSuper(BU1);

    function BU1() {
      (0, _classCallCheck2.default)(this, BU1);
      return _super.apply(this, arguments);
    }

    (0, _createClass2.default)(BU1, [{
      key: "render",
      value: function render() {
        return (0, _jsxRuntime.jsx)(_reactNative.View, {
          style: styles.container,
          children: (0, _jsxRuntime.jsx)(_reactNative.Text, {
            style: styles.hello,
            children: "BU1 "
          })
        });
      }
    }]);
    return BU1;
  }(_react.default.Component);

// 我们自己写的styles 函数
  var styles = _reactNative.StyleSheet.create({
    container: {
      flex: 1,
      justifyContent: "center",
      height: 100
    },
    hello: {
      fontSize: 20,
      textAlign: "center",
      margin: 10
    },
    imgView: {
      width: "100%"
    },
    img: {
      width: "100%",
      height: 600
    },
    flatContainer: {
      flex: 1
    }
  });

// RNDemo 的 registerComponent 函数
  _reactNative.AppRegistry.registerComponent("Bu1Activity", function () {
    return BU1;
  });
},0,[1,2,3,4,6,9,10,12,179]);
最后 就是RNDemo 的__r 执行了
__r(27);
// 27 这个模块id 我们可以去看看它在做什么
__d(function (global, _$$_REQUIRE, _$$_IMPORT_DEFAULT, _$$_IMPORT_ALL, module, exports, _dependencyMap) {
  'use strict';

  var start = Date.now();

  _$$_REQUIRE(_dependencyMap[0]);

  _$$_REQUIRE(_dependencyMap[1]);

  _$$_REQUIRE(_dependencyMap[2]);

  _$$_REQUIRE(_dependencyMap[3]);

  _$$_REQUIRE(_dependencyMap[4]);

  _$$_REQUIRE(_dependencyMap[5]);

  _$$_REQUIRE(_dependencyMap[6]);

  _$$_REQUIRE(_dependencyMap[7]);

  _$$_REQUIRE(_dependencyMap[8]);

  _$$_REQUIRE(_dependencyMap[9]);

  _$$_REQUIRE(_dependencyMap[10]);

  _$$_REQUIRE(_dependencyMap[11]);

  var GlobalPerformanceLogger = _$$_REQUIRE(_dependencyMap[12]);

  GlobalPerformanceLogger.markPoint('initializeCore_start', GlobalPerformanceLogger.currentTimestamp() - (Date.now() - start));
  GlobalPerformanceLogger.markPoint('initializeCore_end');
},27,[28,29,30,32,56,62,65,70,101,105,106,116,78]);

// 这个 模块,可以这样理解,它实际上是 在执行 initializeCore_start,初始化的工作 initializeCore,预载入一些系统 模块


// 直接就是执行 RNDemo 1 的模块代码了 具体的细节这里就不说了,核心就是 执行 模块中 的factory 代码 既__d 的第一个参数fn
__r(0);
这里我们引出一个话题一个思考 🤔:“这些模块id 如何生成的呢?” 这个问题的答案 就得看cli 到底做了什么,我们来深入看看
首先我们看shell,分析一下 整个start/ build 中moudleID 如何生成的
yarn react-native bundle
     --platform android
     --dev false
     --entry-file ./RNDemo.js
     --bundle-output ./android/app/src/main/assets/rn.android.bundle
     --assets-dest ./android/app/src/main/res
     --minify false
     --reset-cache
# 我们不妨找一下 react-native cli 的源码
# 它位于/node_modules/bin 下的目录(为什么是bin 目录?你对node 不熟悉,请去补充一下node 相关的知识)
'use strict';
var cli = require('@react-native-community/cli');
if (require.main === module) {
  cli.run();
}
module.exports = cli;

// 可以看到 实际上就是执行 @react-native-community/cli 里的 cli
// 然后我们去看看 官方,仓库源代码 仓库里有一份清晰的文档说明,详细的描述里 每个参数的作用 ,这里不详细的解了

// 我们前github 找到源代码仓库 .cli/ 里面有一个bin bin 里有一个run ,run 函数定义在 index 中

async function run() {
  try {
    await setupAndRun();
  } catch (e) {
    handleError(e);
  }
}

async function setupAndRun() {
  ....
  // 重点函数  从 detachedCommands 添加更多的 command 比如 build run..... 这个 detachedCommands 就在./commands 中
  for (const command of detachedCommands) {
    attachCommand(command);
  }
  ....
  // 这里有一层合并 操作 projectCommands 也在 ./commands中,config.commands 可以先不关注
  for (const command of [...projectCommands, ...config.commands]) {
      attachCommand(command, config);
    }
}

// ./commands index 中 于是我们发现了  但是这个
import {Command, DetachedCommand} from '@react-native-community/cli-types';
import {commands as cleanCommands} from '@react-native-community/cli-clean';
import {commands as doctorCommands} from '@react-native-community/cli-doctor';
import {commands as configCommands} from '@react-native-community/cli-config';
import {commands as metroCommands} from '@react-native-community/cli-plugin-metro';

import profileHermes from '@react-native-community/cli-hermes';
import upgrade from './upgrade/upgrade';
import init from './init';

export const projectCommands = [
  ...metroCommands,
  ...configCommands,
  cleanCommands.clean,
  doctorCommands.info,
  upgrade,
  profileHermes,
] as Command[];

export const detachedCommands = [
  init,
  doctorCommands.doctor,
] as DetachedCommand[];


// 我们找到 cli-plugin-metro,因为它是rn的大包器 build 和statr 都在它的文件下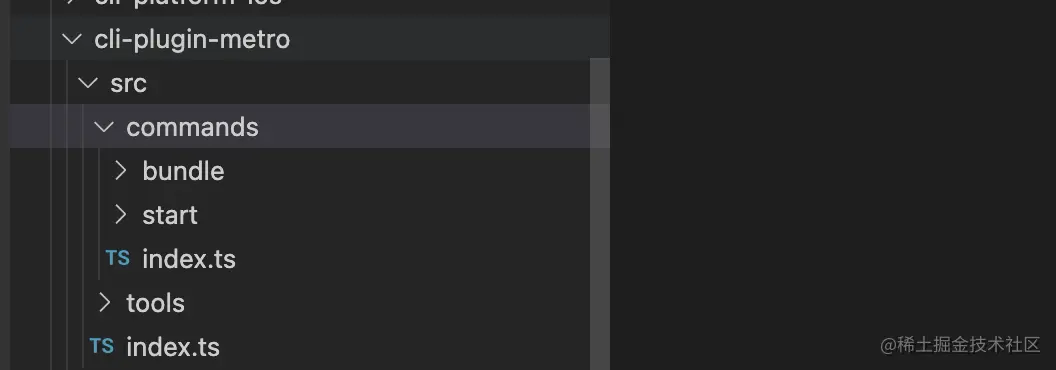
// ++++ 找到start Index 文件 其中发现了这个: 启动sercer 在dev 的时候
const serverInstance = await Metro.runServer(metroConfig, {
    host: args.host,
    secure: args.https,
    secureCert: args.cert,
    secureKey: args.key,
    hmrEnabled: true,
    websocketEndpoints,
  });
// ++++

// 我们找到了它的调用链 看看 server 到底是个什么东西
import Server from 'metro/src/Server';

 const server = new Server(config);

  try {
    const bundle = await output.build(server, requestOpts);

    await output.save(bundle, args, logger.info);
  }

// 然后我们来看 metro 仓库的 Server 中
class Server {
 constructor(config, options) {
    this._config = config;
    this._serverOptions = options;

    if (this._config.resetCache) {
      this._config.cacheStores.forEach((store) => store.clear());

      this._config.reporter.update({
        type: "transform_cache_reset",
      });
    }

    this._reporter = config.reporter;
    this._logger = Logger;
    this._platforms = new Set(this._config.resolver.platforms);
    this._isEnded = false; // TODO(T34760917): These two properties should eventually be instantiated
    // elsewhere and passed as parameters, since they are also needed by
    // the HmrServer.
    // The whole bundling/serializing logic should follow as well.


    this._createModuleId = config.serializer.createModuleIdFactory();
    this._bundler = new IncrementalBundler(config, {
      hasReducedPerformance: options && options.hasReducedPerformance,
      watch: options ? options.watch : undefined,
    });
    this._nextBundleBuildID = 1;
  }
  //....

    // 诶 重点代码 _createModuleId ,创建 ModuleId 但 它从那儿来呢?我们回到执行的地方 @react-native-community/的 cli-plugin-metro中 找到 buildBundle, 它就是命令 执行的地方
// 这个函数下 loadMetroConfig 返回一个config 我们看看 loadMetroConfig 在干什么
async function buildBundle(
  args: CommandLineArgs,
  ctx: Config,
  output: typeof outputBundle = outputBundle,
) {
  const config = await loadMetroConfig(ctx, {
    maxWorkers: args.maxWorkers,
    resetCache: args.resetCache,
    config: args.config,
  });

  return buildBundleWithConfig(args, config, output);
}


export default function loadMetroConfig(
  ctx: ConfigLoadingContext,
  options?: ConfigOptionsT,
): Promise<MetroConfig> {
  const defaultConfig = getDefaultConfig(ctx);
  if (options && options.reporter) {
    defaultConfig.reporter = options.reporter;
  }
  // 发现这里有一个 loadConfig
  return loadConfig({cwd: ctx.root, ...options}, defaultConfig);
}

// loadConfig 从 metro 里 来 通过调用链我们锁定了 这行代码
const getDefaultConfig = require('./defaults');

// 我们接着找到 loadConfig 它里面正好有一个

const defaultCreateModuleIdFactory = require('metro/src/lib/createModuleIdFactory');
// 然后我们先不阅读 具体内容,鉴于 在metro 和 cli 中反复 跳 我们先理解metro
首先我们在metro 官网找到了 相关的 build 构建流程 (https://facebook.github.io/metro/docs/concepts)。主要分下面几个阶段
- Resolution (依据入口文件 解析,他于Transformation 是并行的 )
- Transformation (转换比如一些es6 的语法)
- Serialization (序列化,实际上moduleId 就是这个理生成的)组合成单个 JavaScript 文件的模块包。
// metro 官方文档(https://facebook.github.io/metro/docs/configuration#serializer-options)中提到了 Serialization 时期使用到的几个函数,其中我们要关注的点是“moduleId 如何生成的 ”

// 接着上面的文档分析 我们的调用栈来到了 metro仓库的 metro/src/lib/createModuleIdFactory.js 这里是metro 默认 的 moduleId 生成方式

function createModuleIdFactory() {
  const fileToIdMap = new Map();
  let nextId = 0;
  return (path) => {
    let id = fileToIdMap.get(path);

    if (typeof id !== "number") {
      id = nextId++;
      fileToIdMap.set(path, id);
    }

    return id;
  };
}

// 不难看出 非常的简单 就是0 开始的 自增,后面我们分包的时候 需要手动的定制一些 moduleId 要不然 运行的时候 会导致 模块的依赖出现问题 和冲突 导致闪退!
顺便说一下 Serialization时期 还有一个重要的函数 processModuleFilter,他可以完成模块 build 阶段的过滤,当他 返回 false 就是不打入,这个特性对我们后续的拆包会很有用。
到此为止,我们对bundle 和 metro 的浅析接结束了,以上都是前置内容是了解后续拆包方案的 js部分的基础
实现js分包
了解了原理和细节之后我们如何拆呢?
首先我们分两个部分,common 的包 和 biz 的包,common 的包是公共包 只载入一次。然后biz是业务的包只包含业务代码
我们要准备两份 --metro.config 配置
./metro.common.config
const { hasBuildInfo, writeBuildInfo, clean } = require("./build");

function createModuleIdFactory() {
  const fileToIdMap = new Map();
  let nextId = 0;
  clean("./config/bundleCommonInfo.json");

  // 如果是业务 模块请以 10000000 来自增命名
  return (path) => {
    let id = fileToIdMap.get(path);

    if (typeof id !== "number") {
      id = nextId++;
      fileToIdMap.set(path, id);

      !hasBuildInfo("./config/bundleCommonInfo.json", path) &&
        writeBuildInfo(
          "./config/bundleCommonInfo.json",
          path,
          fileToIdMap.get(path)
        );
    }

    return id;
  };
}

module.exports = {
  serializer: {
    createModuleIdFactory: createModuleIdFactory, // 给 bundle 一个id 避免冲突 cli 源码中这个id 是从1 开始 自增的
  },
};
./metro.main.config
const { hasBuildInfo, getCacheFile, isPwdFile } = require("./build");
const bundleBuInfo = require("./config/bundleBuInfo.json");
function postProcessModulesFilter(module) {
  if (
    module["path"].indexOf("__prelude__") >= 0 ||
    module["path"].indexOf("polyfills") >= 0
  ) {
    return false;
  }

  if (hasBuildInfo("./config/bundleCommonInfo.json", module.path)) {
    return false;
  }

  return true;
}

// 不要使用 string 会导致 bundle 体积陡增
function createModuleIdFactory() {
  // 如果是业务 模块请以 10000000 来自增命名
  const fileToIdMap = new Map();
  let nextId = 10000000;
  let isFirst = false;

  return (path) => {
    if (Boolean(getCacheFile("./config/bundleCommonInfo.json", path))) {
      return getCacheFile("./config/bundleCommonInfo.json", path);
    }

    if (!isFirst && isPwdFile(path)) {
      nextId = bundleBuInfo[isPwdFile(path)];
      isFirst = true;
    }

    let id = fileToIdMap.get(path);
    if (typeof id !== "number") {
      id = nextId++;
      fileToIdMap.set(path, id);
    }
    return id;
  };
}

module.exports = {
  serializer: {
    createModuleIdFactory: createModuleIdFactory, // 给 bundle 一个id 避免冲突 cli 源码中这个id 是从1 开始 自增的
    processModuleFilter: postProcessModulesFilter, // 返回false 就不会build 进去
  },
};
以上关键要点是如何过滤 和如何生成合适的 moduleID 关于过滤我认为没有什么好说的,在build biz 的时候把node_module 和你自己构建的comon.js 公告依赖过滤出去就好了
比如我在./comon中有一个公共的代码他们是这个样子的
// 这里是存放 全模块的 通用 配置,它们会被打入 base 基础包中, 不要随意的添加! 这会让基础包变得越来越大
import "react";
import "react-native";
import "react-native-device-info";
构建命令是这样的
react-native bundle --platform android --dev false --entry-file ./common.js --bundle-output ./android/app/src/main/assets/common.android.bundle --assets-dest ./android/app/src/main/res --config ./metro.common.config.js --minify true --reset-cache这样构建出来的common 就不会包含业务代码,只会是一个公共的包,为了把这些moduleID记录下来,供biz包构建的时候索引,我在build 脚本中把他们写入到了一个json 中形成了path -> moduleId 一一对应的关系,为后续的biz构建做准备
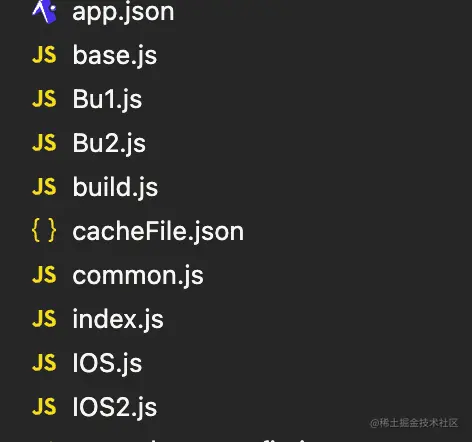
再看biz 构建之前我们先定义一个文件用来记录moduleId 初始化的值,我的业务moduleId方案还是用number 来构建,不同的module 初始化的 moduleId不一样 特别要注意 这一点一定要确保依赖的正确性要不然你的 bunlde 就闪退了!
{
  "index": 10000000,
  "Bu1": 20000000,
  "Bu2": 30000000,
  "IOS": 40000000,
  "IOS2": 50000000
}
在config 中
// 1,在过滤器中 逻辑就是如果comon 有了 你就不需要打入了直接 过滤
if (hasBuildInfo("./config/bundleCommonInfo.json", module.path)) {
    return false;
}

// 在moduleId创建的时候
function createModuleIdFactory() {
  // 如果是业务 模块请以 10000000 来自增命名
  const fileToIdMap = new Map();
  let nextId = 10000000;
  let isFirst = false;

  return (path) => {
    if (Boolean(getCacheFile("./config/bundleCommonInfo.json", path))) {
      return getCacheFile("./config/bundleCommonInfo.json", path); // 返回依赖的moduleId
    }

    if (!isFirst && isPwdFile(path)) {
      nextId = bundleBuInfo[isPwdFile(path)];
      isFirst = true;
    }

    let id = fileToIdMap.get(path);
    if (typeof id !== "number") {
      id = nextId++;
      fileToIdMap.set(path, id);
    }
    return id;
  };
}
其构建命令如下
react-native bundle --platform android --dev false --entry-file ./index.js --bundle-output ./android/app/src/main/assets/index.android.bundle --assets-dest ./android/app/src/main/res --config ./metro.main.config.js --minify true --reset-cache- 构建出来长什么样呢?
特别提醒,不要混淆code 要不然不好分析,当然只是我们这个阶段来说,prd 的时候还是要开启混淆的 --minify false
分析和构建出来的 common 和 biz common 还是一如既往 的样子
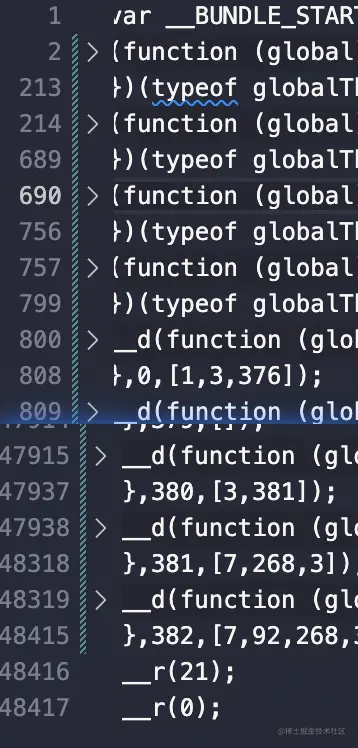
但是biz就小多了
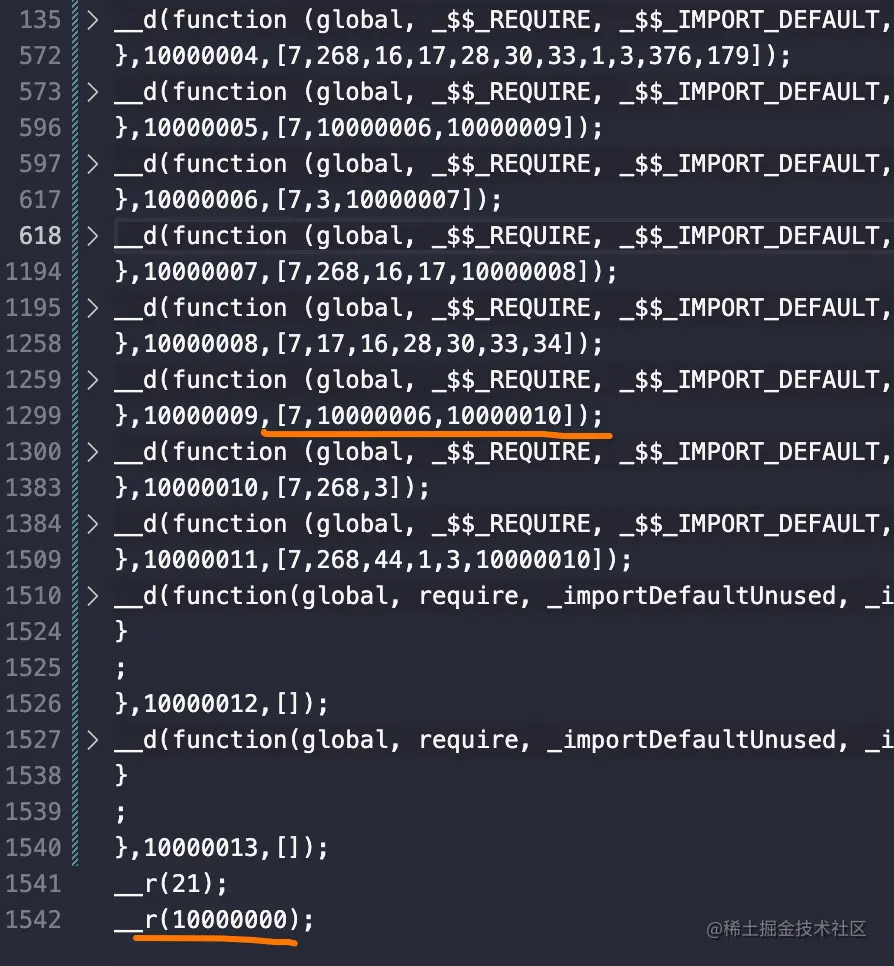
但.... 我们这么验证这东西 能使用呢?在你解决Native 问题之前,最简单的方法就是cv一下这两个代码 合成一个bunlde文件,然后按照 之前的文章一样取load 看看 能不能正常使用,如果能诶!就说明正常!JS的分包就大功告成了!
Android 篇
理论
我在仓库的文档中分析了很深入和详细,涉及到的内容比较的多有 java 也有 C++,为了良好的阅读体验,我在本文中简化了这部分的内容,给出了其中一些至关重要的节点,希望你对java & C++有一定的了解
首先我们必须来看一下现在我们的代码中是如何加载bundle的 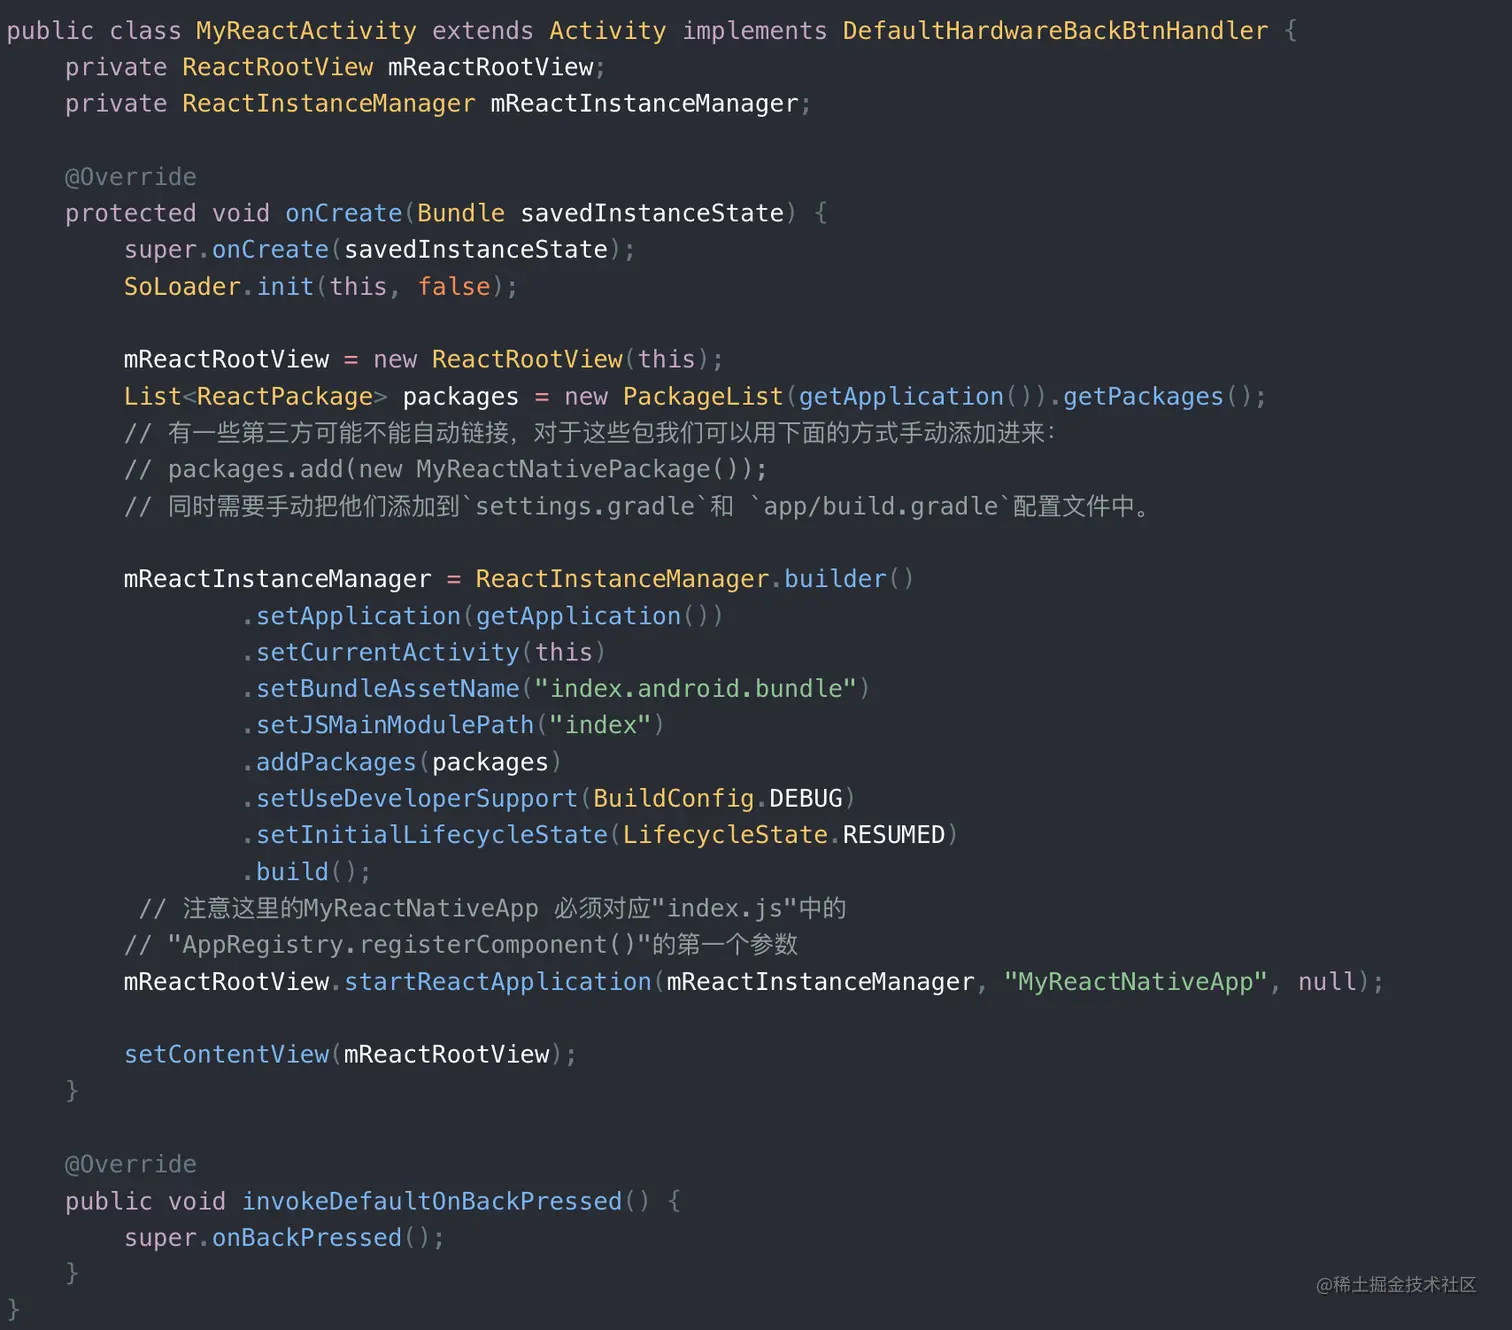
其中非常重要的类是和 ReactRootView, ReactInstanMannger 的 startReactApplication 方法, ReactRootView 是RN渲染的rootView ReactInstanMannger 几乎管理来所有 与RN有关的JS执行 JSC通信 C++调用 startReactApplication 方法是载入 渲染的入口 CatalystInstance 重要的类 真正 load js & C++通信 的类
我们的分析就是从 入口开始,流程是这样
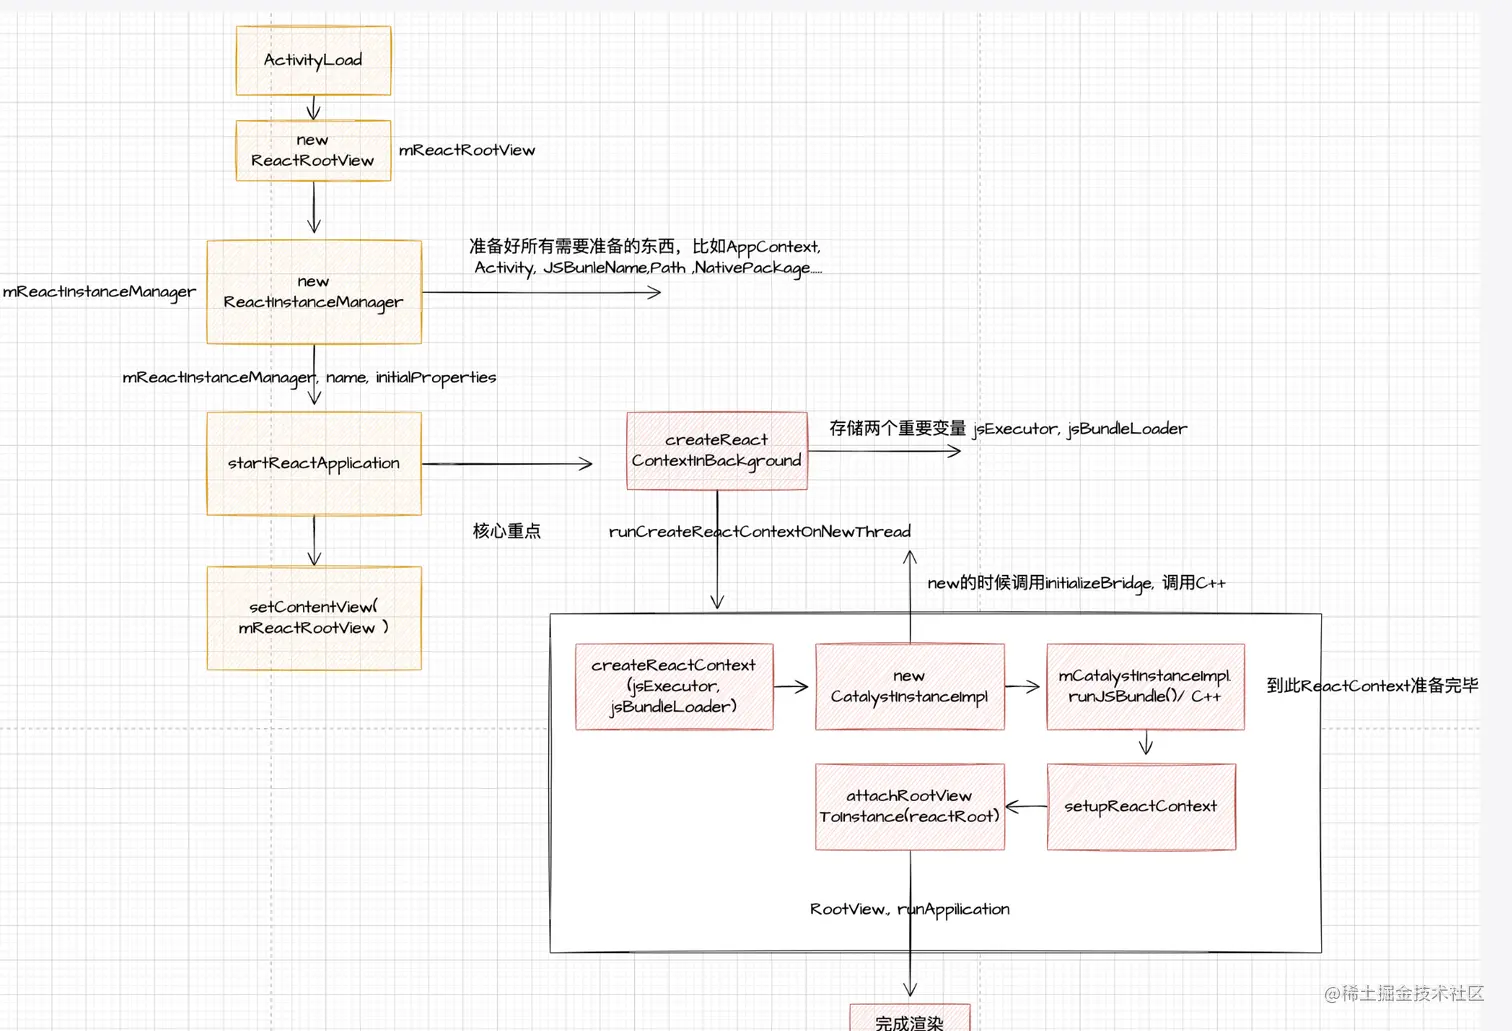
其中通过调用链路的分析我们锁定了一个 类 CatalystInstanceImpl,这个类上有许多有意思的东西, C++和js执行 的调用也是在这里,具体的执行和渲染逻辑 篇幅有限 这里就不放出来了,

通过上述的分析,我们可以了解,只要有办法拿到 CatalystInstance 就能获得 其load js的能力,好在我们的mReactInstanMannger提供了这样的method

等全部的js load 之后。再调用 startReactApplication 进行渲染
迭代1
第一版的方案是下面这样,每个 activity都先load common 然后在load biz
if( BuildConfig.DEBUG ){  // debuger 不管他
    mReactRootView = new ReactRootView(this);
    mReactInstanceManager = ReactInstanceManager.builder()
                .setApplication(getApplication())
                .setCurrentActivity(this)
                .setBundleAssetName(getJSBundleAssetName())
                .setJSMainModulePath(getJsModulePathPath())
                .addPackages(MainApplication.getInstance().packages)
                .setUseDeveloperSupport(true)
                .setInitialLifecycleState(LifecycleState.RESUMED)
                .build();

    mReactRootView.startReactApplication(mReactInstanceManager, getResName(), null);
    setContentView(mReactRootView);
    return;
    return;
}

// 非debuger 就load common 再load biz
    mReactInstanceManager = ReactInstanceManager.builder()
            .setApplication(getApplication())
            .setCurrentActivity(this)
            .setJSBundleFile("assets://common.android.bundle")
            .addPackages(packages)
            .setUseDeveloperSupport(true)
            .setInitialLifecycleState(LifecycleState.RESUMED)
            .build();
// 监听common是否完成了load
mReactInstanceManager.addReactInstanceEventListener(new ReactInstanceManager.ReactInstanceEventListener() {
    @Override
    public void onReactContextInitialized(ReactContext context) {
        MainApplication.getInstance().setIsLoad(true);

        //加载业务包
        ReactContext mContext = mReactInstanceManager.getCurrentReactContext();
        CatalystInstance instance = mContext.getCatalystInstance();
((CatalystInstanceImpl)instance).loadScriptFromAssets("assets://common.biz1.bundle","Biz1" ,false);


        mReactRootView.startReactApplication(mReactInstanceManager, getResName(), null);
        setContentView(mReactRootView);

        mReactInstanceManager.removeReactInstanceEventListener(this);
    }
});
++++
好 讲道理这应该就完了是不是吧!但是这真的ok 吗?很显然你每次新开或者打开一个新activity的时候还是要重新载入comon 那....有没有分包意义不大啊!我们现在看看如何进行优化
迭代2
上文我们提到了,这样的分包方案并不是我们希望的,我们有这样的一个希望Comomon在整个App生命周期中只load 一次,其他如果有的moudle 那就是直接复用这个comon 就好了
于是我们想到了这样方法,我们把新建一个MainAppliction 里面放公共的逻辑(这是Android的知识点了)
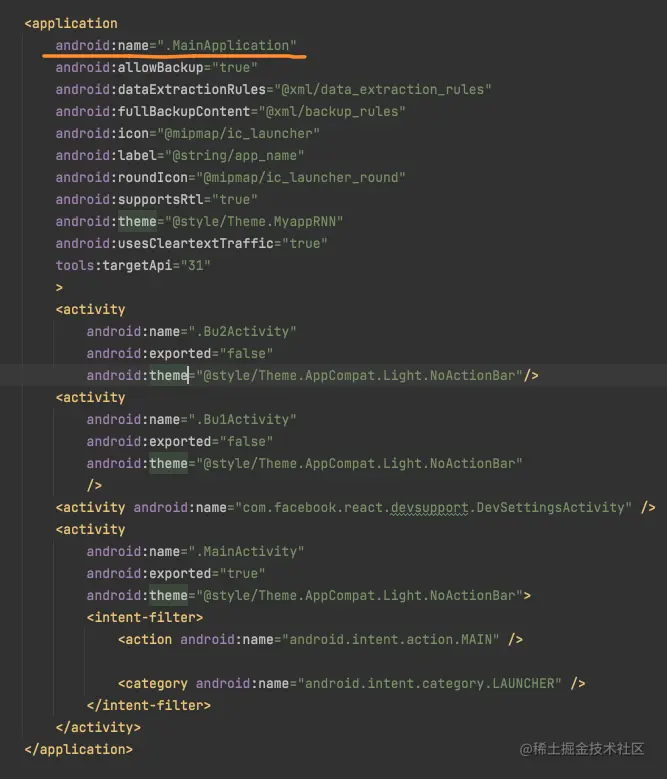
然后写下这样的代码,主要逻辑就是在 MainApplication 中载入comon 和共用的package
public class MainApplication extends Application   {
    public  List<ReactPackage> packages;
    private  ReactInstanceManager cacheReactInstanceManager;
    private Boolean isload = false;

    private static MainApplication mApp;    @Override
    public void onCreate() {
        super.onCreate();
        SoLoader.init(this, /* native exopackage */ false);
        mApp = this;

        packages = new PackageList(this).getPackages();
        packages.add(new RNToolPackage());

        cacheReactInstanceManager = ReactInstanceManager.builder()
                .setApplication(this)
                .addPackages(packages)
                .setJSBundleFile("assets://common.android.bundle")
                .setInitialLifecycleState(LifecycleState.BEFORE_CREATE).build();

    }

    public static MainApplication getInstance(){
        return mApp;
    }

    // 获取 已经缓存过的 rcInstanceManager
    public ReactInstanceManager getRcInstanceManager () {
        return this.cacheReactInstanceManager;
    }


    public void setIsLoad(Boolean isload) {
        this.isload = isload;
    }

    public boolean getIsLoad(){
        return this.isload;
    }
}
然后在 每一个bu中都可以 选择性载入自己的bundle 就完成了,需要注意的就是 一定要判断 comon 的载入状态要不然会出现空指针的问题, 同时我们为了方便后续的使用把它抽离了出来
 @Override
    protected void onCreate(Bundle savedInstanceState) {
        super.onCreate(savedInstanceState);
        if (Build.VERSION.SDK_INT >= Build.VERSION_CODES.M) {
            if (!Settings.canDrawOverlays(this)) {
                Intent intent = new Intent(Settings.ACTION_MANAGE_OVERLAY_PERMISSION,
                        Uri.parse("package:" + getPackageName()));
                startActivityForResult(intent, OVERLAY_PERMISSION_REQ_CODE);
            }
        }
        SoLoader.init(this, false);

        if( BuildConfig.DEBUG ){
            mReactRootView = new ReactRootView(this);
            mReactInstanceManager = ReactInstanceManager.builder()
                    .setApplication(getApplication())
                    .setCurrentActivity(this)
                    .setBundleAssetName(getJSBundleAssetName())
                    .setJSMainModulePath(getJsModulePathPath())
                    .addPackages(MainApplication.getInstance().packages)
                    .setUseDeveloperSupport(true)
                    .setInitialLifecycleState(LifecycleState.RESUMED)
                    .build();

            mReactRootView.startReactApplication(mReactInstanceManager, getResName(), null);
            setContentView(mReactRootView);
            return;
        }

        // 重新设置 Activity 和 files
        mReactInstanceManager = MainApplication.getInstance().getRcInstanceManager();
        mReactInstanceManager.onHostResume(this, this);
        mReactRootView = new ReactRootView(this);

        mReactInstanceManager.addReactInstanceEventListener(new ReactInstanceManager.ReactInstanceEventListener() {
            @Override
            public void onReactContextInitialized(ReactContext context) {
                MainApplication.getInstance().setIsLoad(true);

                //加载业务包
                ReactContext mContext = mReactInstanceManager.getCurrentReactContext();
                CatalystInstance instance = mContext.getCatalystInstance();
                ((CatalystInstanceImpl)instance).loadScriptFromAssets(context.getAssets(), "assets://" + getJSBundleAssetName(),false);

                mReactRootView.startReactApplication(mReactInstanceManager, getResName(), null);
                setContentView(mReactRootView);

                mReactInstanceManager.removeReactInstanceEventListener(this);
            }
        });

        if(MainApplication.getInstance().getIsLoad()){
            ReactContext mContext = mReactInstanceManager.getCurrentReactContext();
            CatalystInstance instance = mContext.getCatalystInstance();
            ((CatalystInstanceImpl)instance).loadScriptFromAssets(mContext.getAssets(), "assets://" + getJSBundleAssetName(),false);

            mReactRootView.startReactApplication(mReactInstanceManager, getResName(), null);
            setContentView(mReactRootView);

        }

        mReactInstanceManager.createReactContextInBackground();
        return;
    }
这样每个Activity 继承它重写里面 的 getBundleName 和 getModulePath 以及ReName 就能非常简单的实现复用逻辑了
public class Bu2Activity  extends PreBaseInit {

    @Override
    public String getJSBundleAssetName(){
        return "bu2.android.bundle";
    };

    @Override
    public String getJsModulePathPath(){
        return "Bu2";
    };

    @Override
    public String getResName(){
        return "bu2";
    };
}
这样就完了吗
我们貌似忽略了一个问题就是如何在各个module之间互相跳转呢?很简单 我们自己定义一些桥接方法就好了,下面是部分核心代码,Android 如何桥接到RN 完有专门的文章说明,请看文末的连接
/**
 * 实现rn -> 切换Activity 注意 参数我们使用json string 虽然提供了 方法让你 传数据,但是不建议 业务是不同Bu业务
 * @param name
 * @param params
 */
@ReactMethod
public void changeActivity (String name,String params) {
    try{
        Activity currentActivity = getCurrentActivity();
        if(currentActivity != null){
            Class toActivity = Class.forName(name);
            Intent intent = new Intent(currentActivity,toActivity);
            intent.putExtra(EXTRA_MESSAGE, params);
            currentActivity.startActivity(intent);
        }
    }catch (Exception e) {
        throw new JSApplicationIllegalArgumentException(
                "不能打开Activity : "+e.getMessage());
    }
} changeActivity: (value) => {
return NativeModules.RNToolsManager.changeActivity(value, null);
},到此为止就没有了,关于参数的传递我们最终 没有选择通过 intent 去做 而是使用 存入本地的方式去做,当然如果你偏要 用intent 也可以,但是你要考虑前进和back 回退依然要保持的问题
IOS 篇
IOS篇比较的简单 ,具体的原理这里就不再深入简单的说一下
理论
大体的加载流程就是图下所示 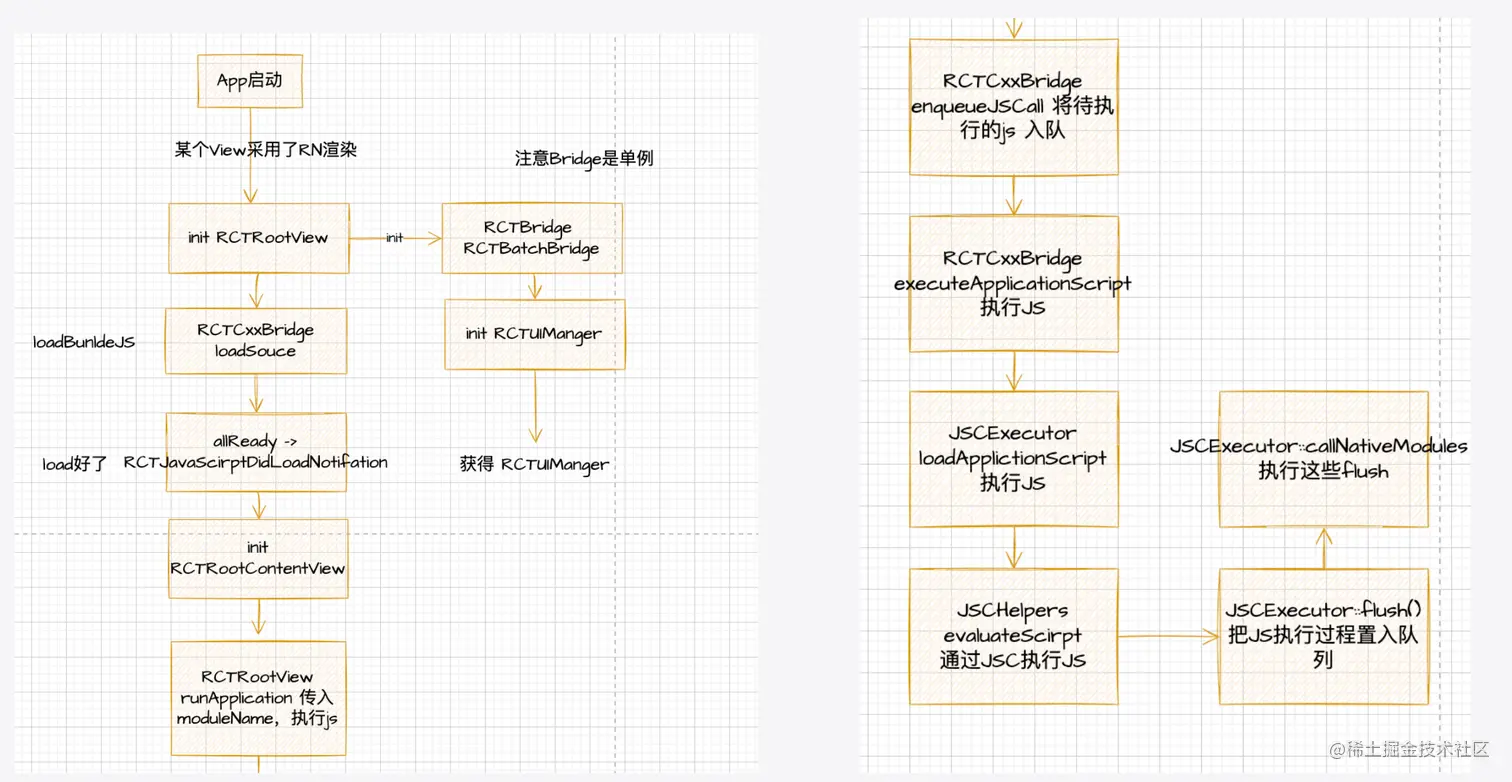
通过 [RCTCxxBridge loadSource] 来下载 bundle 代码。
在 bundle 下载完成之后, 会触发 [[NSNotificationCenter defaultCenter] postNotificationName:RCTJavaScriptDidLoadNotification object:self->_parentBridge userInfo:@{@“bridge”: self}]; 事件,通知 RCTRootView,对应的 JavaScript 代码已经加载完成。然后,执行 RCTRootContentView 的初始化。
RCTRootContentView 在初始化的时候,会调用 bridge 的 [_bridge.uiManager registerRootView:self]; 方法,来将 RootView 注册到 RCTUIManager 的实例上。RCTUIManager,顾名思义,是 React Native 用来管理所有 UI 空间渲染的管理器。
完成 RCTRootContentView 的实例化之后,会执行 [self runApplication:bridge]; 来运行 JavaScript App。我们经常会见到 React Native 的红屏 Debug 界面,有一部分就是在这个时候,执行 JavaScript 代码报错导致的:[[RCTBridge currentBridge].redBox showErrorMessage:message withStack:stack];。
runApplication 方法会走到 [bridge enqueueJSCall:@“AppRegistry” method:@“runApplication” args:@[moduleName, appParameters] completion:NULL]; 中, RCTBatchedBridge 会维护一个 JavaScript 执行队列,所有 JavaScript 调用会在队列中依次执行,这个方法会传入指定的 ModuleName,来执行对应的 JavaScript 代码。
在 OC 层面,实际执行 JavaScript 代码的逻辑在 - (void)executeApplicationScript:(NSData *)script url:(NSURL *)url async:(BOOL)async 中,这个方法有同步和异步两个版本,根据不同的场景可以选择不同的调用方式。实际上的执行逻辑会落在 C++ 层中的 void JSCExecutor::loadApplicationScript( std::unique_ptr<const JSBigString> script, std::string sourceURL) 方法中。 最终,通过 JSValueRef evaluateScript(JSContextRef context, JSStringRef script, JSStringRef sourceURL) 方法来执行 JavaScript 代码,然后获取 JavaScript 执行结果,这个执行结果在 iOS 中是一个 JSValueRef 类型的对象,这个对象可以转换到 OC 的基本数据类型。
在完成了 JavaScript 代码执行的时候,JavaScript 侧的代码会调用原生模块,这些原生模块调用,会被保存在队列中,在 void JSCExecutor::flush() 方法执行的时候,调用 void callNativeModules(JSExecutor& executor, folly::dynamic&& calls, bool isEndOfBatch) 一并执行。并且触发渲染。
那么完美可以观察到 同 Android 端的mReactInstaceManger类似 IOS中有一个的东西 ,它就是bridge,我们可以把bridge中的能够执行js 的方法暴露出来,就能手动载入和执行js 了。
实践方案
还是用前文中的 IOS 项目做说明,
- 把bridge 中可以执行js的方法暴露出来
**@interface** RCTBridge (PackageBundle)

- (RCTBridge *)batchedBridge;
- (**void**)executeSourceCode:(NSData *)sourceCode sync:(**BOOL**)sync;
// 这个就是可以执行js的方法,参数有两个 一个NSData类型的js 一个Sync 意思是同步执行还是异步(用native观点就是“是否开一个线程去执行”
**@end**- 先load comon 并且发出通知
// 下面是部分核心代码 首先是使用notication 去相应 rn 发出来的切换view 的方法,此处都是OC 开发知识 不了解的话可以去学习一下
- (**void**)addObservers {
    // 监听通知
    [[NSNotificationCenter defaultCenter] addObserver:**self** selector: **@selector**(changeView:) name:@"changeBunle" object:**nil**];
};


- (**void**)removeObservers {
    // 监听通知
    [[NSNotificationCenter defaultCenter] removeObserver:**self**];

};


- (**void**)dealloc {
    [**self** removeObservers];
};

// 下面是initBrige 的地方 init 是oc的一个生命周期hook
-(**instancetype**) init {
    **self** = [**super** init];
    [**self** initBridge];
    [**self** addObservers];
    **return**  **self**;

};

- (**void**) initBridge {
    **if**(!**self**.bridge) {
        NSURL *jsCodeLocation = [[NSBundle mainBundle] URLForResource:@"bundle/common.ios" withExtension:@"bundle"];
       // 初始化 bridge,并且加载主包 实际上我这里写的不好,它应该同android 一样 会有一个 notifaction 确保 common 是已经load 过的后续再优化
        **self**.bridge = [[RCTBridge alloc] initWithBundleURL:jsCodeLocation moduleProvider:**nil** launchOptions:**nil**];

    }

};

// 下面是一个通用的方法 我把 loadScript 抽成一个自己的方法了 参数需要两个bundle path & name
-(**void**) loadScript:(NSString *)bundlePath bunldeName: (NSString *)bunldeName {

    NSURL  *jsCodeLocation = [[NSBundle mainBundle] URLForResource:bundlePath withExtension:@"bundle"];

// 这里就是 如果 bridge 已经完成初始化 就能去载入 biz bundle 使用的到的就是 executeSourceCode 方法
    **if**(**self**.bridge) {
        NSError *error = **nil**;
        NSData *sourceBuz = [NSData dataWithContentsOfFile:jsCodeLocation.path
                                                options:NSDataReadingMappedIfSafe
                                                  error:&error];

        [**self**.bridge.batchedBridge executeSourceCode:sourceBuz sync:**NO**];
        RCTRootView *rootView =
          [[RCTRootView alloc] initWithBridge:**self**.bridge moduleName:bunldeName initialProperties:**nil**];
        UIViewController *vc = [[UIViewController alloc] init];
        [self setView: rootView];

    };

}

// 如何处理view 的切换 changeView 方法中有详细的说明
- (**void**)changeView:(NSNotification *)notif{

    NSString *bundlePath = @"";
    NSString *bunldeName = @"";
    bundlePath = [notif.object valueForKey:@"bundlePath"];
    bunldeName = [notif.object valueForKey:@"bunldeName"];

    [self dismissViewControllerAnimated:YES completion:nil];

    [**self** loadScript:bundlePath bunldeName:bunldeName];

};- 其他细节 关于在一个RN module 中切换到另一个 RN module 我们依然使用桥接IOS的方法,主要类通信手段就是 notification 当然deletget 也可以 看你喜了,下文 就是 桥接核心代码 方法(什么?你不知道怎么桥接IOS?请去看我的前不久发的文章 链接在文末)
RCT_REMAP_METHOD(changeActivity,
                 changeActivityWithA:( NSString *)bundlePath bunldeName:( NSString*)bunldeName
                 ){

    dispatch_async(dispatch_get_main_queue(),^{
        [[NSNotificationCenter defaultCenter] postNotificationName:@"changeBunle" object:@{
            @"bundlePath":bundlePath,
            @"bunldeName":bunldeName,
        }];
    });

};
在js端只需要传递两个参数path 和name 就好了,非常简单
- build 相关 注意一个细节build 的时候脚本和原来Android 的时候几乎不变,但是!!!一定要选平台要不然会有问题,不同的平台的bundle 它们可能有点点区别!比如载入时机等.... 下面是我的文件夹结构、
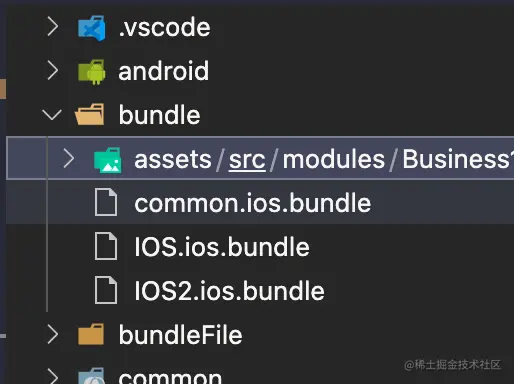
# common
react-native bundle --platform ios --dev false --entry-file ./common.js --bundle-output ./bundle/common.ios.bundle   --config ./metro.common.config.js  --minify false --reset-cache

# biz
react-native bundle --entry-file ./IOS.js --bundle-output ./bundle/IOS.ios.bundle --platform ios --assets-dest ./bundle  --config ./metro.main.config.js --minify false --dev false
还需要注意的路径的问题,我在上面的代码中有这样的一句话
        NSURL *jsCodeLocation = [[NSBundle mainBundle] URLForResource:@"bundle/common.ios" withExtension:@"bundle"];
       // 初始化 bridge,并且加载主包 实际上我这里写的不好,它应该同android 一样 会有一个 notifaction 确保 common 是已经load 过的后续再优化
        **self**.bridge = [[RCTBridge alloc] initWithBundleURL:jsCodeLocation moduleProvider:**nil** launchOptions:**nil**];
@"bundle/common.ios" 这个string 就很很关键,它指的这样的路径 a.我通过build 构建出的东西全部丢到bunlde 文件夹中,然后拖拽到xcode ,xcode 会提示你建立软连接这样
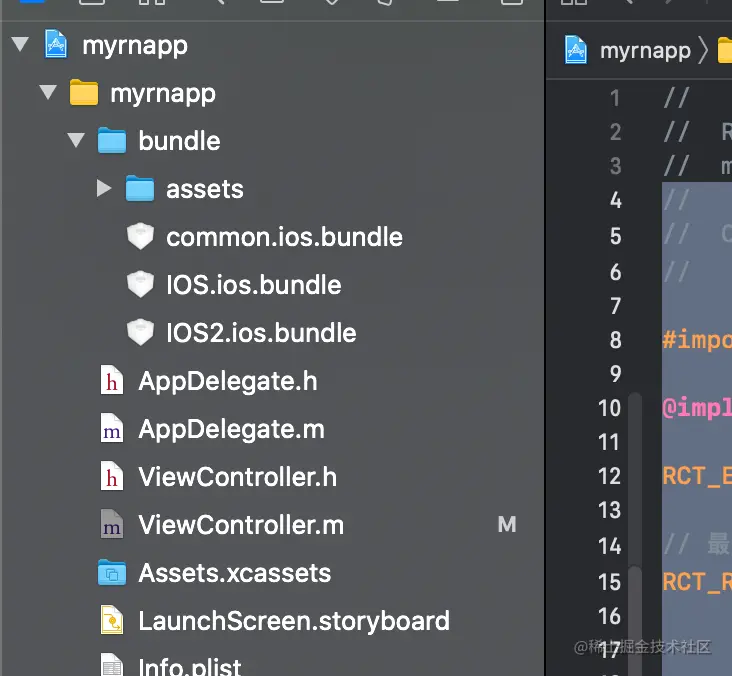
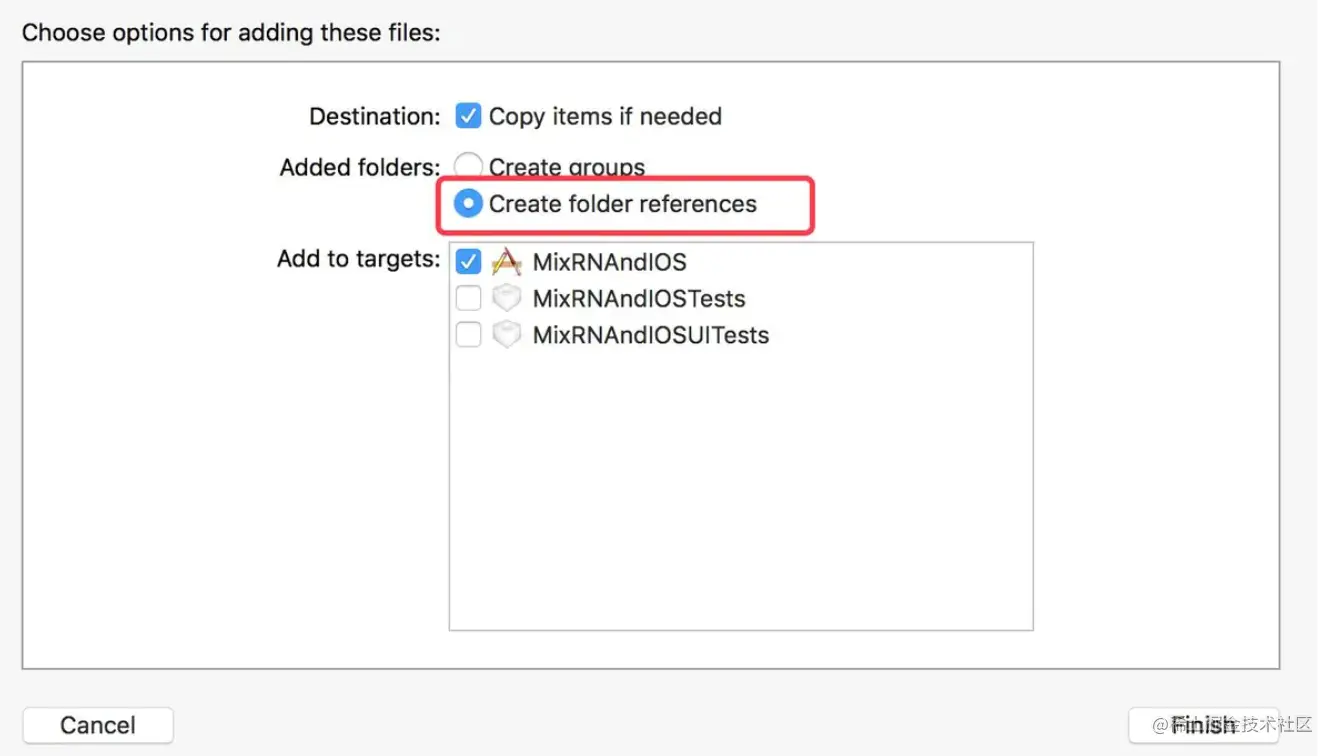
b.然后通过上的 bunle/ 就能拿到这个里面的东西了
总结和参考
好以上就是 我们比较完整的分包方案了,其中还有很多需要完善的地方,请大家指出