iOS 开发实战:WkWebView、动画与网络请求
June 17, 2025 (1y ago)
WkWebView
初次使用
理论知识
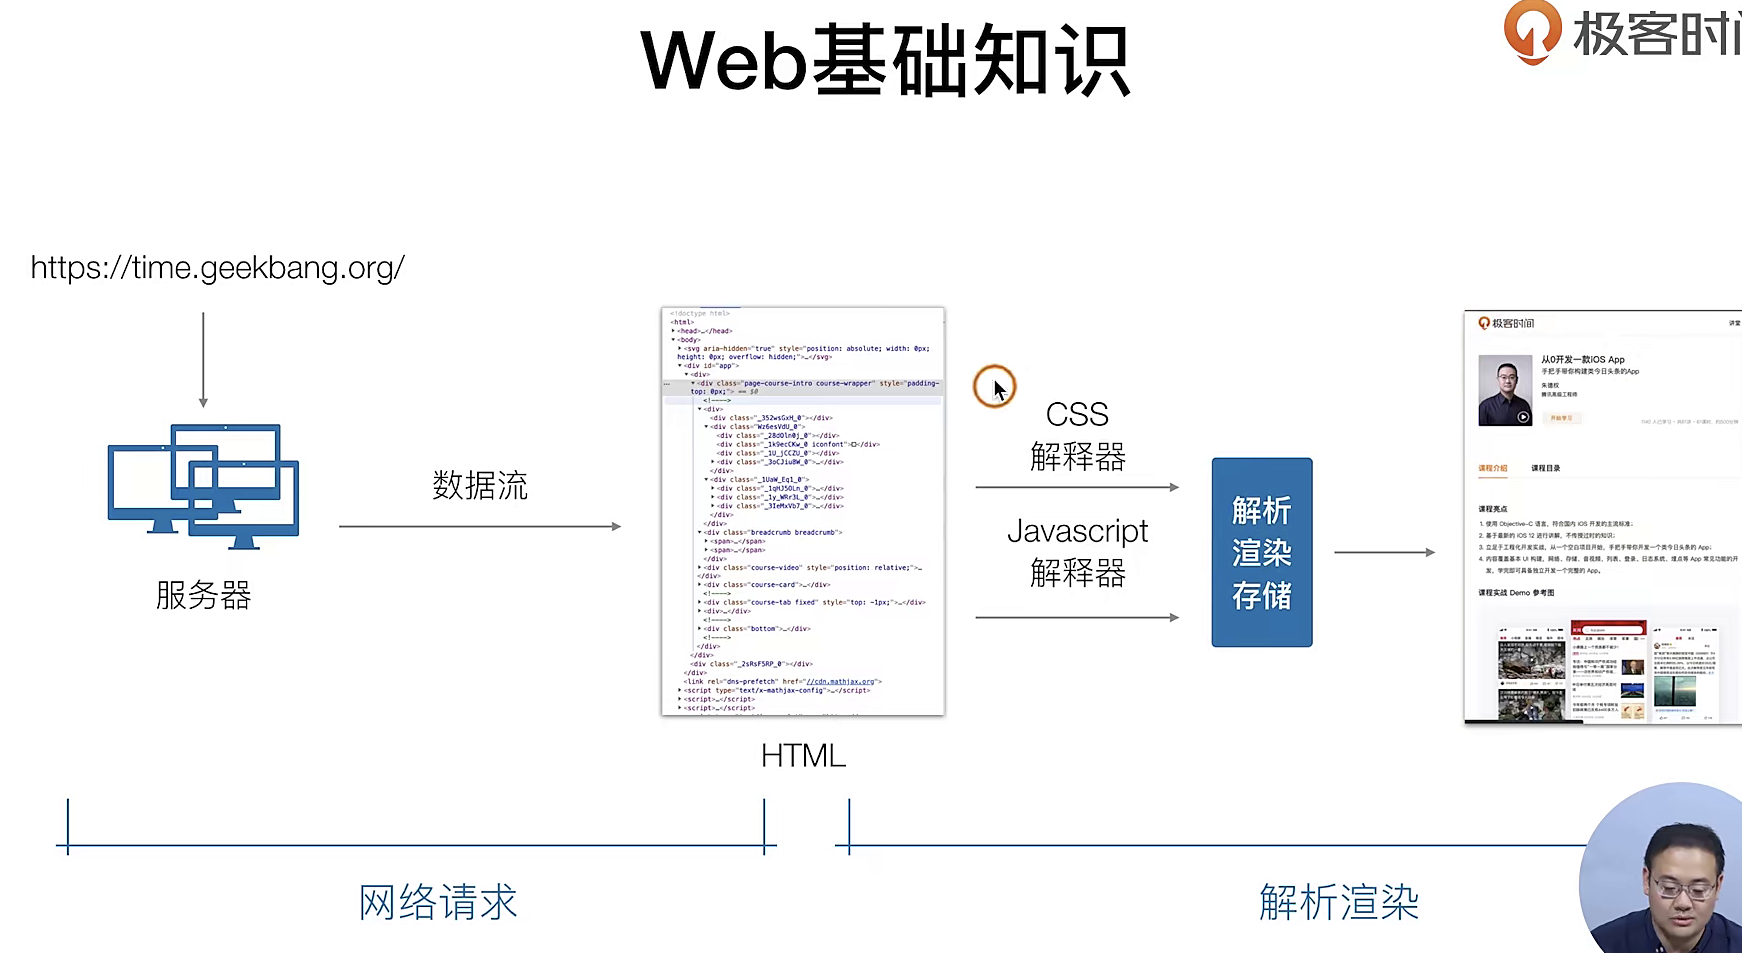
在IOS系统中 系统自带一个WebView 然后还迭代另一个WebView(目前用的最新的WebView就是它)
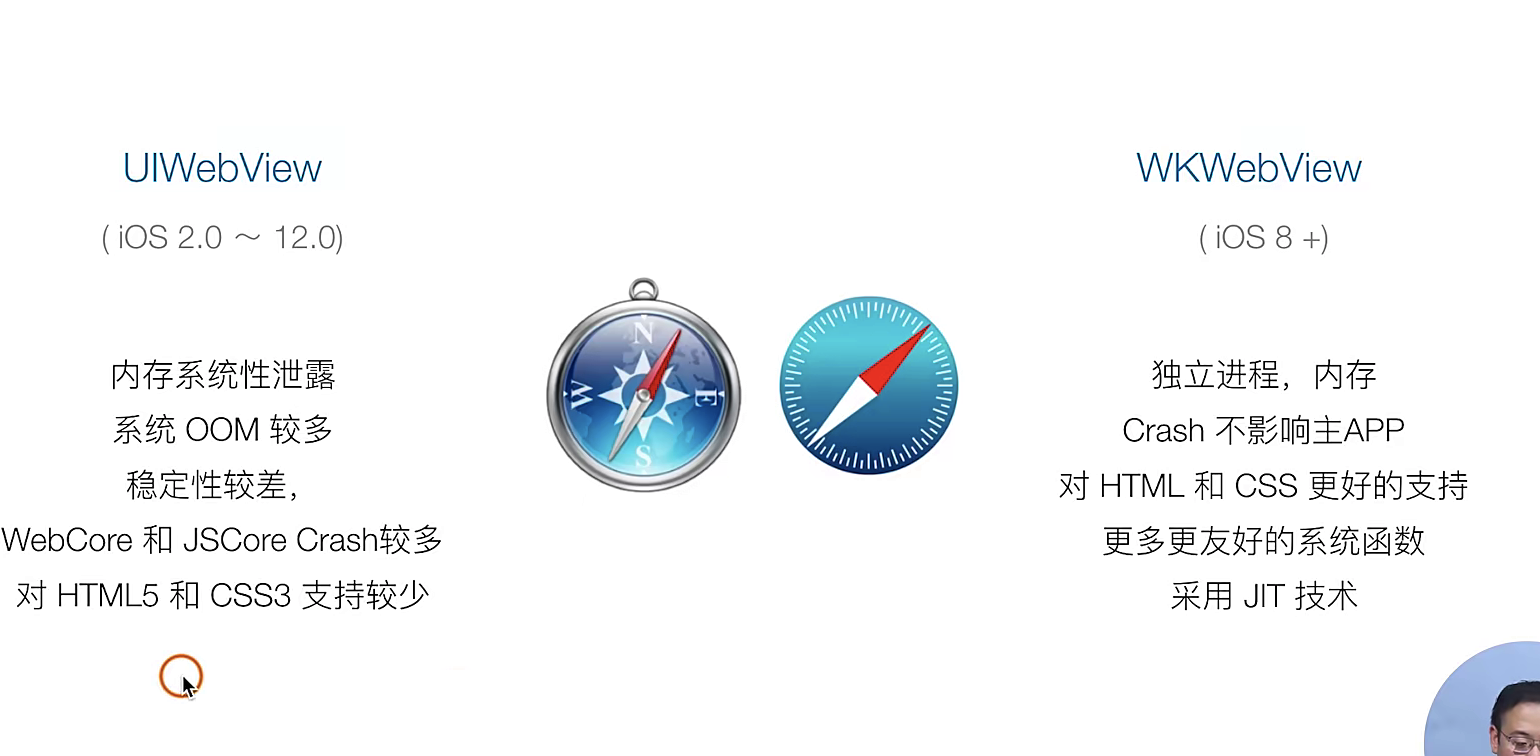
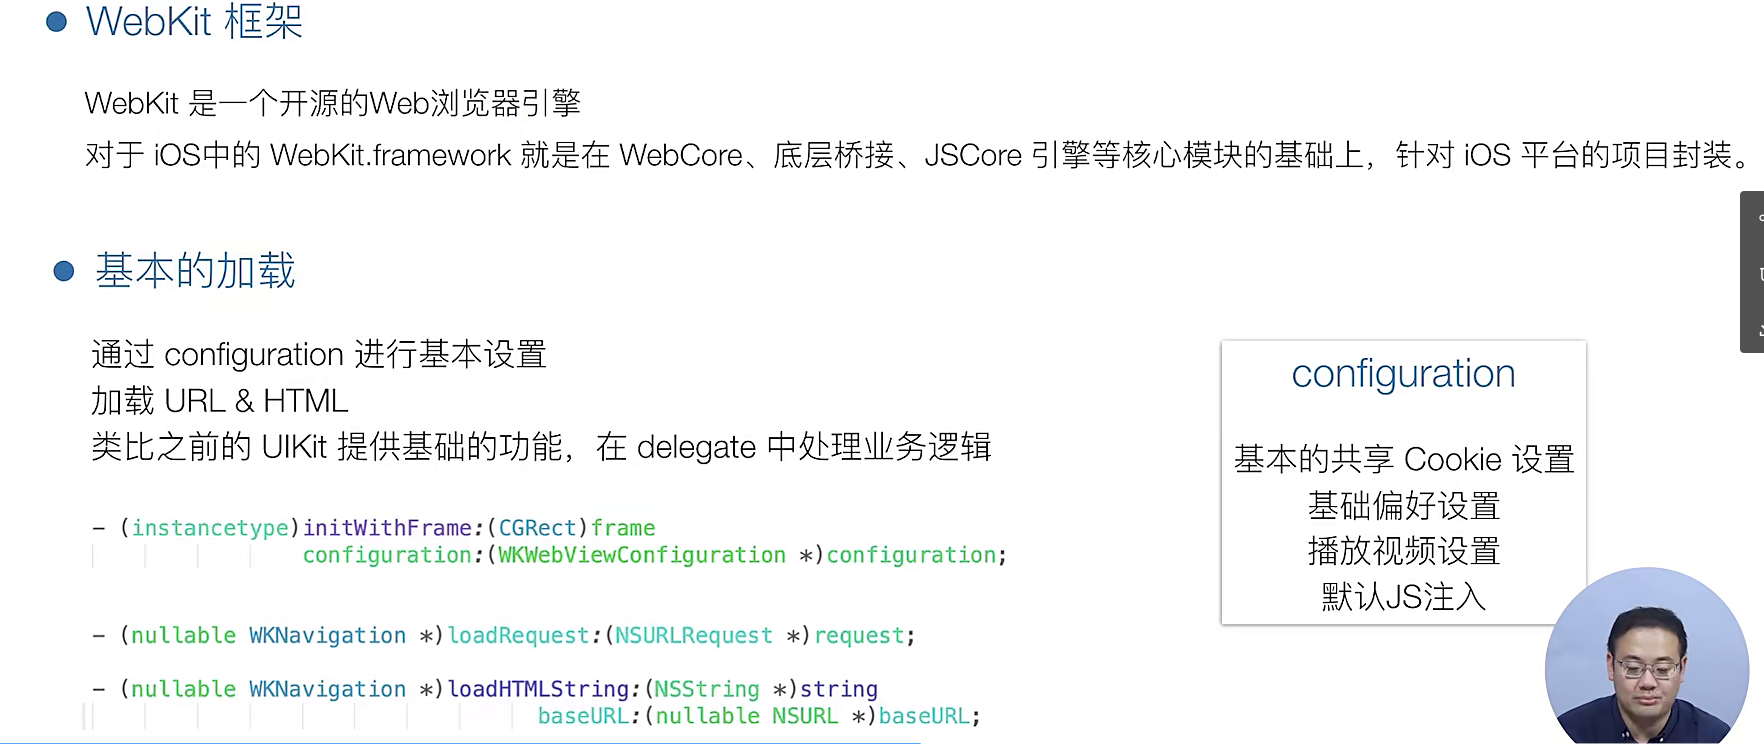
如果你对跨端引擎感兴趣 可以去好好的看看WebKit引擎(需要你会一些C++),如果需要调用这个UIView我们需要使用delegate模式哈
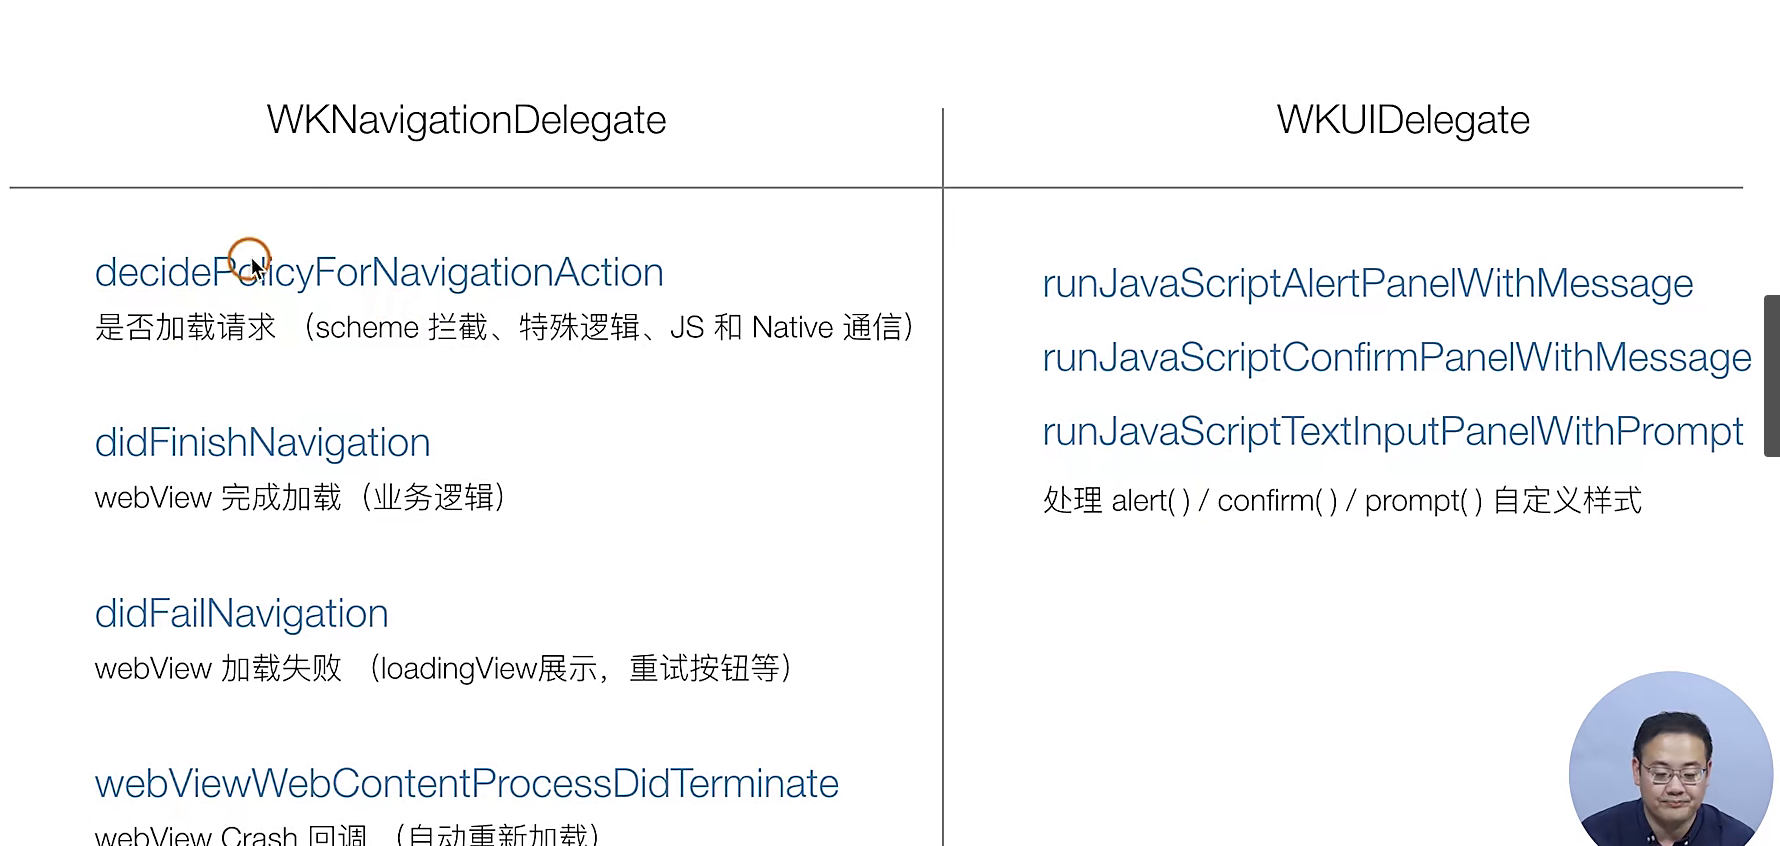
下面的步骤就是如何使用WkWebView去加载一个Web页面
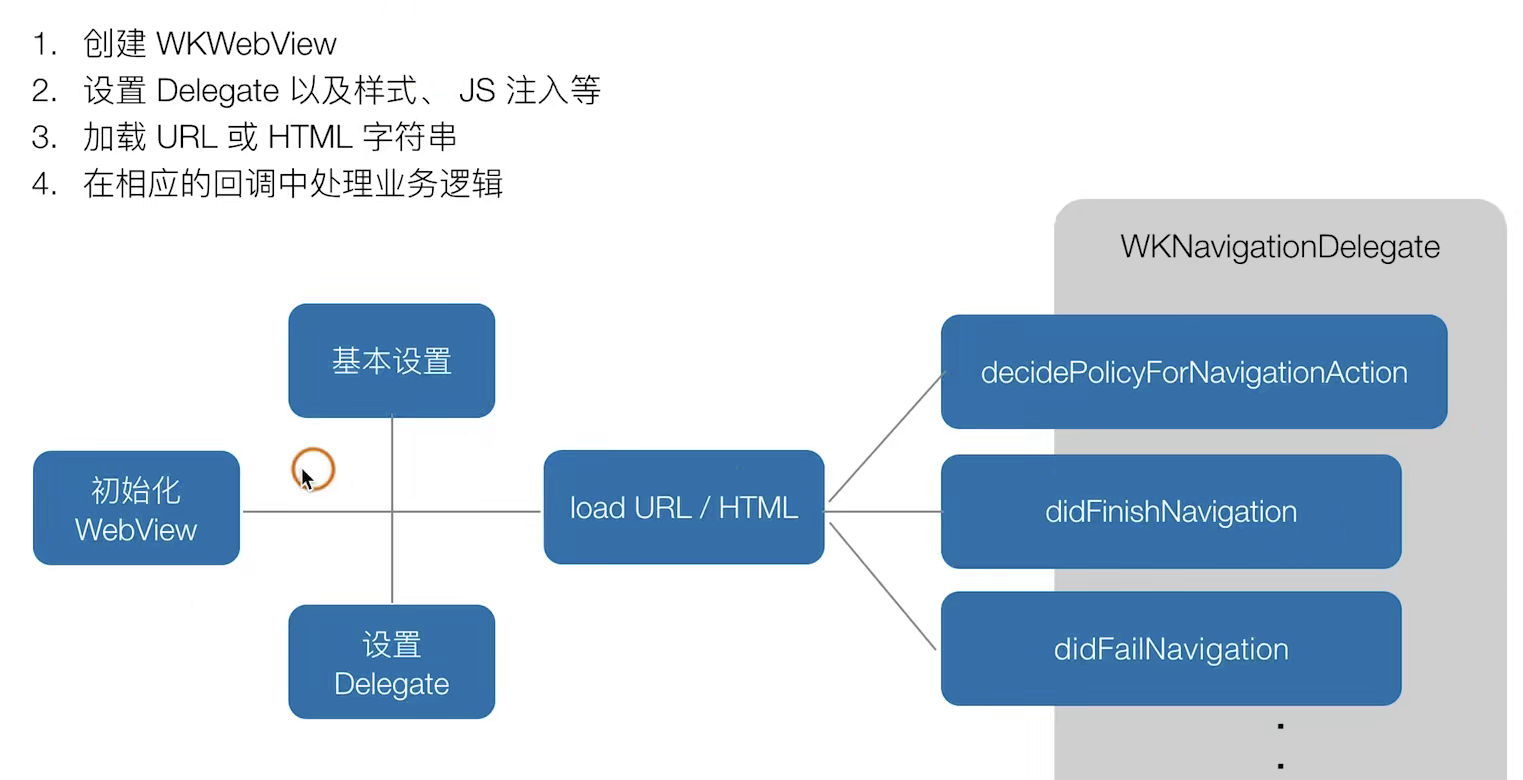
实战指南
注意:这里我们基于原来的代码 把Tab“首页”中的点击事情,调整到了一个新页面这个页面用来作为“容器”盛放我们的WebView
//
//  WebViewViewController.m
//  SimpelApp
//
//  Created by 李仕增 on 2021/11/3.
//

#import "WebViewViewController.h"
#import <WebKit/WebKit.h>  // 引入webkit

@interface WebViewViewController () <WKNavigationDelegate>
@property(nonatomic, strong, readwrite) WKWebView *webView;
@end

@implementation WebViewViewController

- (void)viewDidLoad {
    [super viewDidLoad];

//    设置一个WKWebView
    [self.view addSubview:({
        self.webView = [[WKWebView alloc] initWithFrame:CGRectMake(0, 88, self.view.frame.size.width, self.view.frame.size.height - 88)];
        self.webView;
    })];

//    设置它的delegate
    self.webView.navigationDelegate = self;

//    给定一个网页去加载它

    [self.webView loadRequest:[NSURLRequest requestWithURL:[NSURL URLWithString:@"https://www.baidu.com"]]];
}

- (void)webView:(WKWebView *)webView decidePolicyForNavigationAction:(WKNavigationAction *)navigationAction decisionHandler:(void (^)(WKNavigationActionPolicy))decisionHandler {
    // 去调用一个回调 如果不需要重写 那么请直接掉用 这些方法的参数都有具体的含义的,不过我们目前是用不到的,用到了再说
    decisionHandler(WKNavigationActionPolicyAllow );
    NSLog(@"要开始加载了....");

};

- (void)webView:(WKWebView *)webView didFinishNavigation:(null_unspecified WKNavigation *)navigation {
    NSLog(@"加载完毕...");
};

@end


## 前往我们的之前的ViewController.m文件修改一下原来的UIVIew
- (void)tableView:(UITableView *)tableView didSelectRowAtIndexPath:(NSIndexPath *)indexPath {
// 设置一个新的UIView
//        Webvie *viewControoler = [[UIViewController alloc] init];
//        viewControoler.view.backgroundColor = [UIColor whiteColor];
//        viewControoler.navigationItem.title = [NSString stringWithFormat:@"标题 - %@", @(indexPath.row)];

            WebViewViewController *viewControoler = [[WebViewViewController alloc] init];
            viewControoler.view.backgroundColor = [UIColor whiteColor];
            viewControoler.navigationItem.title = [NSString stringWithFormat:@"标题 - %@", @(indexPath.row)];

        [self.navigationController pushViewController: viewControoler animated:YES];
};
观察者模式
前期提要,有关于 观察者模式 和发布订阅模型 在前端也应用很广 比如vue源码中就 有用到
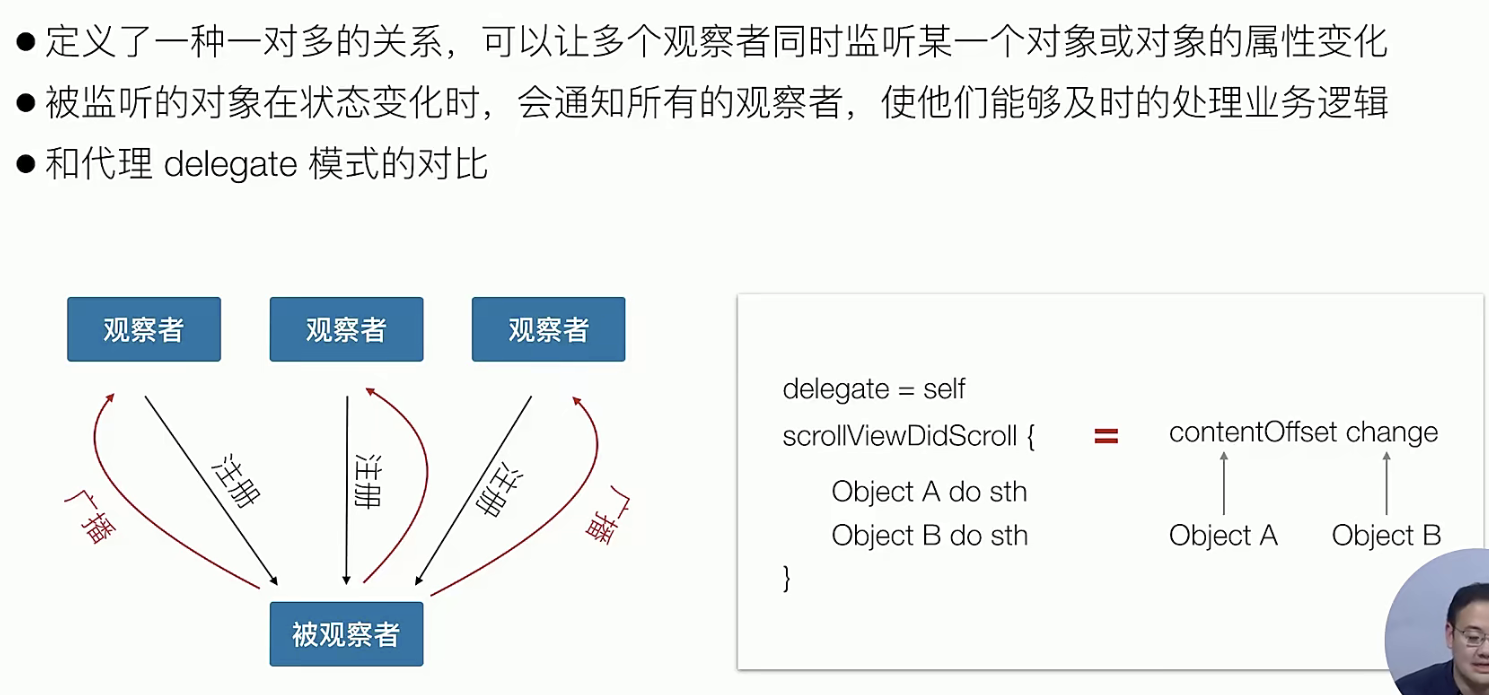
只要是有key-value-obersting的属性描述,就能对该属性进行观察

我们可以去用一些开源的KVO减少 KVO的繁琐操作
实战指南
//
// WebViewViewController.m
// SimpelApp
//
// Created by 李仕增 on 2021/11/3.
//
#import "WebViewViewController.h"
#import <WebKit/WebKit.h> // 引入webkit
@interface WebViewViewController () <WKNavigationDelegate>
++++ 搞一个View 上去 UIProgressView 展示进度条
@property(nonatomic, strong, readwrite) UIProgressView *webProgreess;
++++
@end
@implementation WebViewViewController
- (void)viewDidLoad {
[super viewDidLoad];
+++++
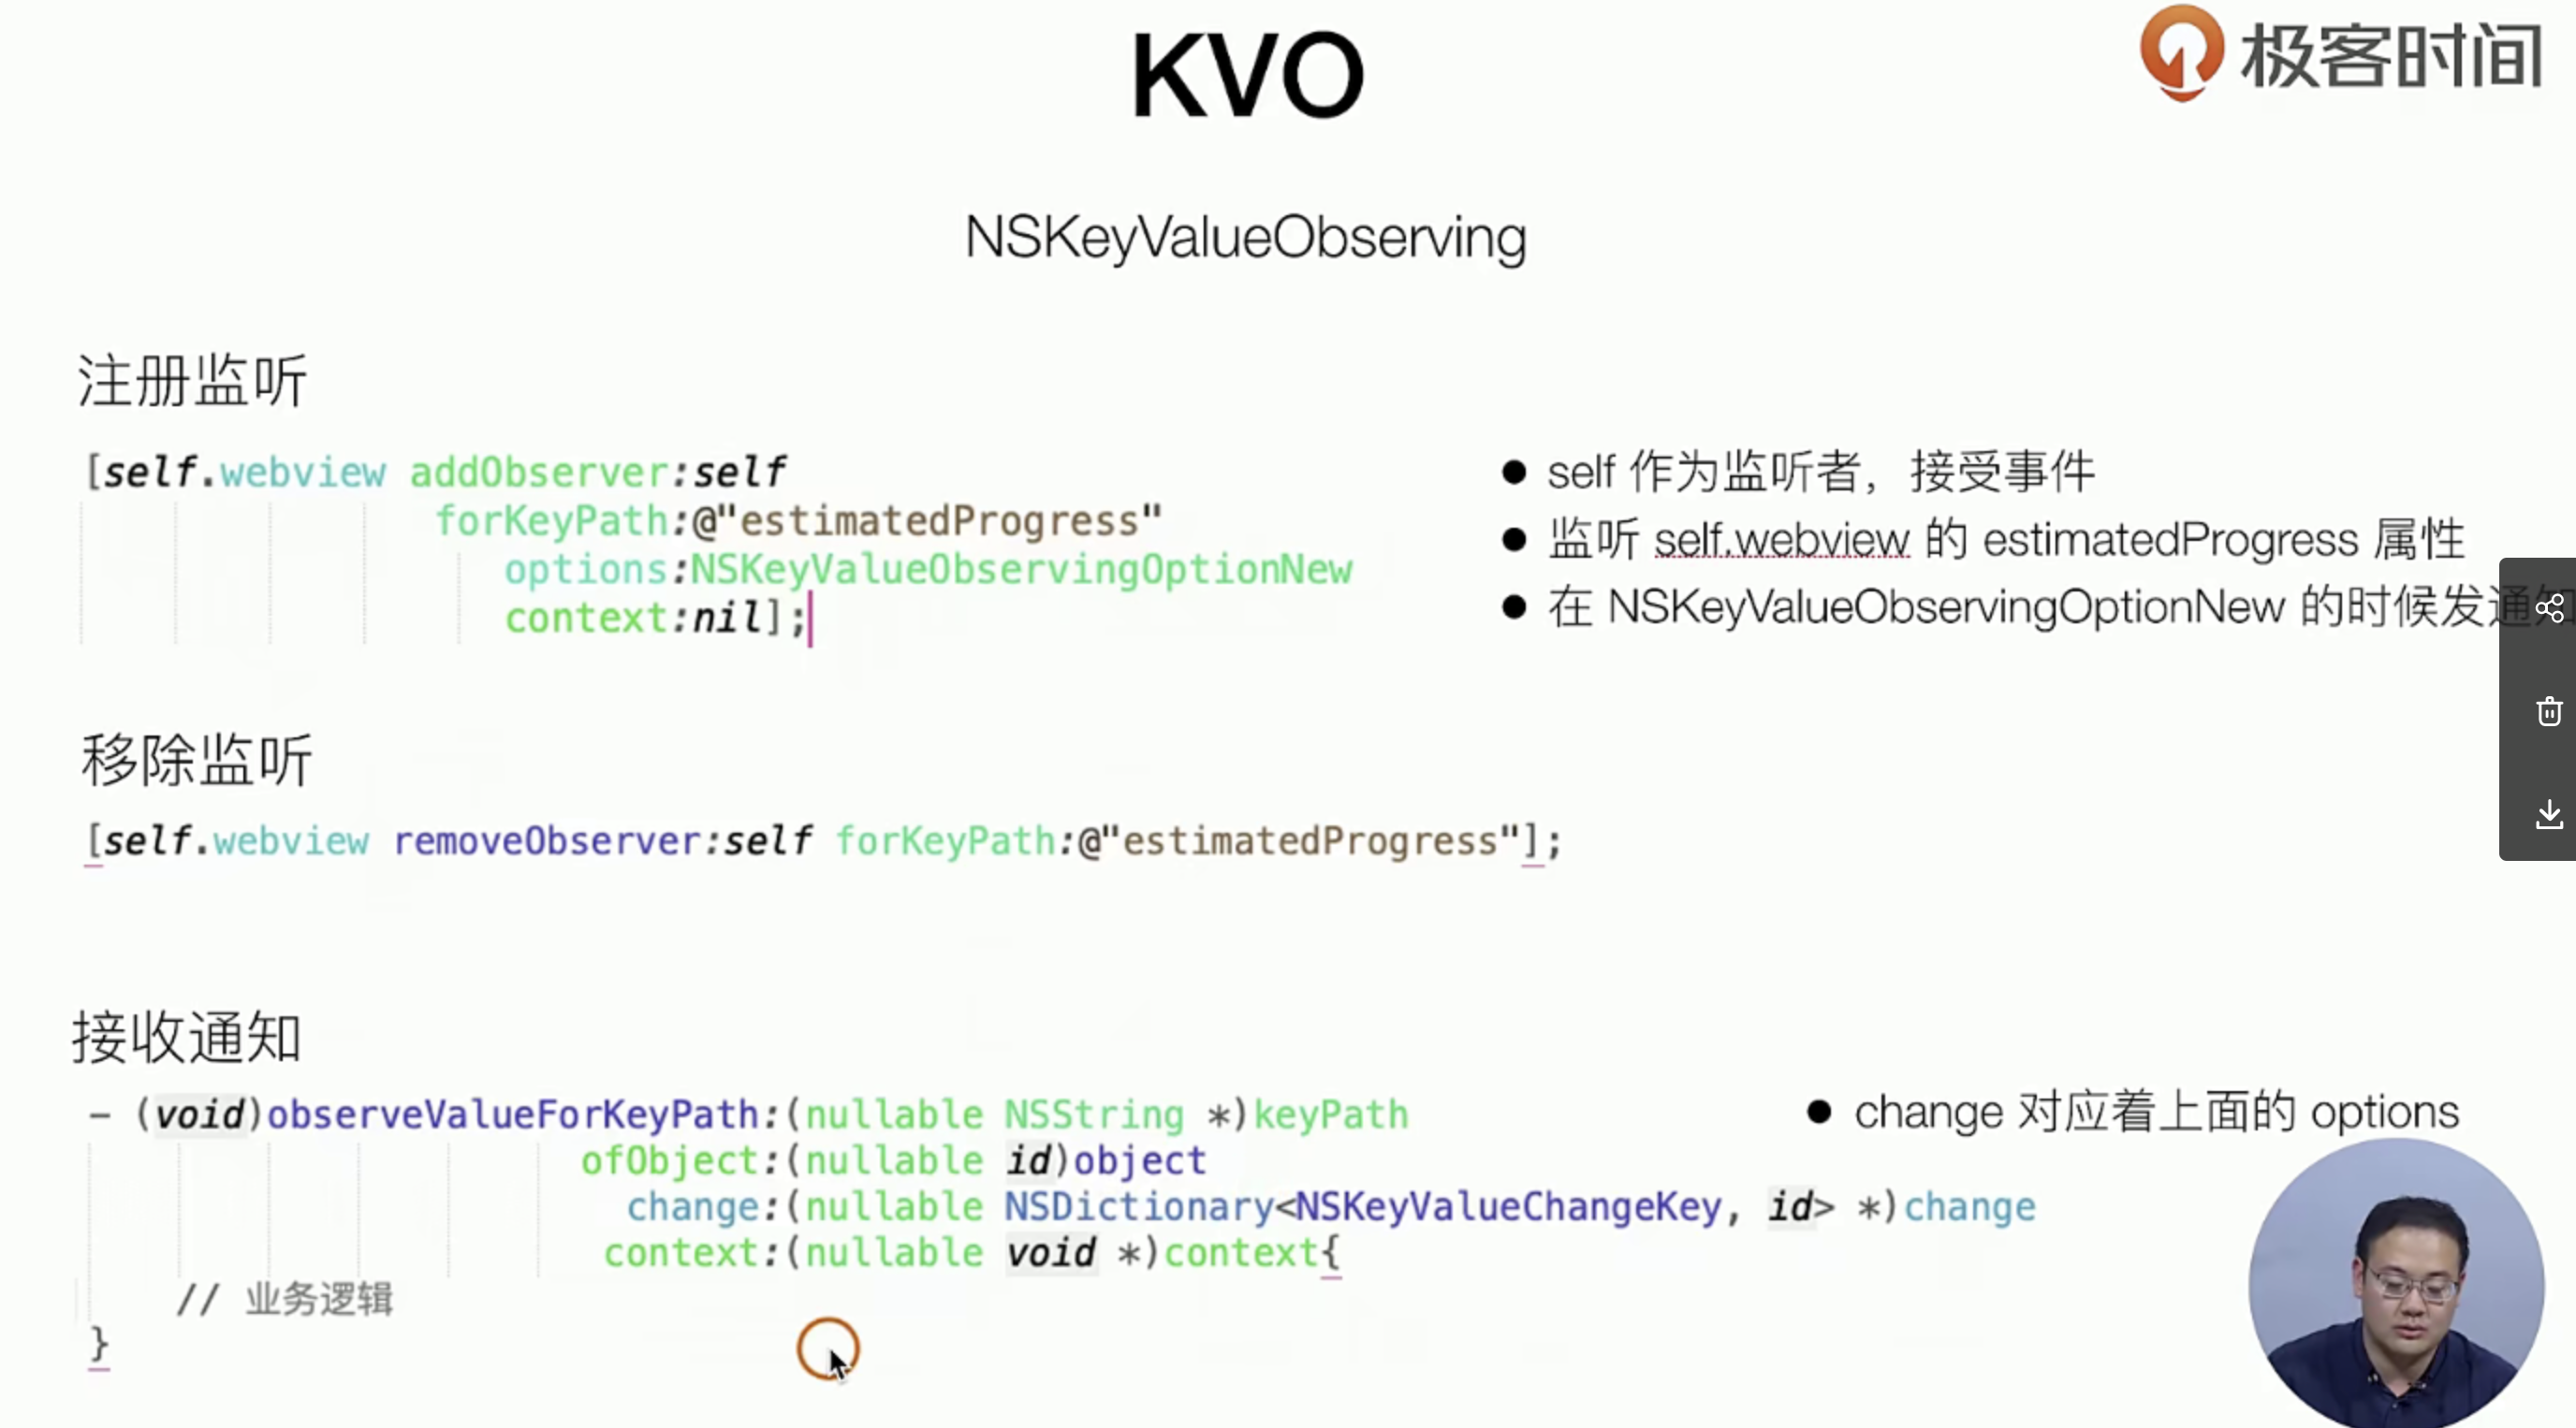
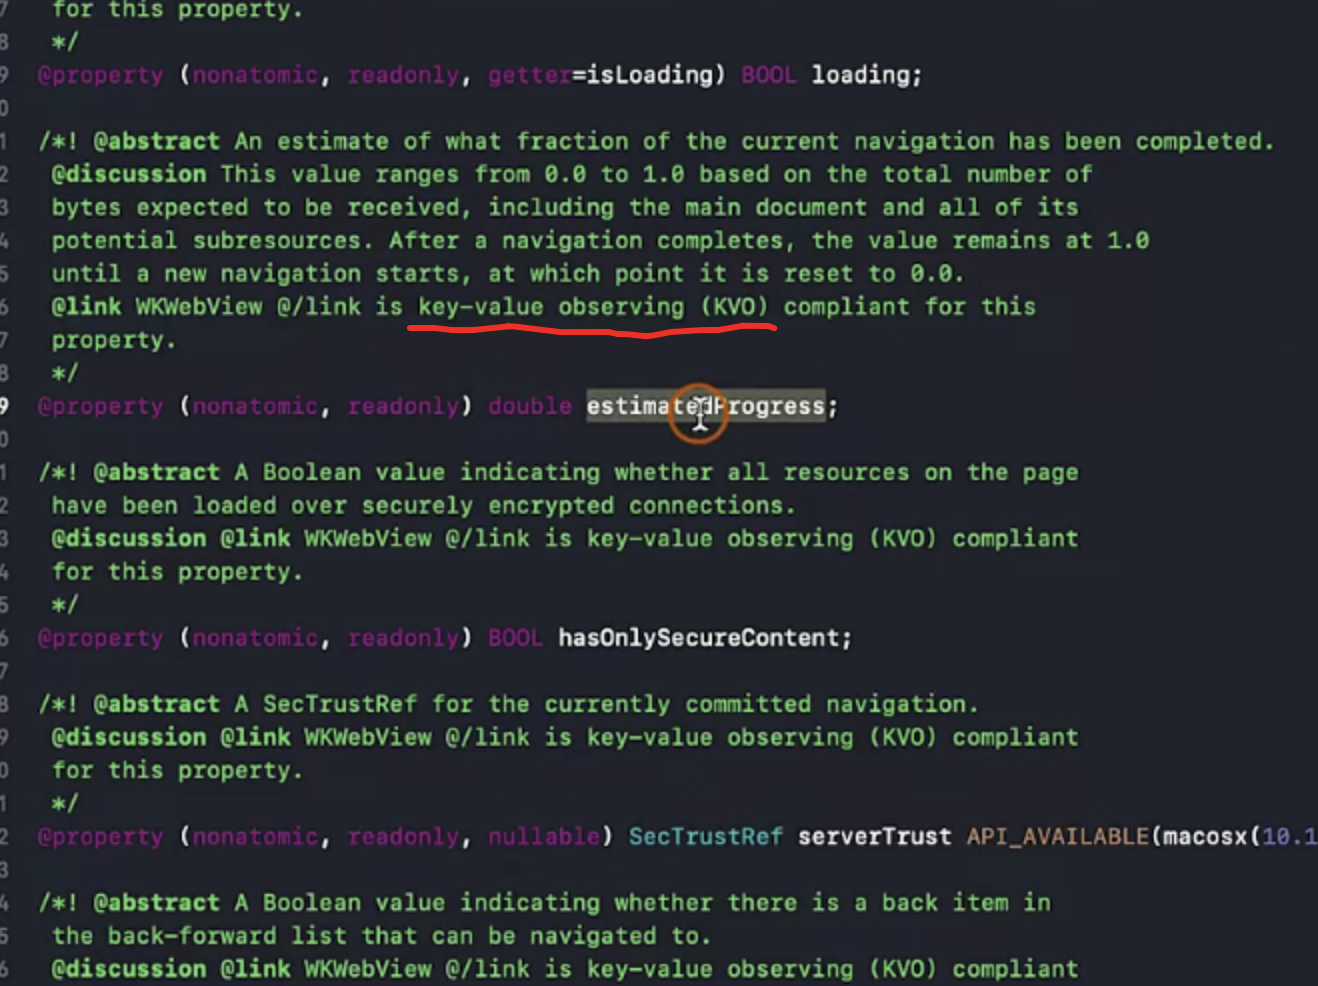
// 搞上一个KVO观察者模式 1. 注册 监听某些属性的变化,比如这里监听的是estimatedProgress变化时,该属性如何变化时触发方法呢(estimatedProgress属性新变化的时候触发)? 需要传递什么参数呢,
[self.webView addObserver:self forKeyPath:@"estimatedProgress" options:(NSKeyValueObservingOptionNew) context:(nil)];
// KVO设置一个进度条 4. 建立一个进度条 view
[self.view addSubview:({
self.webProgreess = [[UIProgressView alloc] initWithFrame:CGRectMake(0, 99, self.view.frame.size.width, 30) ];
self.webProgreess;
})];
}
+++++
// 加一个回调 2. 注册一个kvo事件 ,方法从addObserverjupmTo进来的
- (void)observeValueForKeyPath:(nullable NSString *)keyPath ofObject:(nullable id)object change:(nullable NSDictionary<NSKeyValueChangeKey, id> *)change context:(nullable void *)context {
// KVO设置一个进度条 5. 给进度条 view 设置值
self.webProgreess.progress = self.webView.estimatedProgress;
};
// 3. 销毁的时候移除监听
-(void)dealloc {
[self.webView removeObserver:self forKeyPath:@"estimatedProgress"];
};
@end
一些通用的框架层的封装
理论知识
实际上这些东西 就是在UIViewController上架了一层的交互而已,但是Flutter不一样Flutter 有自己的渲染器
动画使用
在IOS中动画是比较重要的
基础知识IOS中的动画
实际上动画在IOS中用的是一个叫做Core Animation实现的,但是我们用的时候用的是上层封装


UIView提供的animation是比较常用的,但是对于中间状态的控制是控制不到的
实践指南
我们的目标如下:使用UIView 和两种Class通信方式(delegate 设计模式 bolock设计模式) + animation 实现一个动画,(全局的弹出层)(实现一个跟随点击位置的弹出框)(实现删除cell的逻辑)(处理循环引用)
下面的代码有点得多,我们这里画了一个图 方便大家理解 已经学习和记忆
- 先把按钮的class 和 页面的viewContlor 进行通信 (使用Delegate模式。我们需要自定义一个Delegate)
## 1. 在CGPtTableViewCell.H 和.m 中先声明已经实现
//
//  CGPtTableViewCell.h
//  SimpelApp
//
//  Created by 李仕增 on 2021/10/23.
//

#import <UIKit/UIKit.h>

NS_ASSUME_NONNULL_BEGIN


//  自定义delegate 1,声明这种属性
@protocol CGPtTableViewCellDelegate <NSObject>
- (void)tabViewCell: (UITableViewCell *)tabViewCell clickDeleteButton:(UIButton *)delegateButton;
@end


@interface CGPtTableViewCell : UITableViewCell
//  自定义delegate 2,原来的类上 加上这个属性 weak类型哈
@property(nonatomic, weak, readwrite) id<CGPtTableViewCellDelegate> delegate;
- (void) layoutInitCell;
@end

NS_ASSUME_NONNULL_END


.m文件
++++
- (void) myButtonClick {
//  加这段判断的原因是:我们的自定义的Delegate是非必选的,为了避免报错需要这样来兜底处理
    if(self.delegate && [self.delegate respondsToSelector:@selector(tabViewCell:clickDeleteButton:)]  ) {
        [self.delegate tabViewCell:self clickDeleteButton:self.myButton];
    }
}


## 2. 在viewController中使用Delegate 并且实现其方法,别忘记去引用头文件
++++

- (UITableViewCell *)tableView:(UITableView *)tableView cellForRowAtIndexPath:(NSIndexPath *)indexPath {

    CGPtTableViewCell *cell = [tableView dequeueReusableCellWithIdentifier:@"id"];
    if ( !cell ) {
        cell = [[CGPtTableViewCell alloc] initWithStyle:UITableViewCellStyleSubtitle reuseIdentifier:@"id"];
        cell.delegate = self; // 拿到一个delegate【重点】
    }

    [cell layoutInitCell];
//    cell.textLabel.text =  [NSString stringWithFormat:@"主标题 - %@",@(indexPath.row)];
//    cell.detailTextLabel.text = @"副标题";
//    cell.imageView.image = [UIImage imageNamed:@"icon.bundle/video.png"];
    return cell;
};

//  实现自定义的Delegate 【重点】
- (void)tabViewCell: (UITableViewCell *)tabViewCell clickDeleteButton:(UIButton *)delegateButton {
    NSLog(@"");
};- 然后我们自定义的一个弹出框
创建文件的部分省略
## 1. 创建一个 独立的文件表示浮层 组件 下面分别是.m 和.h
//
//  GTDeleteCellView.m
//  SimpelApp
//
//  Created by 李仕增 on 2021/11/10.
//

#import "GTDeleteCellView.h"

@interface GTDeleteCellView ()
@property(nonatomic, strong, readwrite) UIView *backView;
@property(nonatomic, strong, readwrite) UIButton *deletButton;
@end


@implementation GTDeleteCellView

-(instancetype) initWithFrame:(CGRect) frame {

    self = [super initWithFrame:frame];

    if(self) {
        [self addSubview:({
            _backView = [[UIView alloc] initWithFrame:self.bounds];
            _backView.backgroundColor = [UIColor blackColor];
            _backView.alpha = 0.6;

//            别忘记点击mask要添加手势的
            [_backView addGestureRecognizer:({
                UITapGestureRecognizer *tapGesture = [[UITapGestureRecognizer alloc] initWithTarget:self action:@selector(dismissDeleteView)];
                tapGesture;
            })];

            _backView;

        })];

        [self addSubview:({
            _deletButton = [[UIButton alloc] initWithFrame:CGRectMake(0, 0, 200, 200)];
            [_deletButton addTarget:self action:@selector(_clickButton) forControlEvents:UIControlEventTouchUpInside];
            _deletButton.backgroundColor = [UIColor blueColor];
            _deletButton;
        })];
    }
    return  self;
}

// 实现方法
- (void)_clickButton {
    [self removeFromSuperview];
}

- (void)showDeletView {
    [[UIApplication sharedApplication].keyWindow addSubview:self];
}

- (void)dismissDeleteView {
    [self removeFromSuperview];
}
@end


//
//  GTDeleteCellView.h
//  SimpelApp
//
//  Created by 李仕增 on 2021/11/10.
//

#import <UIKit/UIKit.h>

NS_ASSUME_NONNULL_BEGIN

@interface GTDeleteCellView : UIView
- (void)showDeletView;
@end

NS_ASSUME_NONNULL_END


## 2. 点击的时候调用它viewController里
+++
//  实现自定义的Delegate
- (void)tabViewCell: (UITableViewCell *)tabViewCell clickDeleteButton:(UIButton *)delegateButton {
    GTDeleteCellView *deletViewDialog = [[GTDeleteCellView alloc] initWithFrame:self.view.bounds];
    [deletViewDialog showDeletView];
};
- 实现一个跟随位置的弹出层
点击蓝色按钮需要与ViewCOntroller通信,因为展示Diloag的逻辑是在ViewController中的,所以你这个关闭也是在ViewController中才对

## 1. Dialog的.m 文件中(也就上文的GTDeleteCellView )把 show方法逻辑改一下加一个动画,加一个bolock的持有逻辑(这个东西就想传递了一个引用进来 有了别人的引用你就能操作别人的东西)
++++
@interface GTDeleteCellView ()
@property(nonatomic, strong, readwrite) UIView *backView;
@property(nonatomic, strong, readwrite) UIButton *deletButton;
@property(nonatomic, copy, readwrite) dispatch_block_t delteBlock;
@end
++++
- (void)showDeletView:(CGPoint)point clickBlock:(dispatch_block_t) clickBlock{
    _deletButton.frame = CGRectMake(point.x, point.y, 0, 0)

    _delteBlock = [clickBlock copy];  // 点击的时候持有这个Block 这个东西就像一个回调函数一样 关闭之后触发 见下面的dismissDeleteView中


    [[UIApplication sharedApplication].keyWindow addSubview:self];

//    高级动画的 通过block的方法 来进行Class之间的通信
    [UIView animateWithDuration:1.f delay:0.f usingSpringWithDamping:0.5 initialSpringVelocity:0.5 options:UIViewAnimationOptionCurveEaseInOut animations:^{
            self.deletButton.frame = CGRectMake((self.bounds.size.width - 200) / 2, (self.bounds.size.height - 200) / 2, 200, 200);
        } completion:^(BOOL finished){
            NSLog(@"动画结束了");
        }];
}

- (void)dismissDeleteView {
    [self removeFromSuperview];
    if(_delteBlock) {
        _delteBlock();
    }
}

+++
## .h文件中需要暴露出去
    @interface GTDeleteCellView : UIView
- (void)showDeletView:(CGPoint)point clickBlock:(dispatch_block_t) clickBlock;
@end

## 2.使用的时候就比较的简单 viewContialr中
+++
- (void)tabViewCell: (UITableViewCell *)tabViewCell clickDeleteButton:(UIButton *)delegateButton {
    GTDeleteCellView *deletViewDialog = [[GTDeleteCellView alloc] initWithFrame:self.view.bounds];

//    把点击位置的坐标系进行转化转到自己的父容器中
    CGRect rect = [tabViewCell convertRect:delegateButton.frame toView:nil];
    [deletViewDialog showDeletView:rect.origin clickBlock:^{
        NSLog(@"99");
    } ];
};
- 实现 删除列表的item的逻辑(实现的过程中会解决一个循环引用的一个问题)
## 下面的逻辑全部在VIewController中实现,因为这个list就是ViewController的

# 1.把原来写死的20item 换成一个Array 并且在init的时候初始化它
+++++
@interface ViewController ()<UITableViewDataSource, UITableViewDelegate, CGPtTableViewCellDelegate>
// 把tabView变成一个属性
@property(nonatomic, strong, readwrite) UITableView *tabView;
// 把原来的个数变成一个数组   因为待会删除的时候是一点点的pop
@property(nonatomic, strong, readwrite) NSMutableArray *dataArray;
@end

@implementation ViewController

- (instancetype)init{
    self = [super init];
    if(self){
        //    初始化给数组加20
        _dataArray = @[].mutableCopy;
        for (int i = 0; i < 20; i++) {
            [_dataArray addObject:@(i)];
        }
    }
    return self;
};
+++++
## 2. 给原来的东西把20 写死的额改掉
    - (NSInteger)tableView:(UITableView *)tableView numberOfRowsInSection:(NSInteger)section {
    return _dataArray.count;
};

+++++

## 3. 增加删除的逻辑
- (void)tabViewCell: (UITableViewCell *)tabViewCell clickDeleteButton:(UIButton *)delegateButton {
    GTDeleteCellView *deletViewDialog = [[GTDeleteCellView alloc] initWithFrame:self.view.bounds];

    //    处理循环引用
    __weak typeof (self) weself = self;
    //    把点击位置的坐标系进行转化转到自己的父容器中
    CGRect rect = [tabViewCell convertRect:delegateButton.frame toView:nil];
    [deletViewDialog showDeletView:rect.origin clickBlock:^{
        __strong typeof(self) strongSelf = weself;
        //    删除Item的逻辑
        [strongSelf.dataArray removeLastObject];
        [strongSelf.tabView deleteRowsAtIndexPaths:@[[strongSelf.tabView indexPathForCell:tabViewCell]] withRowAnimation:UITableViewRowAnimationAutomatic];
    }];

};
CALayer
理论知识
它是一个类 ,用来支撑动画也是支撑界面绘制的一个类,除去CALayer 还是各种的Layer他们在IOS中都是用于底层渲染和GUI绘制,从性能的角度来看CALayer也是比较的 好的 但是缺点就是在Xcode的自定义的绘制Debuger的时候看不到,所以一般是不会自接用哈。
一般来说不会直接开发者去使用CALayer
实战指南
1.把删除的按钮变成圆角的 再改一个边框
## CGPtTableViewCell.m 文件中
++++
//        这里我们来加一个UIButton
        [self.contentView addSubview:({
            self.myButton = [[UIButton alloc] initWithFrame:CGRectMake(260, 35, 30, 30)];
            [self.myButton setTitle:@"X" forState:UIControlStateNormal];
            [self.myButton setTitle:@"V" forState:UIControlStateHighlighted];
            self.myButton.backgroundColor = [UIColor systemBlueColor];
//            添加一个事件
            [self.myButton addTarget:self action:@selector(myButtonClick) forControlEvents:UIControlEventTouchUpInside];

//            实现圆角
            self.myButton.layer.cornerRadius = 10 ;
            self.myButton.layer.masksToBounds = YES ;
            self.myButton.layer.borderColor = [UIColor lightGrayColor ].CGColor;
            self.myButton.layer.borderWidth = 2;
            self.myButton;
        })];
CoreAnimation
这个是一个类下面还有很多的子类,用于实现一些 “强迫症”的动画。但是用UIVIiew就足够了,但如果你硬要也是可以实现的,下面的列几个 常用的
理论知识

更多的动画 可以去看开源的一些东西。业界主流开发方向有哦两个
-
封装IOS系统提供的
-
自接自接写更底层的实现
代码规范和重构
主要是以下面的三个维度来进行重构:
批量修改 rename
注释有讲究 h 头文件就是一个类 应该注释需要实现什么样的功能 对于方法来说也是一样的 最好是不写注释
如何收齐方法和类?
一键重命名
关于命名?
语言清晰就够了
不需要的东西注释
文件夹的结构从新归类
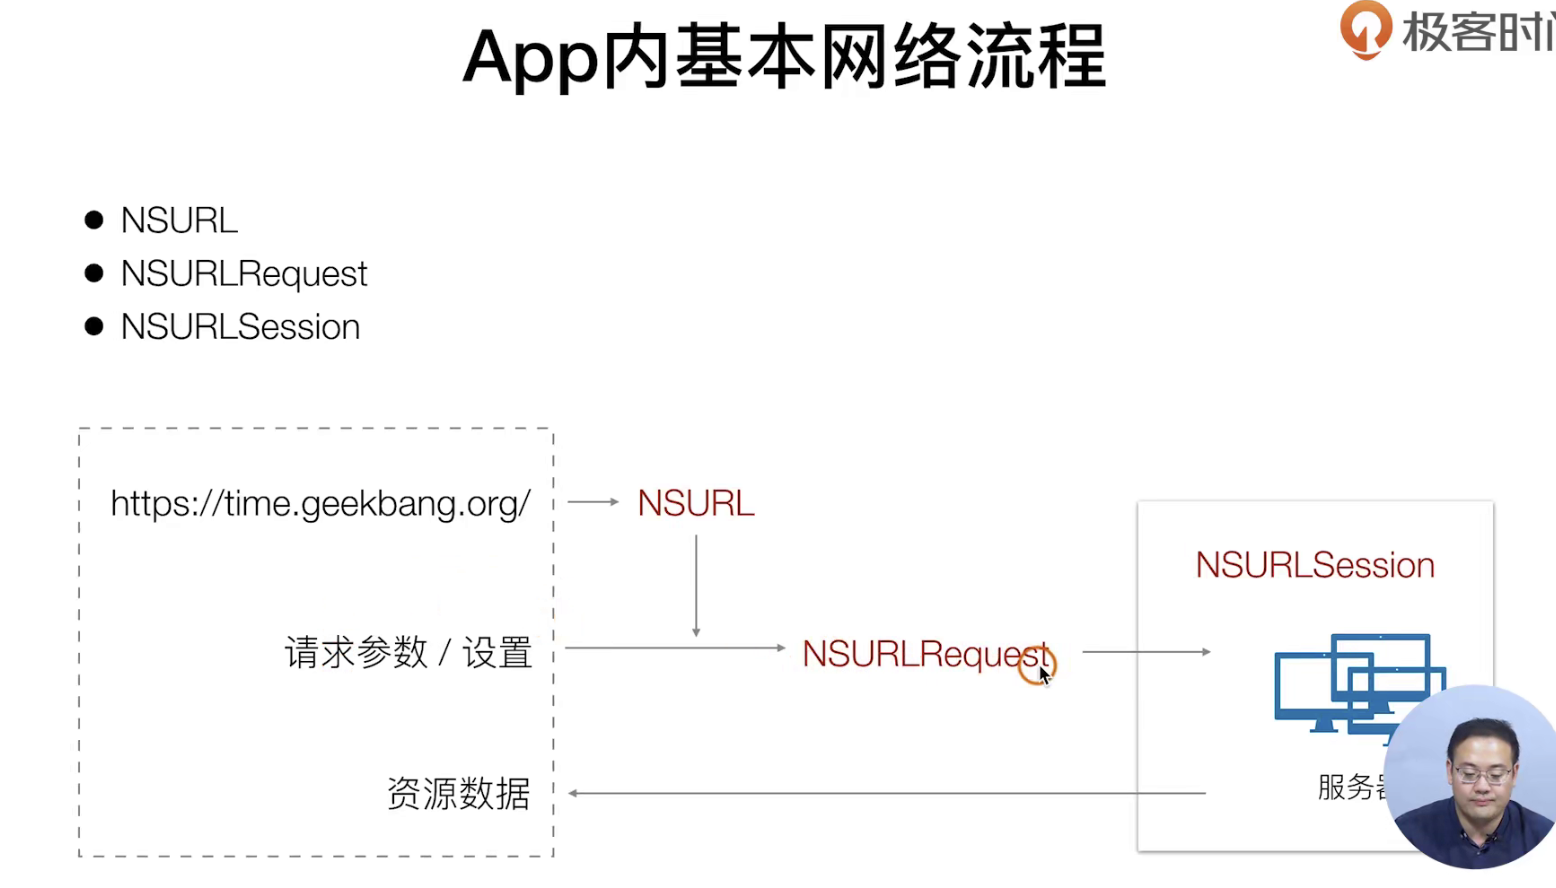
网络请求
用一下试试看
理论知识
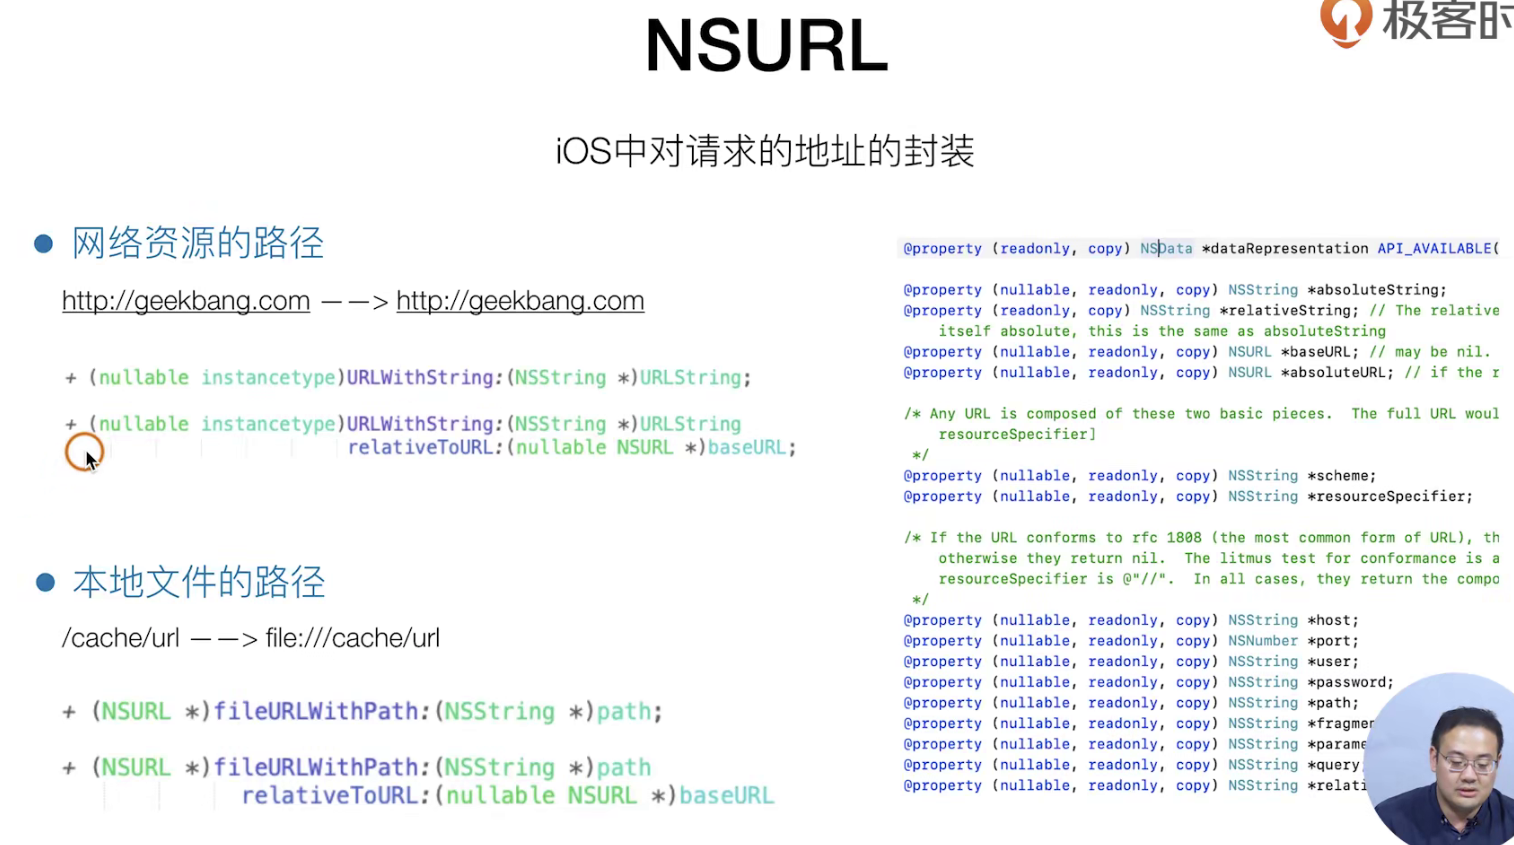
事件上NSURL就是对 请求string的封装就像ajax 对XHttpReque的封装

实战指南
下面我们就创建一个Http请求体 (暂时不发只是创建它)
# 我们新建立了一个文件Load的文件夹下面的loader就是和服务器打交道的一个中间层

.h
//
//  GTListLoader.h
//  SimpelApp
//
//  Created by 李仕增 on 2021/11/12.
//

#import <Foundation/Foundation.h>

NS_ASSUME_NONNULL_BEGIN

///  列表请求
@interface GTListLoader : NSObject
- (void) loadListData;
@end

NS_ASSUME_NONNULL_END


.m
//
//  GTListLoader.m
//  SimpelApp
//
//  Created by 李仕增 on 2021/11/12.
//

#import "GTListLoader.h"

@implementation GTListLoader

- (void)loadListData{
    //    1.生成一个请求 URL对象 NSURL对象
    NSString *urlStr = @"http://yapi.smart-xwork.cn/mock/48537/test/api/project/get";
    //    2.发送一个请求 使用一个NSURLRequest 对象
    NSURL *listURl = [NSURL URLWithString:urlStr];

    //    2.发送一个请求 使用一个NSURLRequest 对象 这个就是一个Request了 你可以来设置它的更多的东西
    __unused NSURLRequest *listRequesst = [NSURLRequest requestWithURL:listURl];
    NSLog(@"");
};

@end


## 在原来的list列表中初始化的时候使用它

#import "NewsController.h"
#import "CGPtTableViewCell.h"
#import "GTDeleteCellView.h"
#import "WebViewViewController.h"
#import "GTListLoader.h"


@interface NewsController ()<UITableViewDataSource, UITableViewDelegate, CGPtTableViewCellDelegate>
// 把tabView变成一个属性
@property(nonatomic, strong, readwrite) UITableView *tabView;
// 把原来的个数变成一个数组   因为待会删除的时候是一点点的pop
@property(nonatomic, strong, readwrite) NSMutableArray *dataArray;
@property(nonatomic, strong, readwrite) GTListLoader *listLoader;
@end

@implementation NewsController

++++
- (void)viewDidLoad {
++++
//    开始去加载真实的网络数据
    self.listLoader = [[GTListLoader alloc] init];
    [self.listLoader loadListData];
}
调试小技巧 我们可以手动的去随时的打日志 哈哈哈 秒
准备发送真正的请求
从这里开始我们就涉及到 异步和并发问题了
理论知识

NSURLSession就像一个请求组统一调度和管理
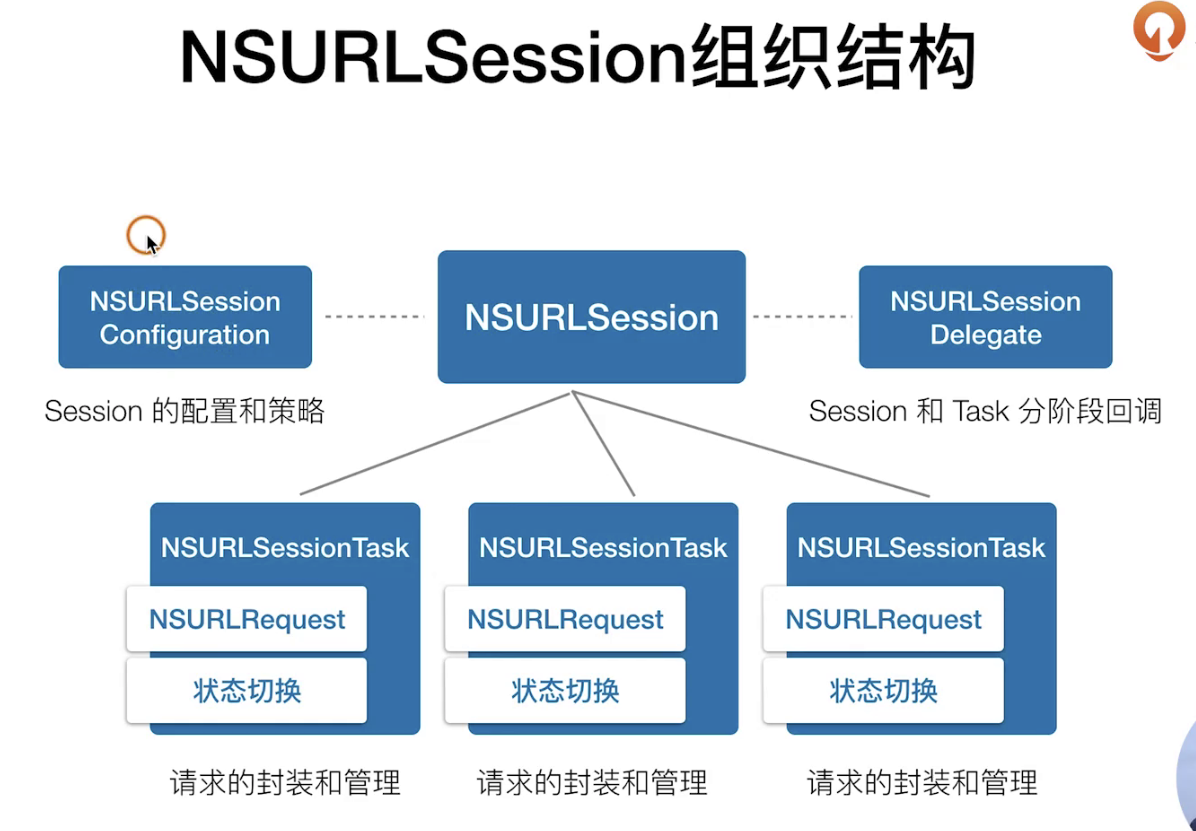
下面的就是NSURlSession 就是一个 单例了
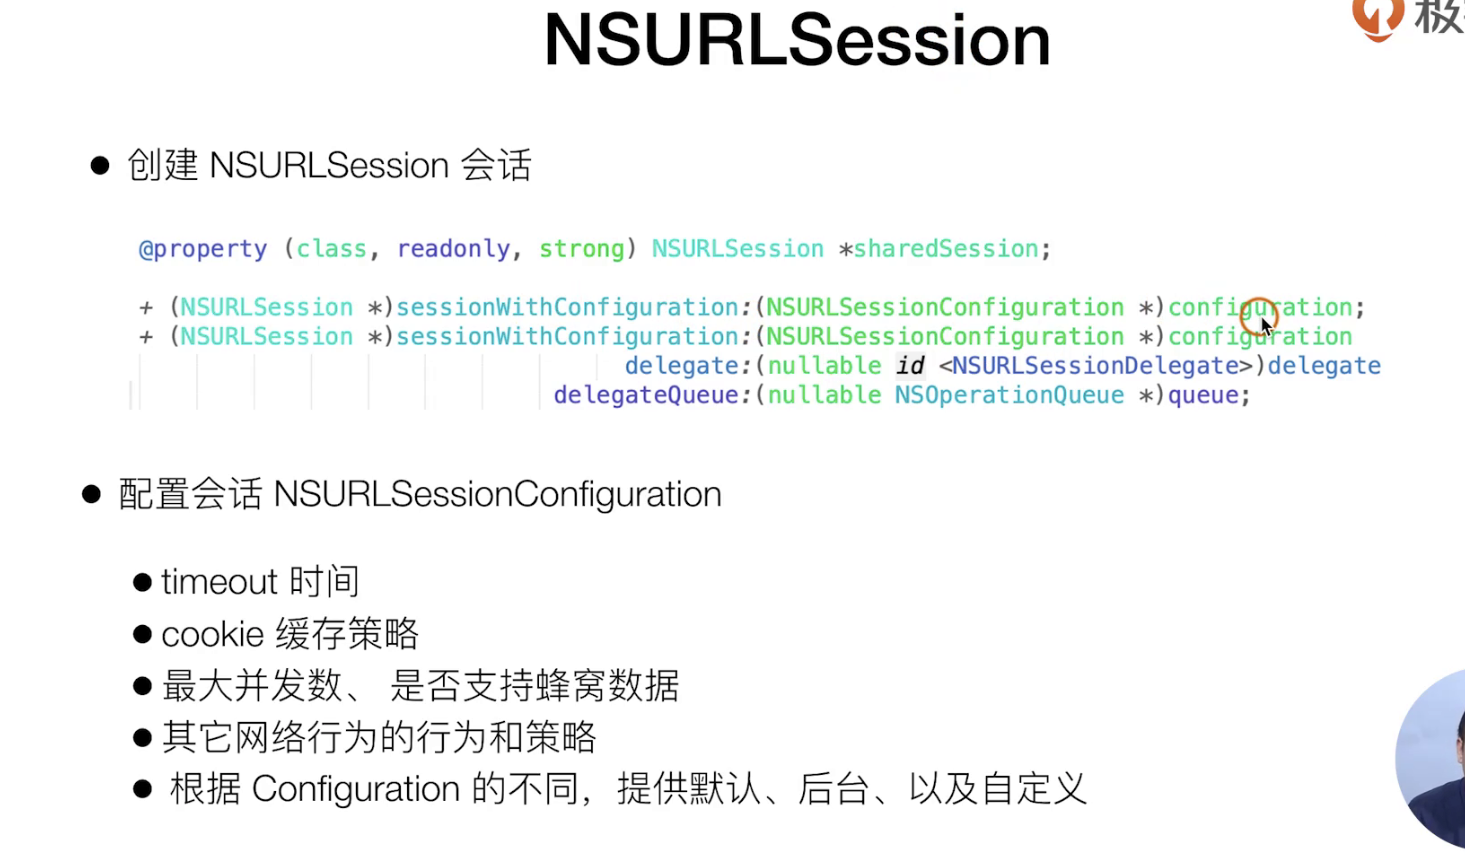
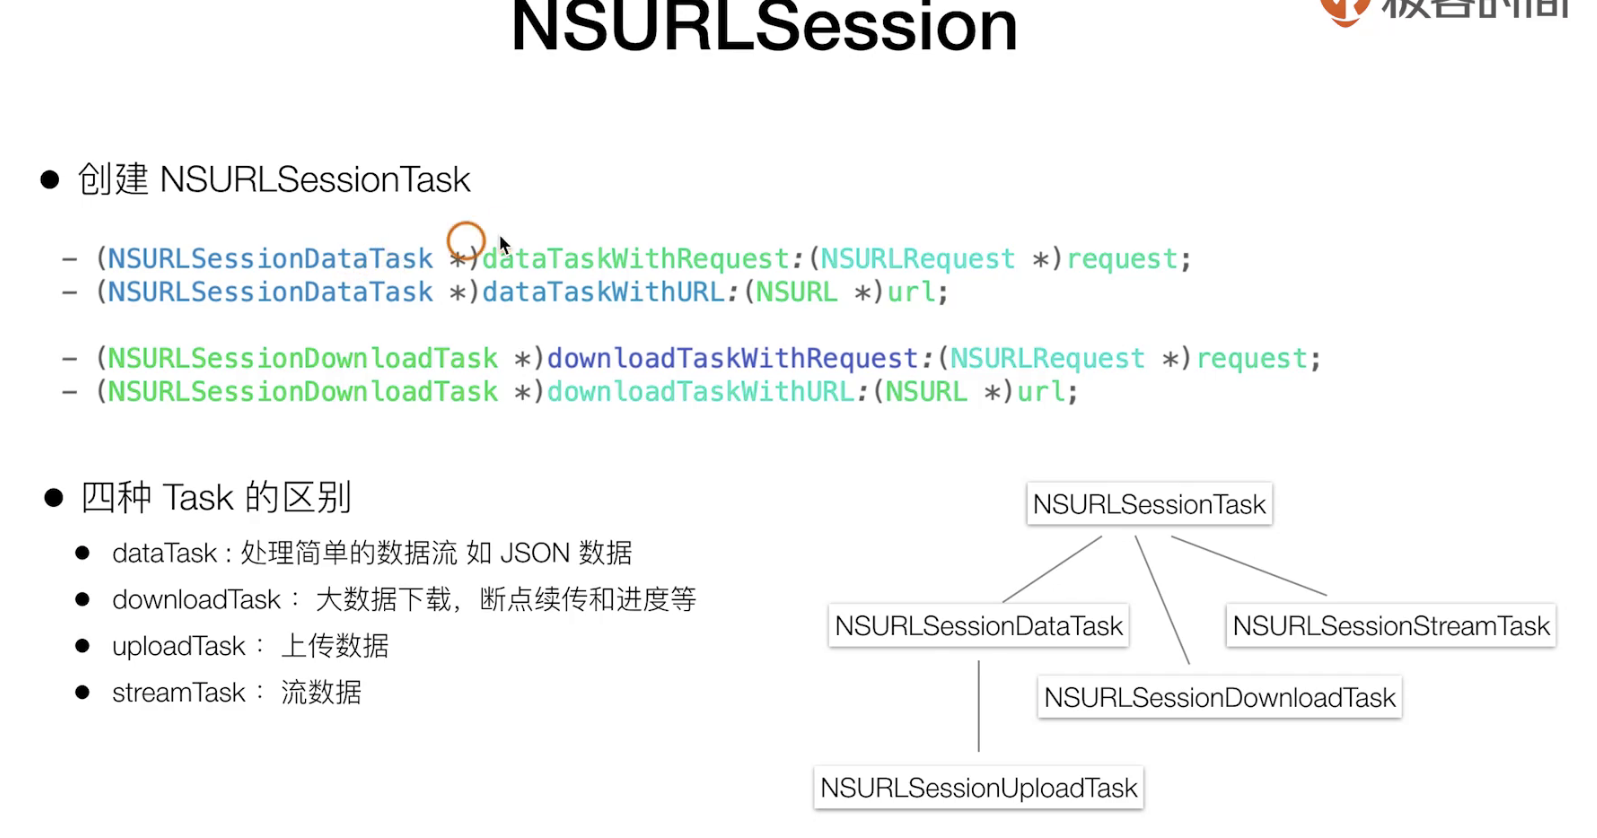
一般情况下我们都是使用NSURLSessionTask 这在很多场景下都是够用的
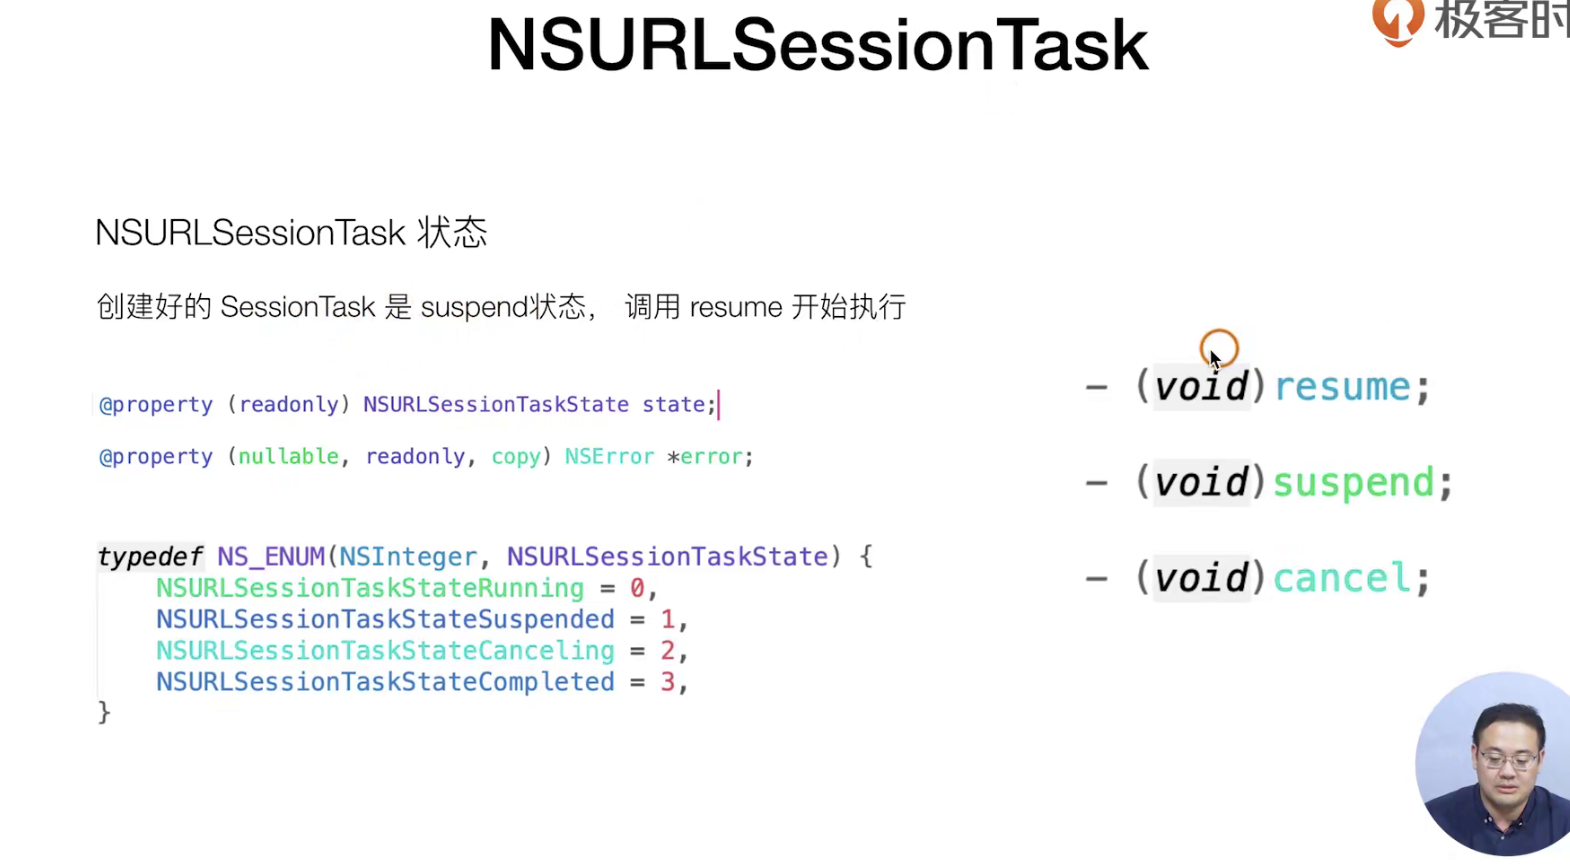
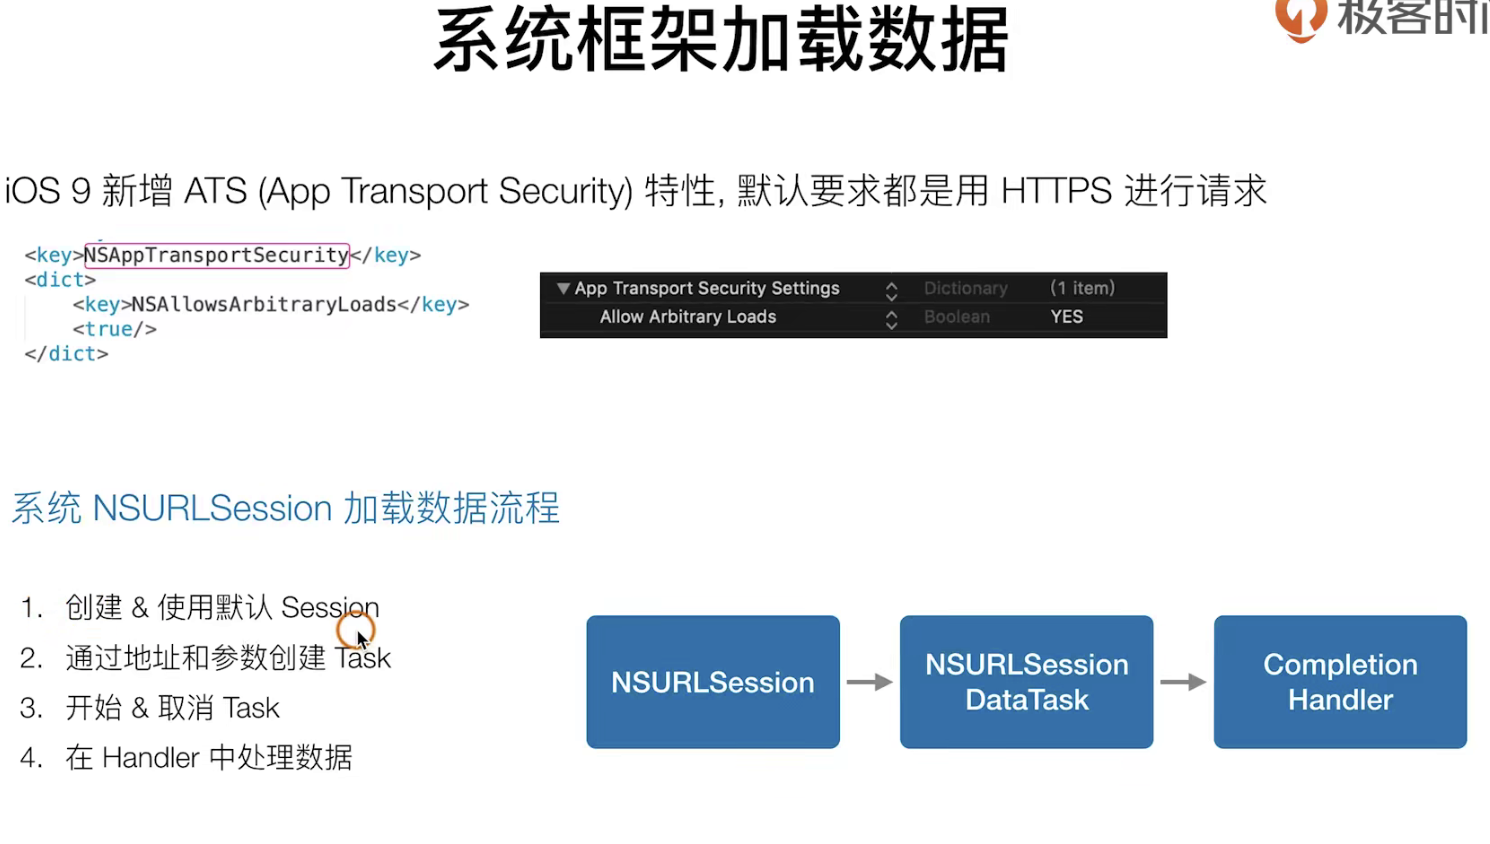
你需要解开非HTTPS的请求在IOS9 之后默认强制都要Https
实践指导
//
//  GTListLoader.m
//  SimpelApp
//
//  Created by 李仕增 on 2021/11/12.
//

#import "GTListLoader.h"

@implementation GTListLoader

- (void)loadListData{
    //    1.生成一个请求 URL对象 NSURL对象
//    NSString *urlStr = @"http://yapi.smart-xwork.cn/mock/48537/test/api/project/get";
    NSString *urlStr = @"http://www.tianqiapi.com/api?version=v1&appid=23035354&appsecret=8YvlPNrz";
    //    2.发送一个请求 使用一个NSURLRequest 对象
    NSURL *listURl = [NSURL URLWithString:urlStr];

    //    3.发送一个请求 使用一个NSURLRequest 对象 这个就是一个Request了 你可以来设置它的更多的东西
    __unused NSURLRequest *listRequesst = [NSURLRequest requestWithURL:listURl];
//    4. 设置seesion
    NSURLSession * sessionx = [NSURLSession sharedSession];
//    5. 创建Task
    NSURLSessionDataTask *dataTask1 = [sessionx dataTaskWithRequest:listRequesst completionHandler:^(NSData * _Nullable data, NSURLResponse * _Nullable response, NSError * _Nullable error) {
        NSLog(@"");
    }]; // 这个NSURLSessionDataTask 属于session1下的 session1是一个单例

    // 6 发起
    [dataTask1 resume];

    NSLog(@"");
};

@end
太麻烦了有没有类似前端fetch 或者axios的东西?
这种东西是有的,在IOS中的可以的 ,现在我们就来看看 这样的一个东西 NSNetWorking,
在IOS开发中,这些集成进来的东西,通常为:xxx框架。
理论知识
一般来说 如果你需要集成某个开源的框架,你吧下载下来的开源框架(实际上就是一个独立的Project)把它 拖拽到自己的项目workSpace就好了、
cocapods 就是这种 类似于一个npm ,主要功能就是可以把多个 project合成一个workSpace
它这个东西就是 类似npm ,主要是做两件事 1. 下载代码片段 2. 合并成一个Pods 最后合并到 自己的项目 worksapce 里去
实战指南
// 前置安装
首先我们要暂时的先关闭 Xcode,在项目的文件夹下,写一个podfile 文件(这个东西就是OC Cocapad的包管理文件 类属于前端得packag.json)
target 'SimpelApp' do
  pod 'AFNetworking'   // 这个就是你的包
end
然后我们进入控制台 运行下面的命令( 前情提示,如果你不知道pod xxx 这些东西 那么你最好去看看cocapad的文档 )
pod install
# 这个执行完毕之后就会得出想的文件夹结构
Podif.lock
# 这个文件是运行上述命令后生成的,主要是多人开发的时候锁定版本🔒
它实际上的做事情就是 ,吧原来的项目 结合 cocapad 结合在一起生成一个新的工作区 ,也就是说你再次打开的时候应该点击wcworlsapce 文件夹而不是原来的codeproj工作区
我们的第三方的开源工具 就是在Pods文件夹中
再之后呢,我们就以前端得方法去引入文件就好了
/loader/GTlist.m
//
//  GTListLoader.m
//  SimpelApp
//
//  Created by 李仕增 on 2021/11/12.
//

#import "GTListLoader.h"
#import "AFNetworking.h"  // 这个就是你的包

@implementation GTListLoader

- (void)loadListData{
    //    1.生成一个请求 URL对象 NSURL对象
//    NSString *urlStr = @"http://yapi.smart-xwork.cn/mock/48537/test/api/project/get";
    NSString *urlStr = @"http://www.tianqiapi.com/api?version=v1&appid=23035354&appsecret=8YvlPNrz";
    NSURL *listURl = [NSURL URLWithString:urlStr];


    //    2.发送一个请求 使用一个NSURLRequest 对象 这个就是一个Request了 你可以来设置它的更多的东西
    __unused NSURLRequest *listRequesst = [NSURLRequest requestWithURL:listURl];
//    3. 设置seesion
    NSURLSession * sessionx = [NSURLSession sharedSession];
//    4. 创建Task
    NSURLSessionDataTask *dataTask1 = [sessionx dataTaskWithRequest:listRequesst completionHandler:^(NSData * _Nullable data, NSURLResponse * _Nullable response, NSError * _Nullable error) {
        NSLog(@"");
    }]; // 这个NSURLSessionDataTask 属于session1下的 session1是一个单例

    // 5 发起
    [dataTask1 resume];

    NSLog(@"");

//    使用第三方框架 使用第三方框架就方便了很多
    [[AFHTTPSessionManager manager] GET: @"http://www.tianqiapi.com/api?version=v1&appid=23035354&appsecret=8YvlPNrz" parameters:nil headers:nil progress:^(NSProgress * _Nonnull downloadProgress) {
        NSLog(@"");
    } success:^(NSURLSessionDataTask * _Nonnull task, id  _Nullable responseObject) {
        NSLog(@"");
    } failure:^(NSURLSessionDataTask * _Nullable task, NSError * _Nonnull error) {
        NSLog(@"");
    }];
};

@end
以上就是如何使用第三方框架的说明 ,其他类型的框架都是一样的,就是这样去用就好了
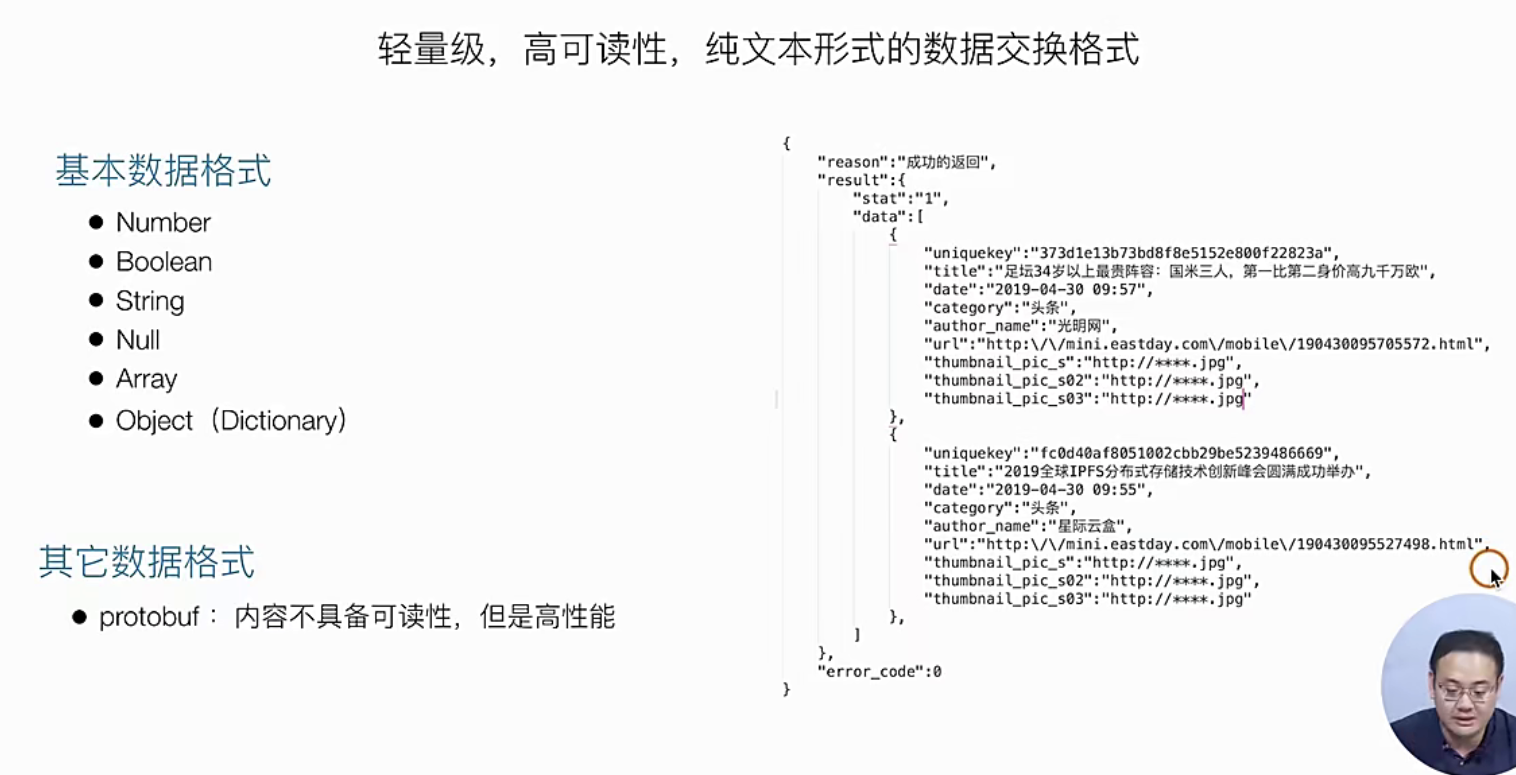
JSON数据如何解析?
上诉我们以及获取到了数据,现在我们考虑如何解析它,这里就不详细的说明了
理论指导快速上手
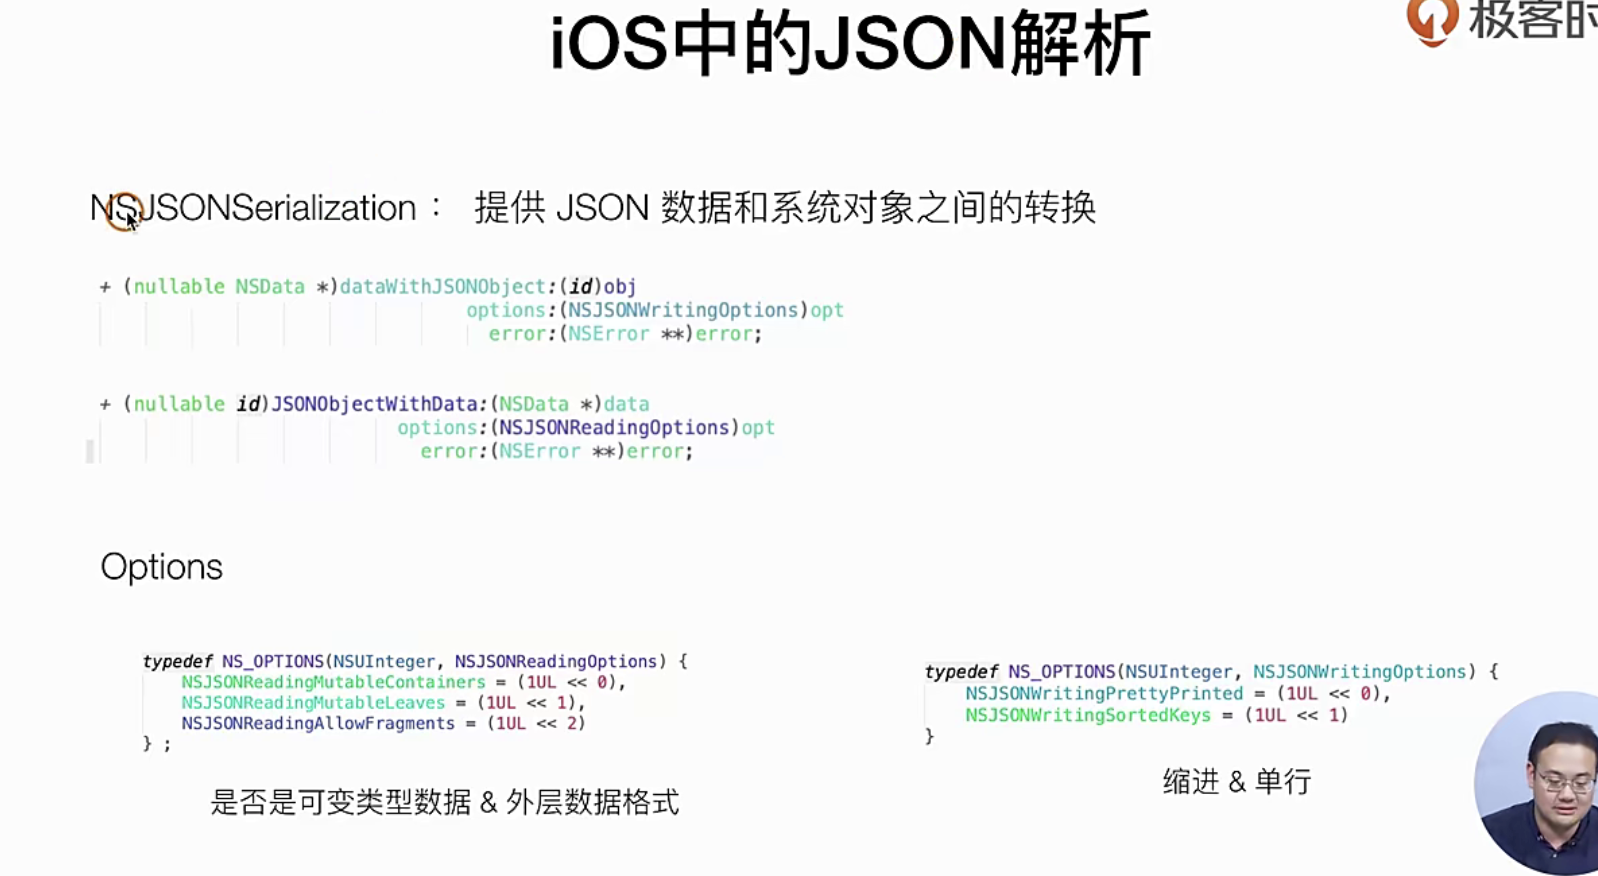
那么我们先睹为快,看看如何写这个代码
//
//  GTListLoader.m
//  SimpelApp
//
//  Created by 李仕增 on 2021/11/12.
//

#import "GTListLoader.h"

@implementation GTListLoader

- (void)loadListData{
+++++

    NSURLSessionDataTask *dataTask1 = [sessionx dataTaskWithRequest:listRequesst completionHandler:^(NSData * _Nullable data, NSURLResponse * _Nullable response, NSError * _Nullable error) {
        NSError *jsonError;
        id jsonObj = [NSJSONSerialization JSONObjectWithData:data options:0 error:&jsonError];

        NSLog(@"");
    }]; // 这个NSURLSessionDataTask 属于session1下的 session1是一个单例

    [dataTask1 resume];
    NSLog(@"");
};

@end
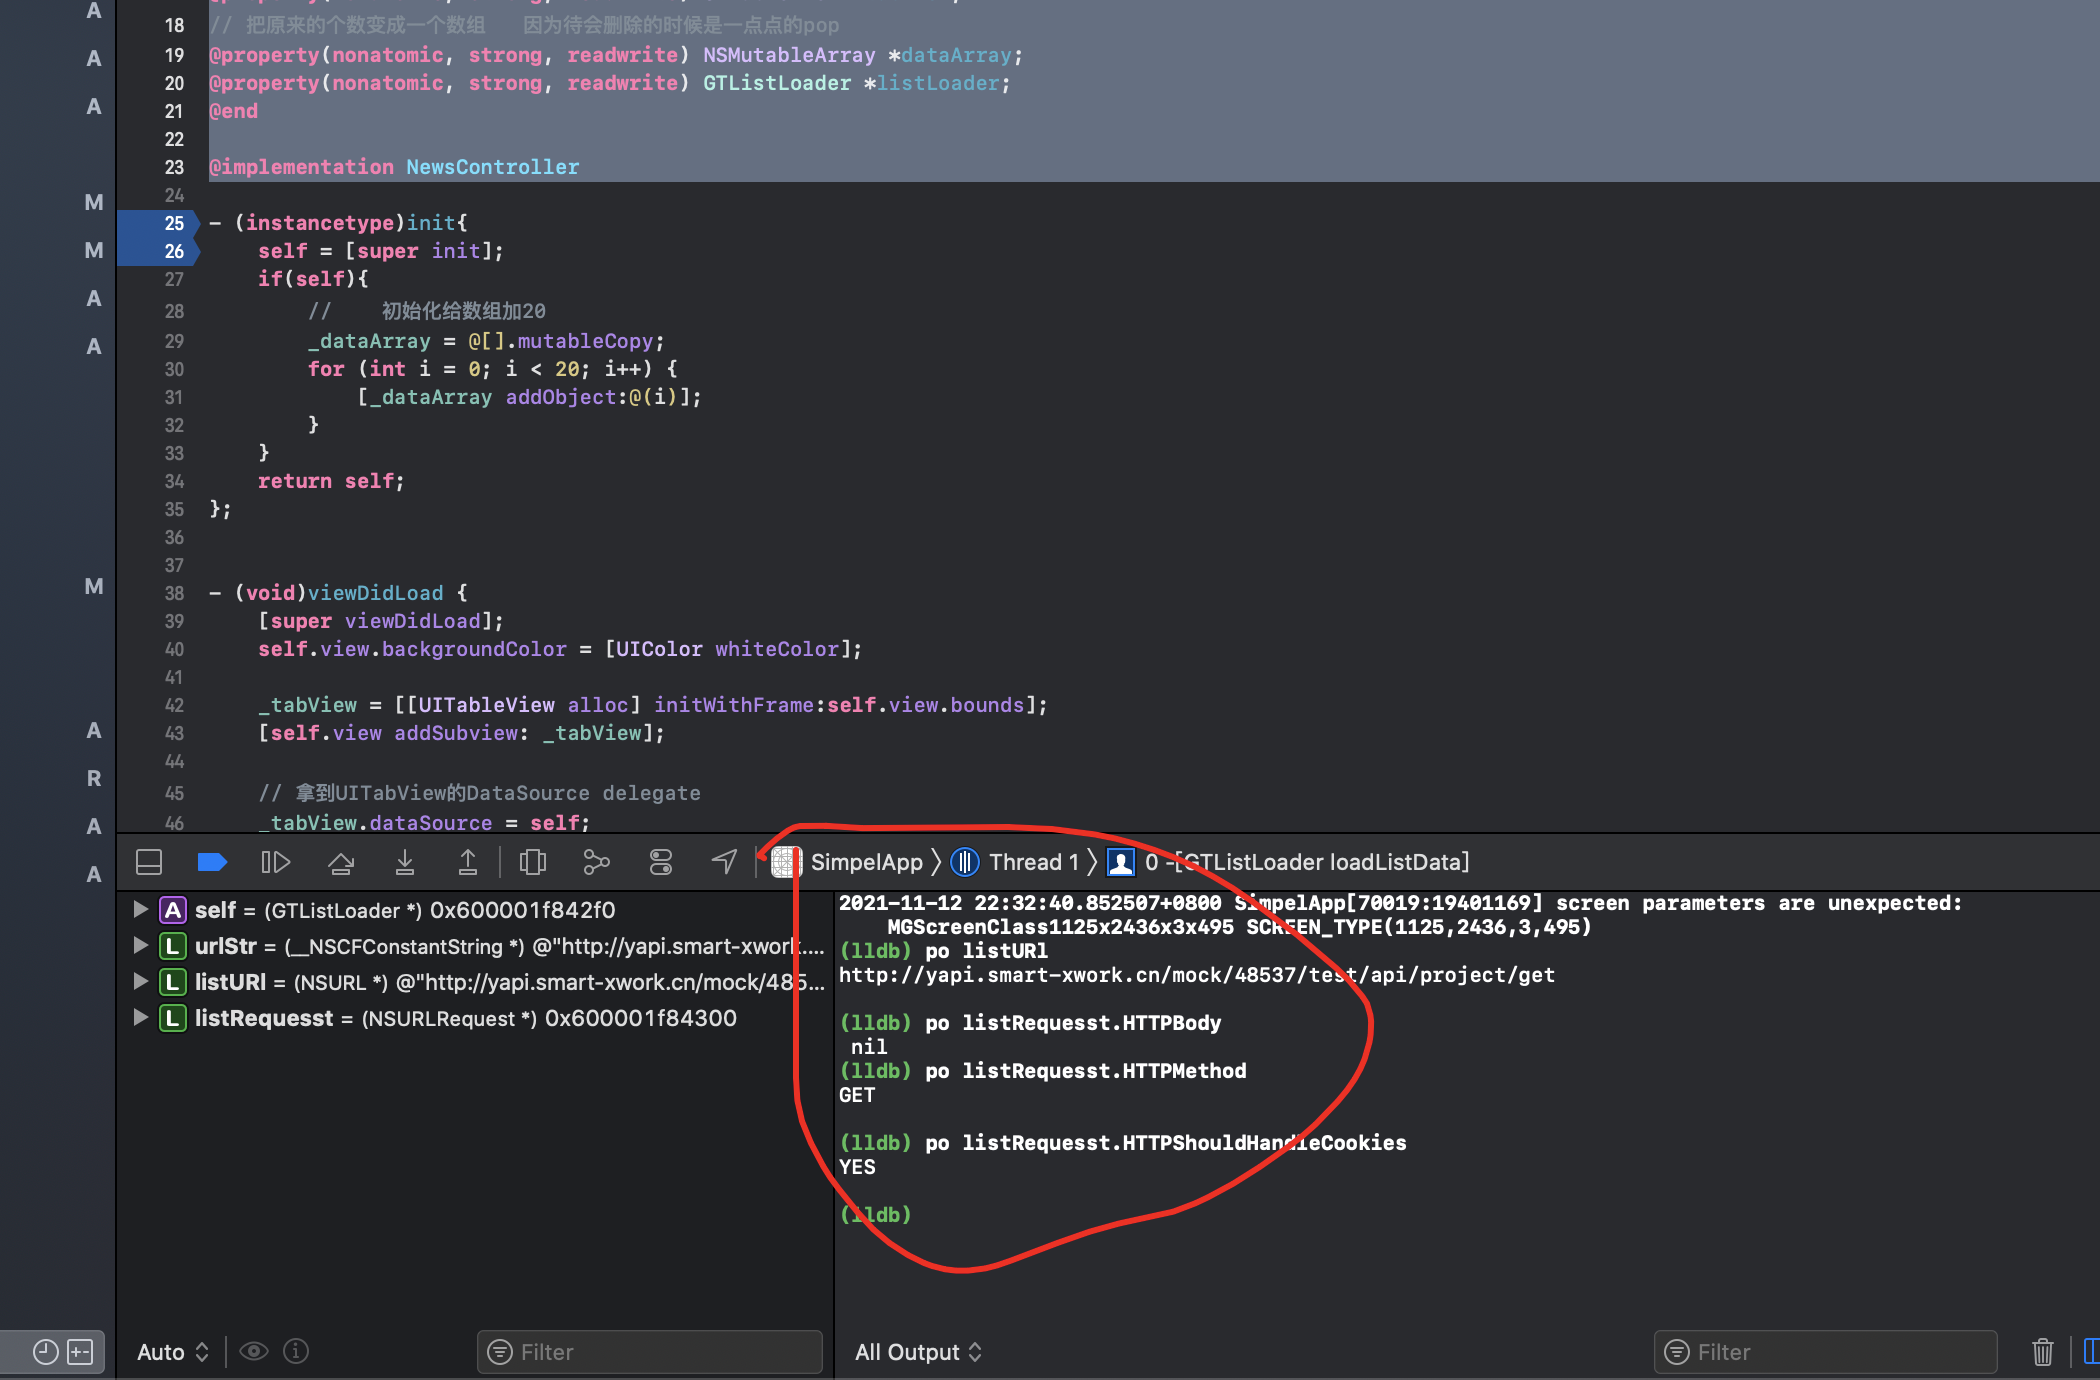
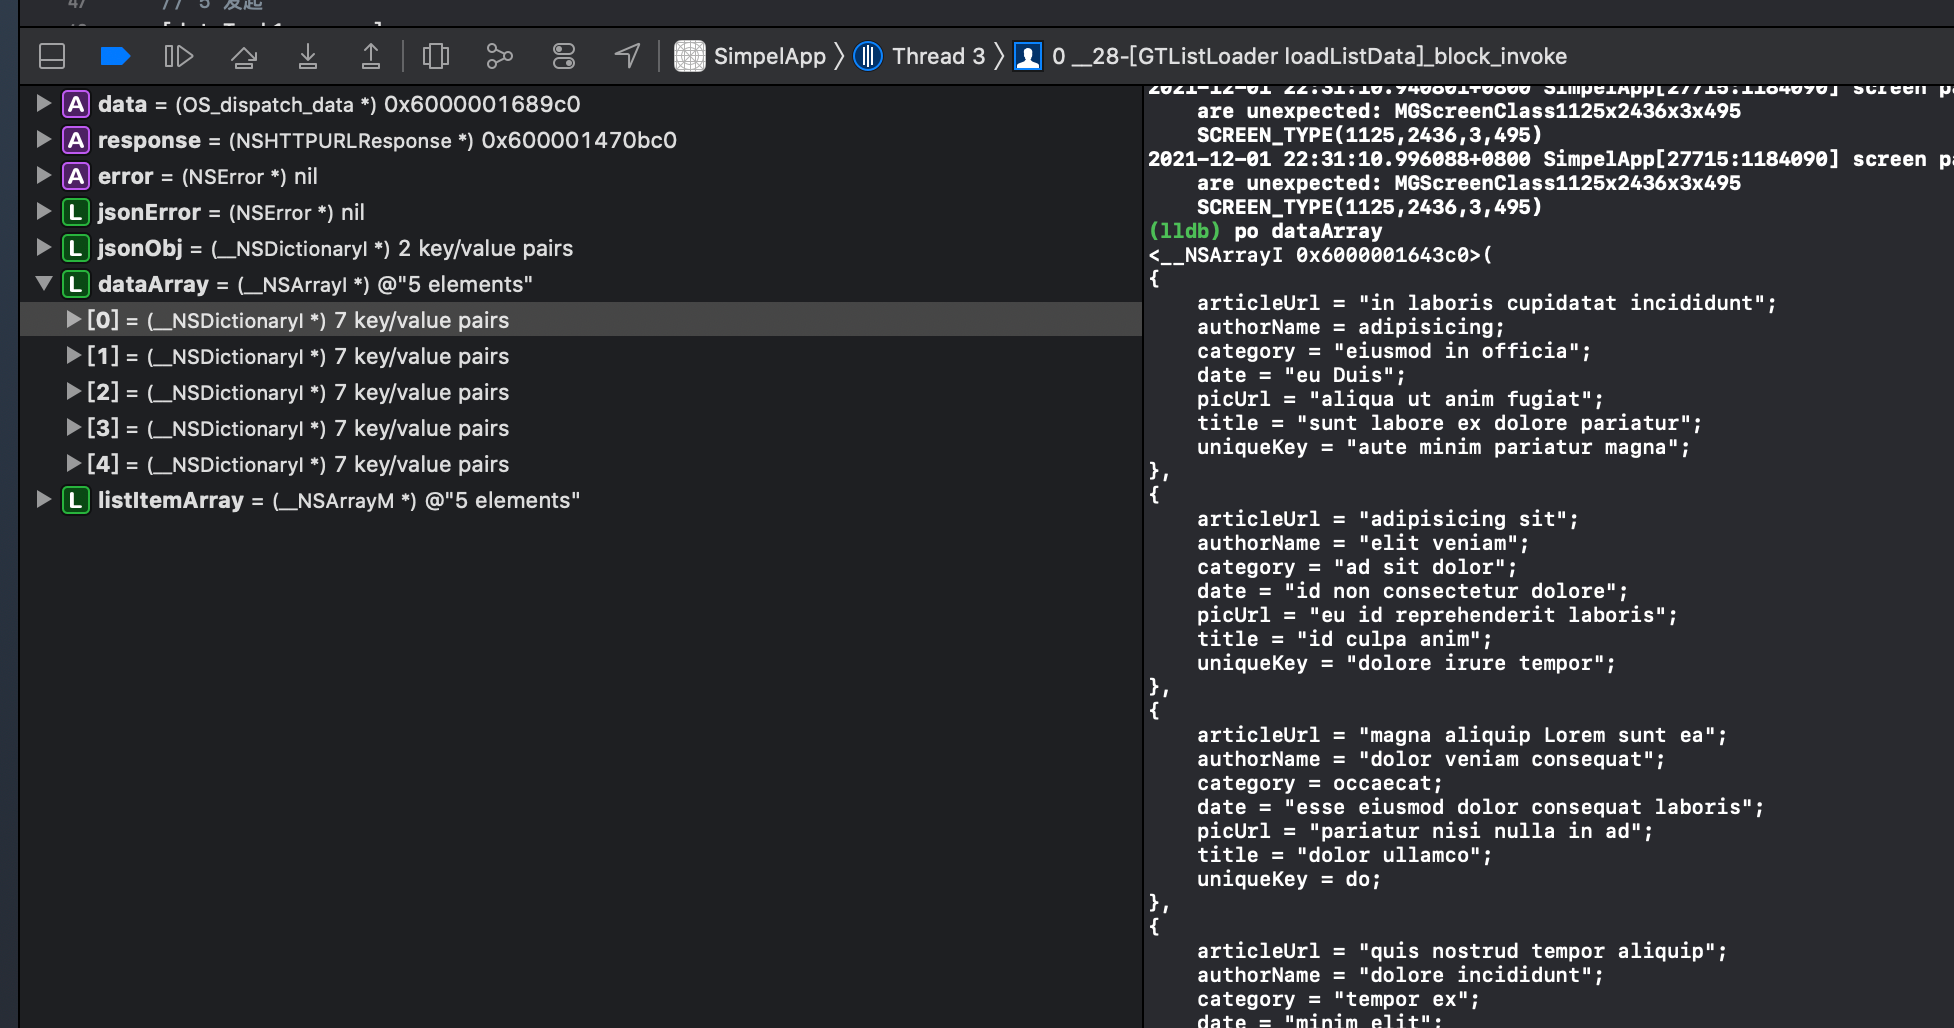
然后我们打个断掉调试一下就变成这样了

基于Model的数据流处理
意思是把JSON给包装成Oc的Object 这种结构化的书籍
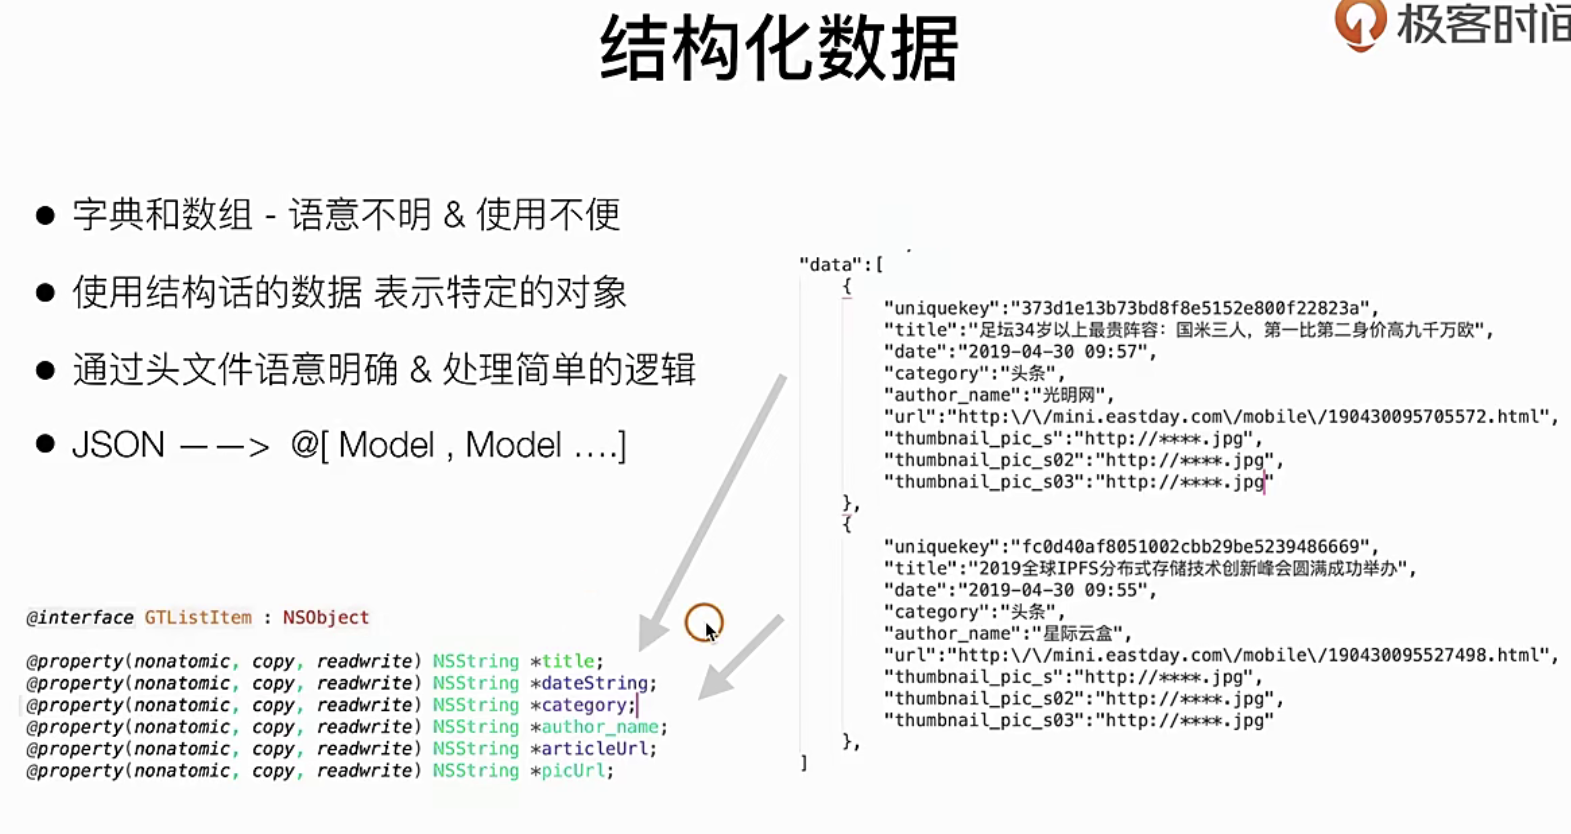
自己写是可以实现的,但也有社区的开源方案:具体如下
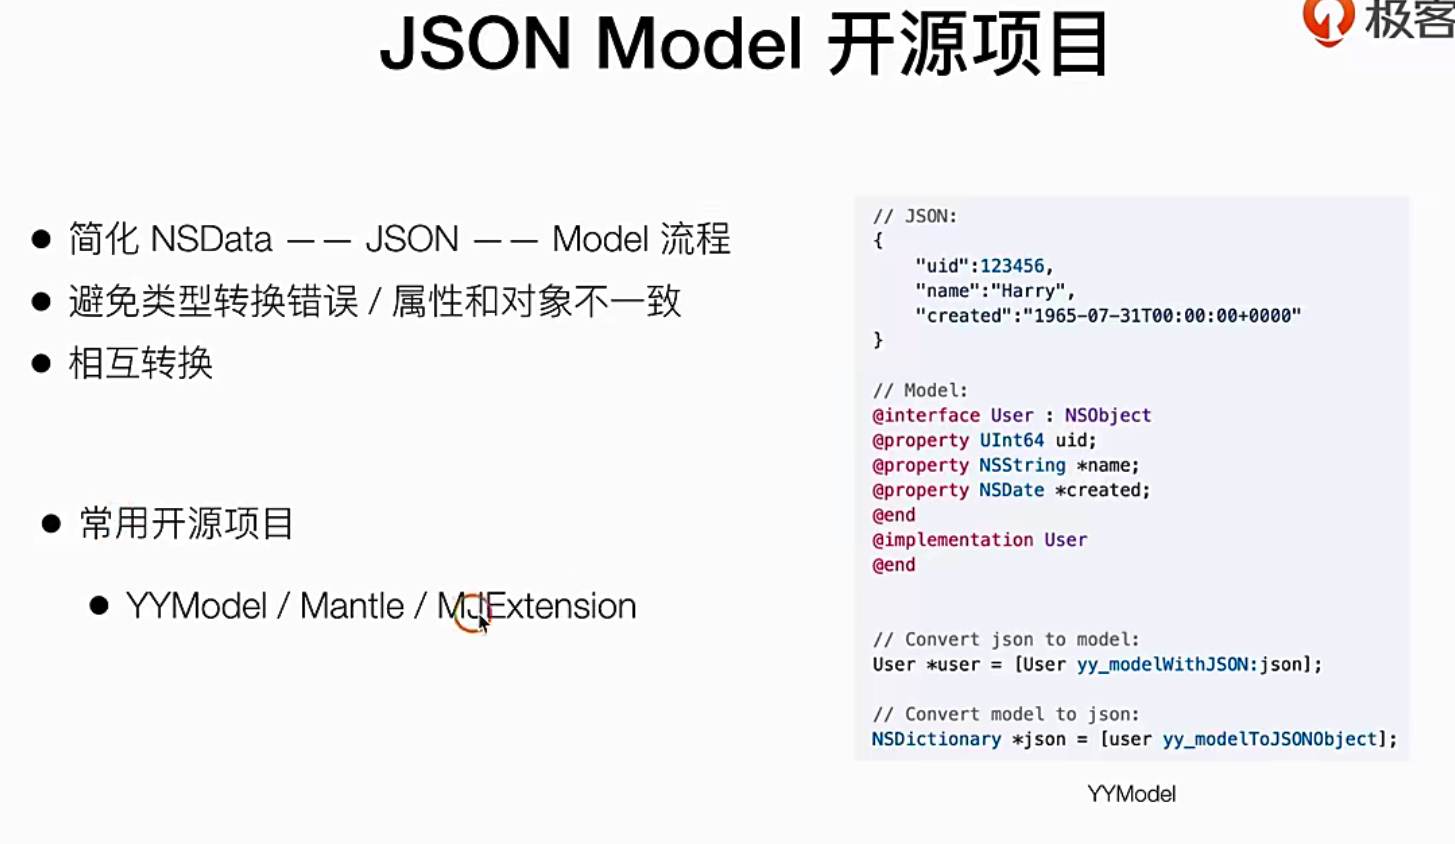
推荐使用YYModel这些开源项目主要是为了预防类型异常出现导致的问题
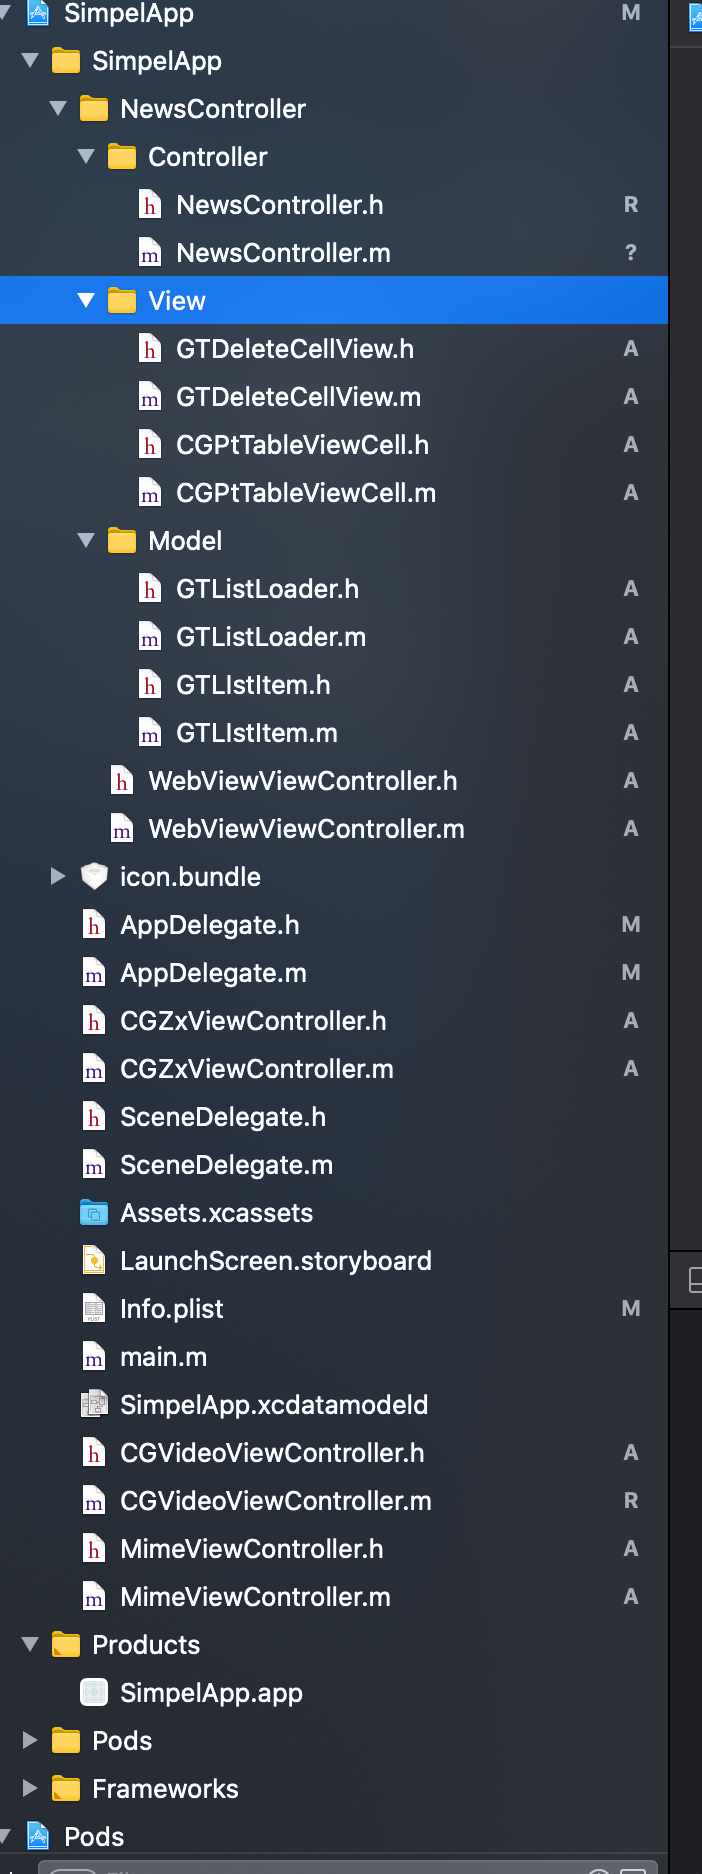
我们先来调整文件夹组织结构
代码实现
下面的代码主要干这几件事情
调整原来的目录结构把news 聚合起来成一个MVC 结构,把外面的loader也拿进来
创建爱你一个Model 用来结构化JSON数据
设置此Model的实现的类型声明
在接口处,还它赋值
# h声明文件
#import <Foundation/Foundation.h>

NS_ASSUME_NONNULL_BEGIN
/**
 列表结构化数据
 */
@interface GTLIstItem : NSObject

@property(nonatomic, copy, readwrite ) NSString *category;
@property(nonatomic, copy, readwrite ) NSString *picUrl;
@property(nonatomic, copy, readwrite ) NSString *uniqueKey;
@property(nonatomic, copy, readwrite ) NSString *title;
@property(nonatomic, copy, readwrite ) NSString *date;
@property(nonatomic, copy, readwrite ) NSString *authorName;
@property(nonatomic, copy, readwrite ) NSString *articleUrl;

- (void) configWithDictionary: (NSDictionary *)dictionary;
@end

NS_ASSUME_NONNULL_END


# 实现m文件
#import "GTLIstItem.h"

@implementation GTLIstItem

- (void) configWithDictionary: (NSDictionary *)dictionary {

#warning 类型匹配和容错
   self. category = [dictionary objectForKey:@"category"];
   self. picUrl = [dictionary objectForKey:@"picUrl"];
   self. uniqueKey = [dictionary objectForKey:@"uniqueKey"];
   self. title = [dictionary objectForKey:@"title"];
   self. date = [dictionary objectForKey:@"date"];
   self. authorName = [dictionary objectForKey:@"authorName"];
   self. articleUrl = [dictionary objectForKey:@"articleUrl"];
};
@end
//
//  GTListLoader.m
//  SimpelApp
//
//  Created by 李仕增 on 2021/11/12.
//

++++++
//    6. 解析数据
        NSError *jsonError;
        id jsonObj = [NSJSONSerialization JSONObjectWithData:data options:0 error:&jsonError];

//        7. 赋值结构化 dataArray就是你的结构化数据啦
        NSArray *dataArray = [  (
                                 (NSDictionary *)[ (
                                                    (NSDictionary *)jsonObj  // 先强制装换到NSDictionary
                                                    ) objectForKey:@"res" ] // 调用objectForKey方法得到又一个JSON然后再次强转到NSDictionary
                                 ) objectForKey:@"data"   ]; // 再调用key 取值
        NSMutableArray *listItemArray = @[].mutableCopy;
        for (  NSDictionary *info in dataArray ) {
            GTLIstItem *listItem = [[GTLIstItem alloc] init];
            [listItem configWithDictionary:info];
            [listItemArray addObject:listItem];
        }


        NSLog(@"");
    }]; // 这个NSURLSessionDataTask 属于session1下的 session1是一个单例

    // 5 发起
    [dataTask1 resume];

    NSLog(@"");
};

@end
把加载好的数据渲染到项目中去
主要是讲一下如何渲染数据

实践指南
喂了我们的ListContainer能更方便的获取到我们的Model数据我们使用 block来进行操作
你可以使用快捷的Xcode操作,直接拖入一个Block快就好了
#   GTListLoader.h

#import <Foundation/Foundation.h>
@class GTLIstItem; // 为了避免在H文件中过度的引入依赖我们声明一下就好了,具体用到的时候再自己去引入
typedef void(^GTLisrLoaderFinishBlock)(BOOL success, NSArray<GTLIstItem *> *dataArray); // 定一个一个C语言类型的Block 返回值说void ,参数一个BOOL,返回值说一个NSArray
NS_ASSUME_NONNULL_BEGIN

///  列表请求
@interface GTListLoader : NSObject
- (void)loadListDataWithFinishBlock: (GTLisrLoaderFinishBlock)finishBlock; // 实现这个函数 这个函数调用的时候回在回掉的时候返回一个经过网络和modal包装好的书籍结构给你
@end

NS_ASSUME_NONNULL_END


#   GTListLoader.m
#import "GTListLoader.h"
#import "AFNetworking.h"
#import "GTListItem.h"
@implementation GTListLoader

- (void)loadListDataWithFinishBlock: (GTLisrLoaderFinishBlock)finishBlock {
+++++
  //  8 进行数据包装处理 注意为了体验和我们把这个操作放到主线层去因为列表的绘制也在主线程
        dispatch_async(dispatch_get_main_queue(), ^{
            if(finishBlock){
                finishBlock(error === nil, listItemArray.copy);
            };
        });
++++++
};

@end


# 然后我们去调用的地方看看如何使用 请关注重点代码    NewsController.m
#import "NewsController.h"
#import "CGPtTableViewCell.h"
#import "GTDeleteCellView.h"
#import "WebViewViewController.h"
#import "GTListLoader.h"


@interface NewsController ()<UITableViewDataSource, UITableViewDelegate, CGPtTableViewCellDelegate>
// 把tabView变成一个属性
@property(nonatomic, strong, readwrite) UITableView *tabView;
// 把原来的个数变成一个数组   因为待会删除的时候是一点点的pop
@property(nonatomic, strong, readwrite) NSArray *dataArray;
@property(nonatomic, strong, readwrite) GTListLoader *listLoader;
@end

@implementation NewsController

- (instancetype)init {
	self = [super init];  // 这里去掉了原来的东西换成真实的数据
	return self;
};


- (void)viewDidLoad {
	[super viewDidLoad];
	self.view.backgroundColor = [UIColor whiteColor];

	_tabView = [[UITableView alloc] initWithFrame:self.view.bounds];
	[self.view addSubview: _tabView];

	// 拿到UITabView的DataSource delegate
	_tabView.dataSource = self;
	// 拿到UITabView的 delegate
	_tabView.delegate = self;

//    开始去加载真实的网络数据
	self.listLoader = [[GTListLoader alloc] init];

//    依然要处理循环引用的问题 (重点)++++
	__weak typeof(self) weself = self;
	[self.listLoader loadListDataWithFinishBlock:^(BOOL success, NSArray<GTLIstItem *> *dataArray) {
	         __strong typeof(self) strongSelf = weself;
	         // 赋值和relaod
	         strongSelf.dataArray = dataArray;
	         [strongSelf.tabView reloadData];
	 }];
}

#pragma mark NewsController

- (NSInteger)tableView:(UITableView *)tableView numberOfRowsInSection:(NSInteger)section {
	return _dataArray.count;
};

- (void)tableView:(UITableView *)tableView didSelectRowAtIndexPath:(NSIndexPath *)indexPath {
	WebViewViewController *viewControoler = [[WebViewViewController alloc] init];
	viewControoler.view.backgroundColor = [UIColor whiteColor];
	viewControoler.navigationItem.title = [NSString stringWithFormat:@"标题 - %@", @(indexPath.row)];

	[self.navigationController pushViewController: viewControoler animated:YES];
};

- (CGFloat)tableView:(UITableView *)tableView heightForRowAtIndexPath:(NSIndexPath *)indexPath {
	return 100.0;
};

- (UITableViewCell *)tableView:(UITableView *)tableView cellForRowAtIndexPath:(NSIndexPath *)indexPath {

	CGPtTableViewCell *cell = [tableView dequeueReusableCellWithIdentifier:@"id"];
	if ( !cell ) {
		cell = [[CGPtTableViewCell alloc] initWithStyle:UITableViewCellStyleSubtitle reuseIdentifier:@"id"];
		cell.delegate = self; //
	}

	// 重点+++++
    [cell layoutInitCellWithItem:[self.dataArray objectAtIndex: indexPath.row] ];  // 依据数据来渲染UI试图

	return cell;
};

- (void)tabViewCell: (UITableViewCell *)tabViewCell clickDeleteButton:(UIButton *)delegateButton {
};
@end


# 然后我们去到每一个cell渲染的地方 把对应的数据拿过去,随便改改样式什么的 请关注 重点+++
//
//  CGPtTableViewCell.m
//  SimpelApp
//
//  Created by 李仕增 on 2021/10/23.
//

#import "CGPtTableViewCell.h"
#import "GTLIstItem.h"  // 重点+++

@interface CGPtTableViewCell ()

@property(nonatomic, strong, readwrite) UILabel *titleLabel;
@property(nonatomic, strong, readwrite) UILabel *sourceLabel;
@property(nonatomic, strong, readwrite) UILabel *commentLabel;
@property(nonatomic, strong, readwrite) UILabel *timeLabel;
@property(nonatomic, strong, readwrite) UIImageView *rightImageView;
@property(nonatomic, strong, readwrite) UIButton *myButton;

@end

@implementation CGPtTableViewCell
+++++
- (void) layoutInitCellWithItem: (GTLIstItem *) item {
    self.titleLabel.text = item.title;
    self.sourceLabel.text = item.authorName;

    self.commentLabel.text = item.category;
    [self.commentLabel sizeToFit];
    self.commentLabel.frame = CGRectMake(self.sourceLabel.frame.origin.x + self.sourceLabel.frame.size.width + 15,  self.commentLabel.frame.origin.y , self.commentLabel.frame.size.width,self.commentLabel.frame.size.height);

    self.timeLabel.text = item.date;
    [self.timeLabel sizeToFit];
    self.timeLabel.frame = CGRectMake(self.commentLabel.frame.origin.x + self.commentLabel.frame.size.width + 15,  self.timeLabel.frame.origin.y , self.timeLabel.frame.size.width,self.timeLabel.frame.size.height);


    // 我们使用网络图片的加载
#warning 暂时这样写先
    UIImage *image = [UIImage imageWithData:[NSData dataWithContentsOfURL:[NSURL URLWithString:item.picUrl]]];

    self.rightImageView.image = image;
    //  这个会返回一个UIImage类
//        self.rightImageView.image = [UIImage imageNamed:@"icon.bundle/home.png"];
}

- (void) myButtonClick {
//  加这段判断的原因是:我们的自定义的Delegate是非必选的,为了避免报错需要这样来兜底处理
    if(self.delegate && [self.delegate respondsToSelector:@selector(tabViewCell:clickDeleteButton:)]  ) {
        [self.delegate tabViewCell:self clickDeleteButton:self.myButton];
    }
}
@end
上面的我们只是把List搞定了,现在我们来处理一下离main的一个Webview的URL地址
//
//  NewsController.m
//  SimpelApp
//
//  Created by 李仕增 on 2021/10/20.
//

#import "NewsController.h"
#import "CGPtTableViewCell.h"
#import "GTDeleteCellView.h"
#import "WebViewViewController.h"
#import "GTListLoader.h"
#import "GTLIstItem.h"


@interface NewsController ()<UITableViewDataSource, UITableViewDelegate, CGPtTableViewCellDelegate>
// 把tabView变成一个属性
@property(nonatomic, strong, readwrite) UITableView *tabView;
// 把原来的个数变成一个数组   因为待会删除的时候是一点点的pop
@property(nonatomic, strong, readwrite) NSArray *dataArray;
@property(nonatomic, strong, readwrite) GTListLoader *listLoader;
@end

@implementation NewsController


+++++

#pragma mark NewsController
++++

- (void)tableView:(UITableView *)tableView didSelectRowAtIndexPath:(NSIndexPath *)indexPath {
    GTLIstItem *item = [self.dataArray objectAtIndex: indexPath.row];
	WebViewViewController *viewControoler = [[WebViewViewController alloc] initWithUrlString:item.picUrl];
	viewControoler.view.backgroundColor = [UIColor whiteColor];
	viewControoler.navigationItem.title = [NSString stringWithFormat:@"标题 - %@", @(indexPath.row)];

	[self.navigationController pushViewController: viewControoler animated:YES];
};
++++
@end


//
//  WebViewViewController.m

#import "WebViewViewController.h"
#import <WebKit/WebKit.h>  // 引入webkit

@interface WebViewViewController () <WKNavigationDelegate>
@property(nonatomic, strong, readwrite) WKWebView *webView;
@property(nonatomic, strong, readwrite) UIProgressView *webProgreess;
@property(nonatomic, copy, readwrite) NSString *articleUrl;

@end

@implementation WebViewViewController


-(instancetype) initWithUrlString : (NSString *)urlString {
    self = [super init];
    if (self) {
        self.articleUrl = urlString;
    };
    return  self;
};

#pragma DidLoad
- (void)viewDidLoad {
	  +++++
    [self.webView loadRequest:[NSURLRequest requestWithURL:[NSURL URLWithString:self.articleUrl]]];
    +++++

@end