IOS开发:图片存储、多媒体处理与布局适配
June 17, 2025 (1y ago)
IOS中图片的存储
理论知识
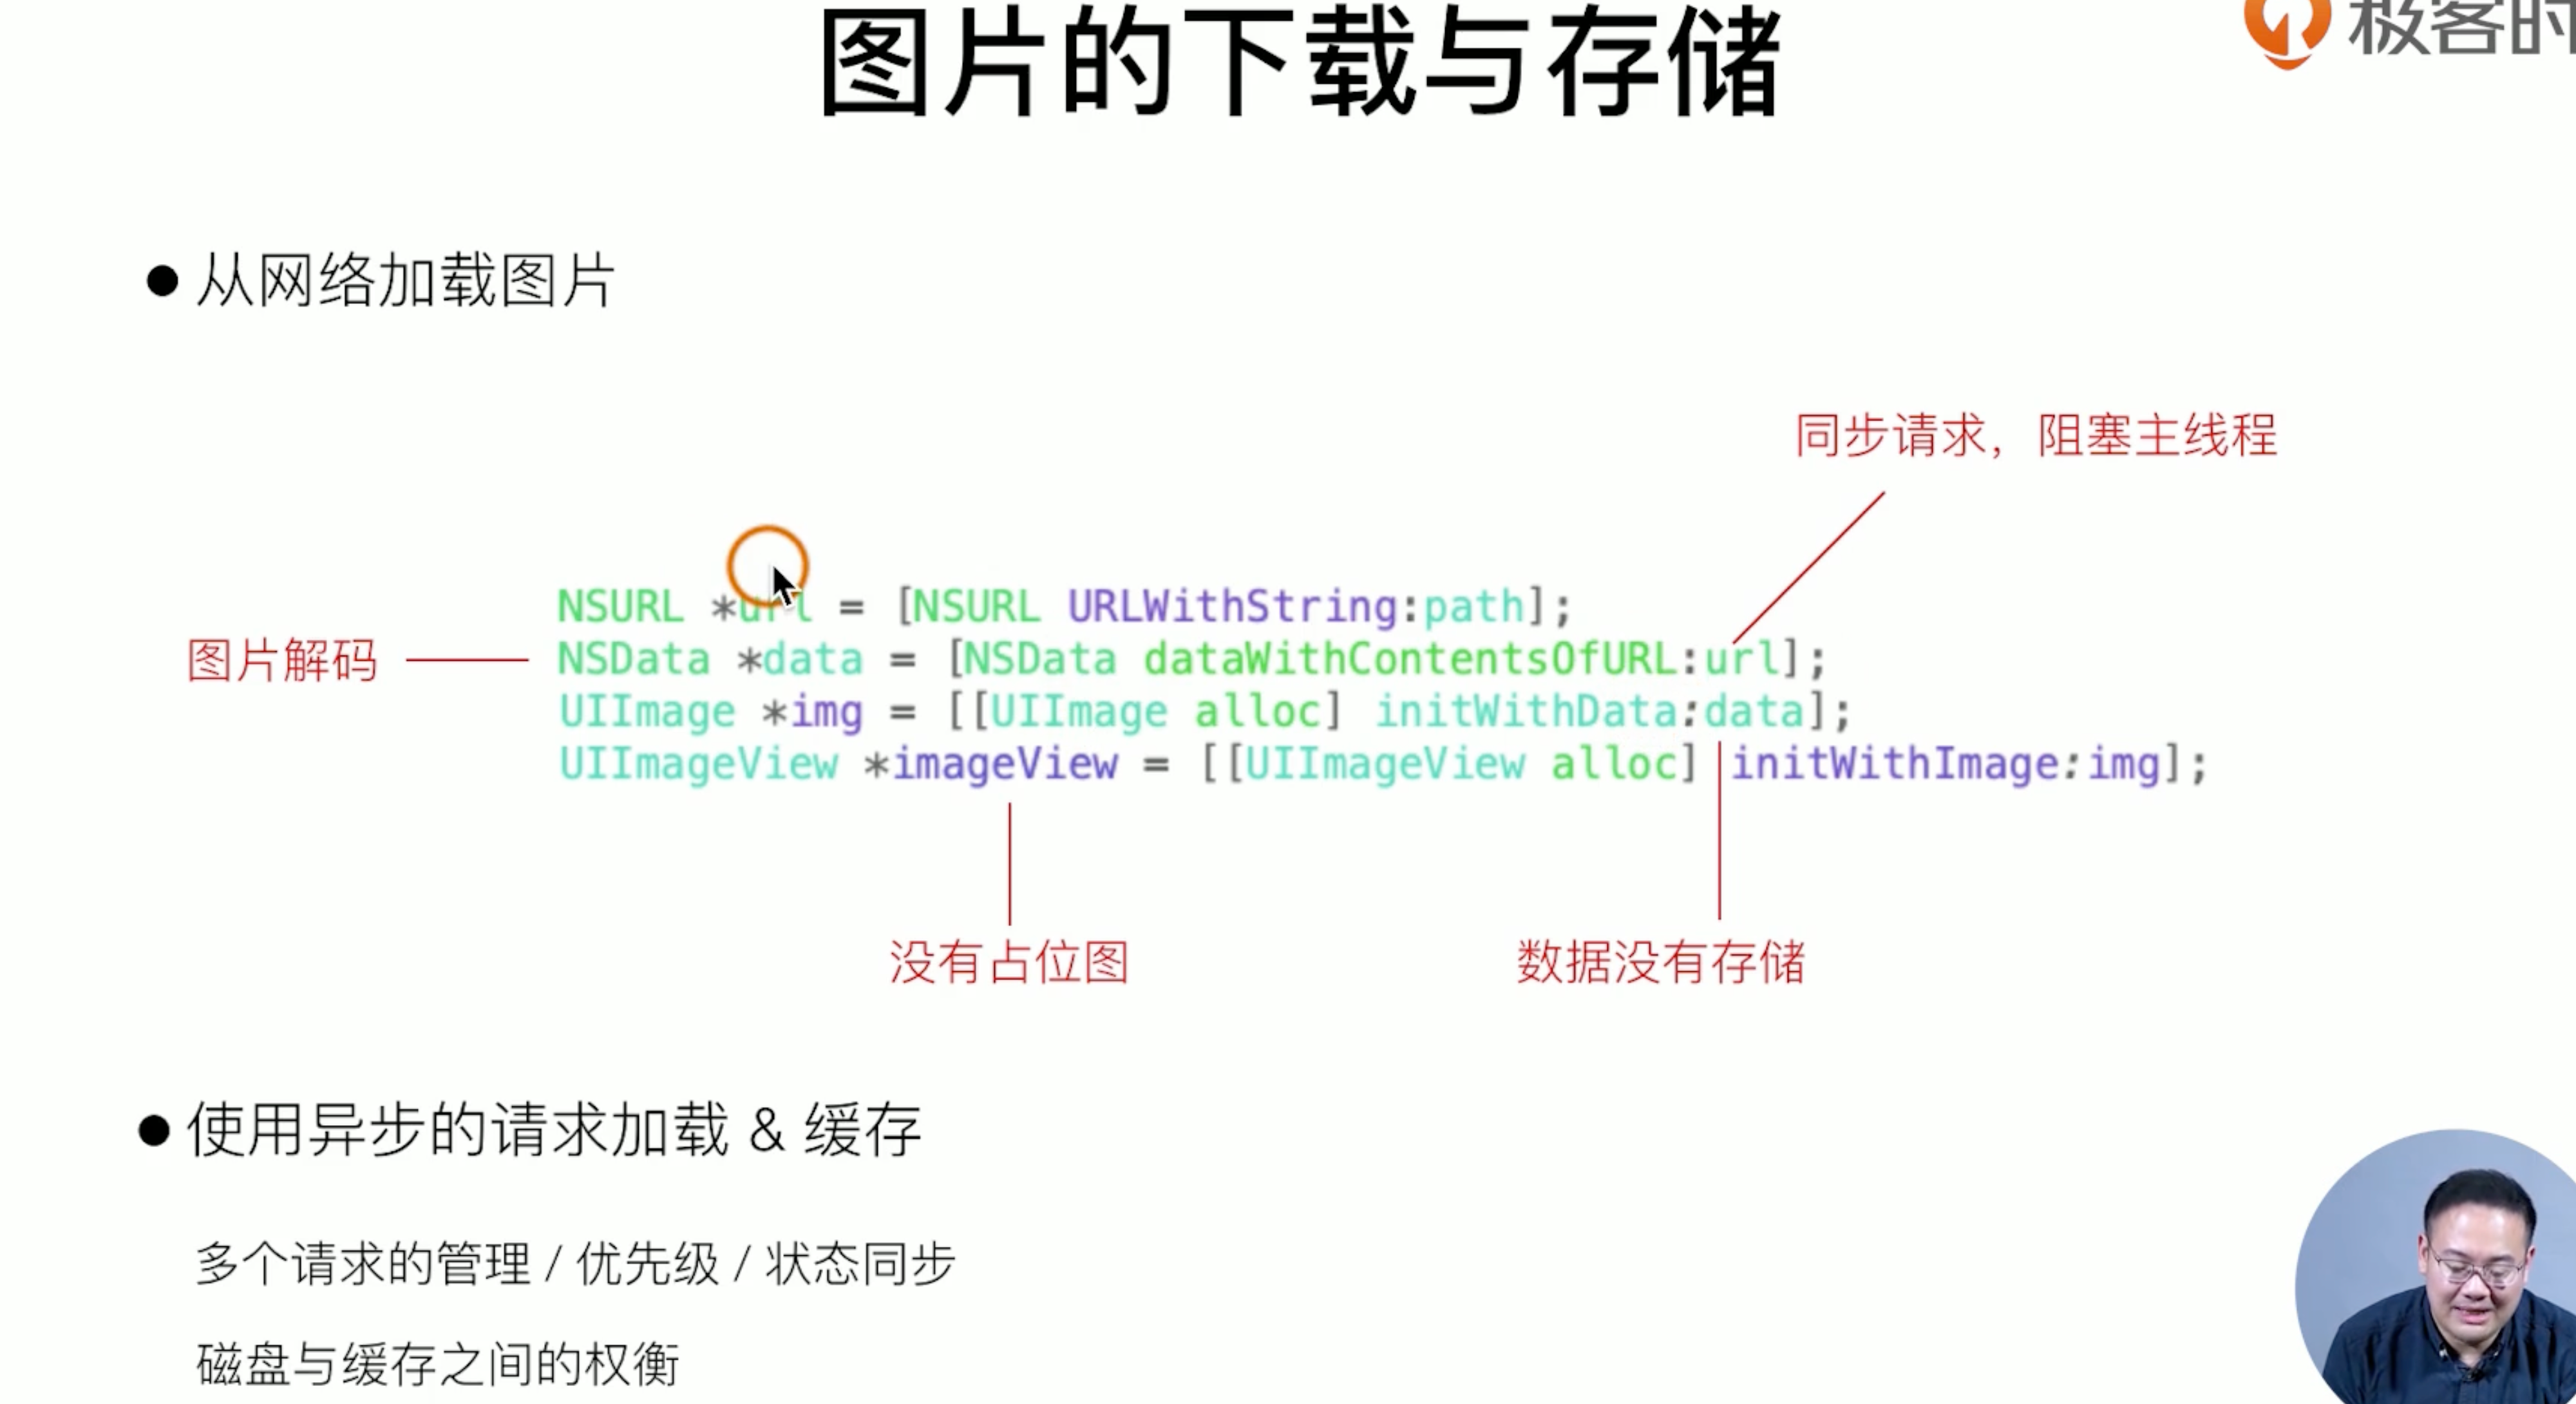
对于资源来说,读取网络是最耗时的,存储本地是最方便的。上述就是ios加载一张图片的过程,那么有没有 好的处理方案呢?是有的下面就是方案,是整个图片的存储方案和过程
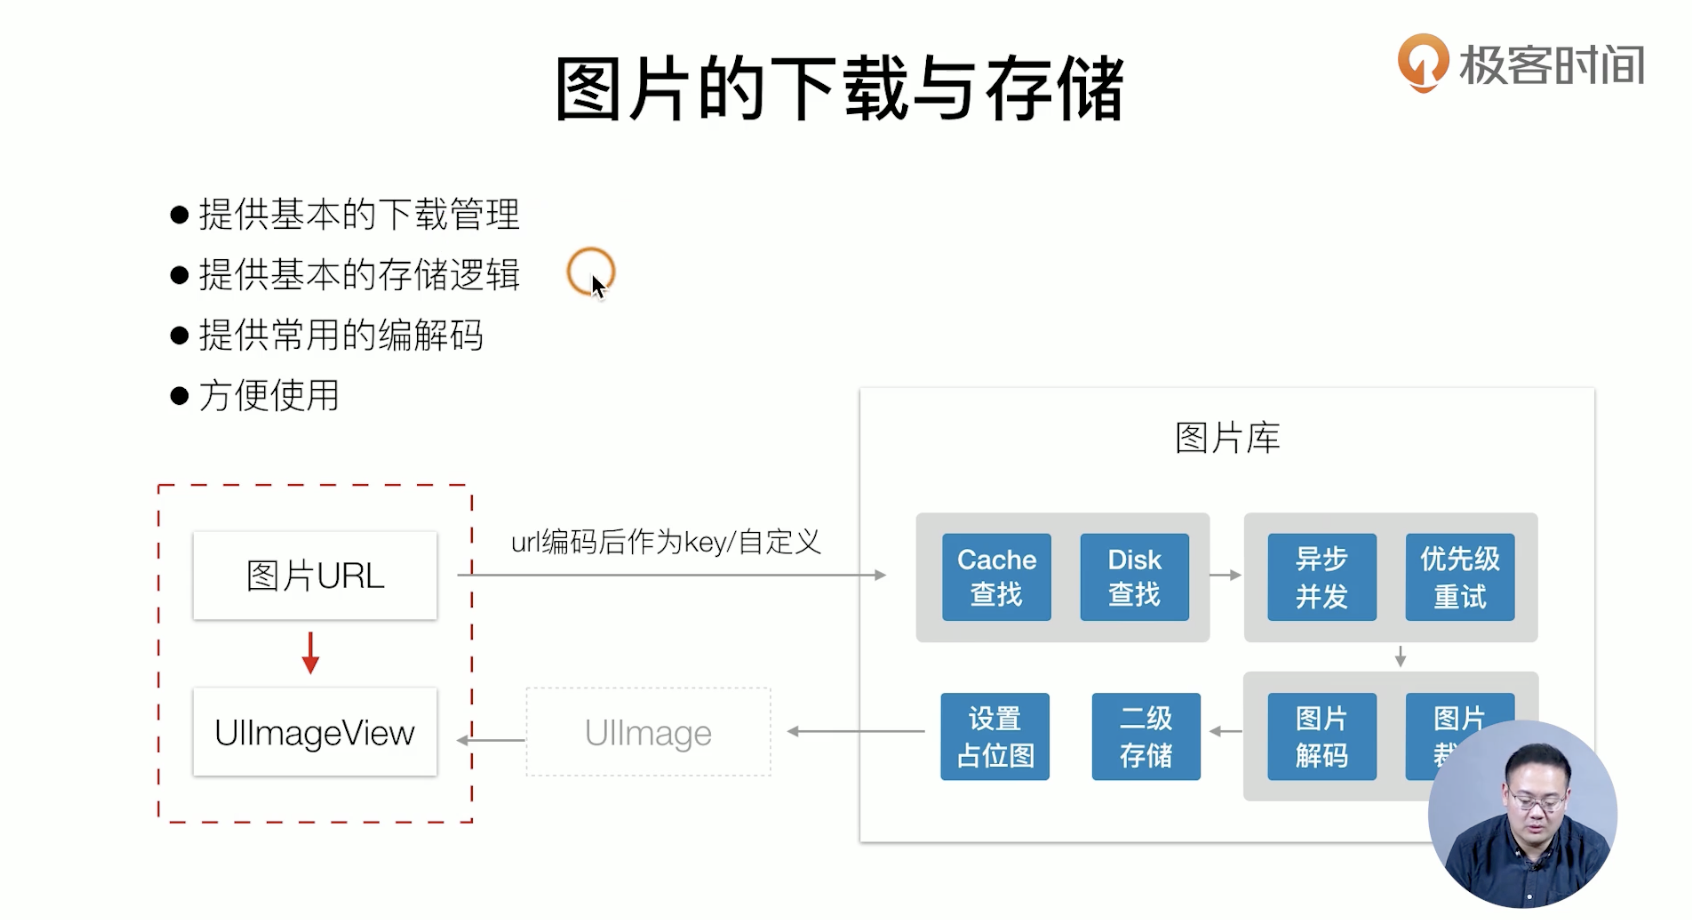
我们常用的就是一个开源框架SDWebImgae 其底层就算上述的

代码指南
我们现在就用cocoapod引入一个 开源的框架SDWebImg
第一步呢,我们要用使用cocapads 下载这个开源的库下来,
- 编辑我们的podfile文件
target 'SimpelApp' do
  pod 'AFNetworking'
  pod 'SDWebImage'
end- 命令行走起来
pod update编码开始
#import "CGPtTableViewCell.h"
#import "GTLIstItem.h"
#import "SDWebImage.h"
++++
- (void) layoutInitCellWithItem: (GTLIstItem *) item {
++++
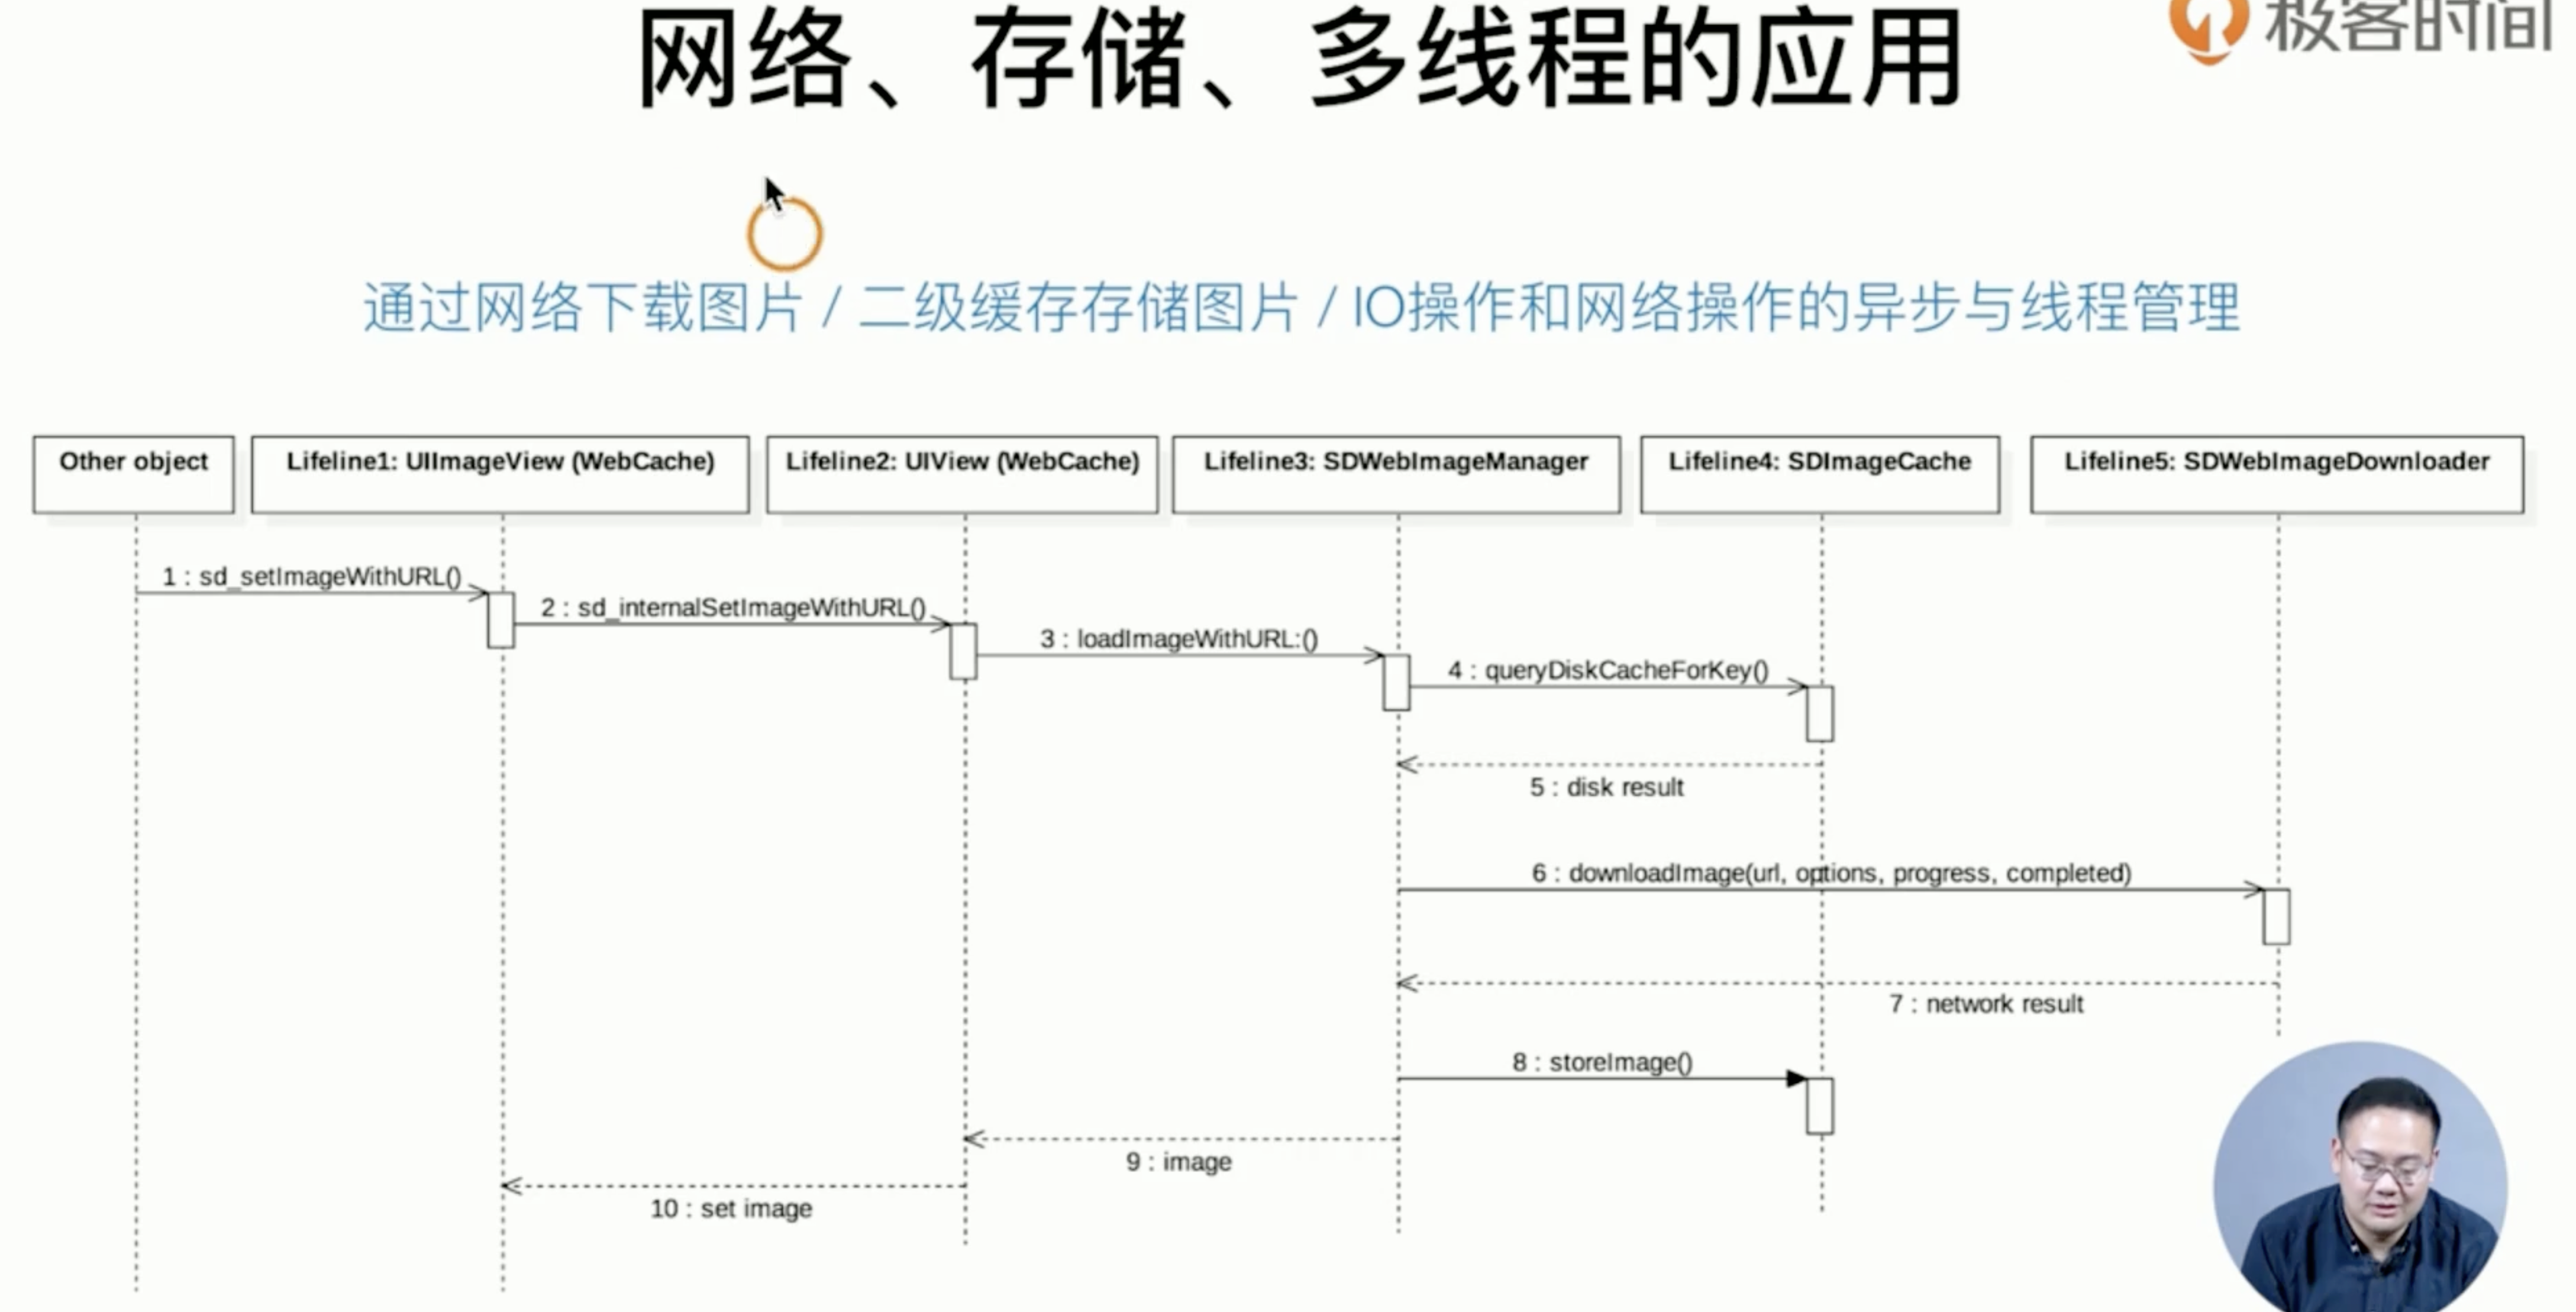
// 使用SDWebImage实现图片的加载 逻辑如下:先看看缓存中有没有,没有就去加载,然后把加载出的图片存到缓存中去
[self.rightImageView sd_setImageWithURL:[NSURL URLWithString:item.picUrl]
completed:^(UIImage * _Nullable image, NSError * _Nullable error, SDImageCacheType cacheType, NSURL * _Nullable imageURL) {
NSLog(@"666");
}];
//基本上这些网图片框架都是围绕换存展位图内存,实际上最后如何实现 采用什么样的方案,都是需要深如思考的
}
@end
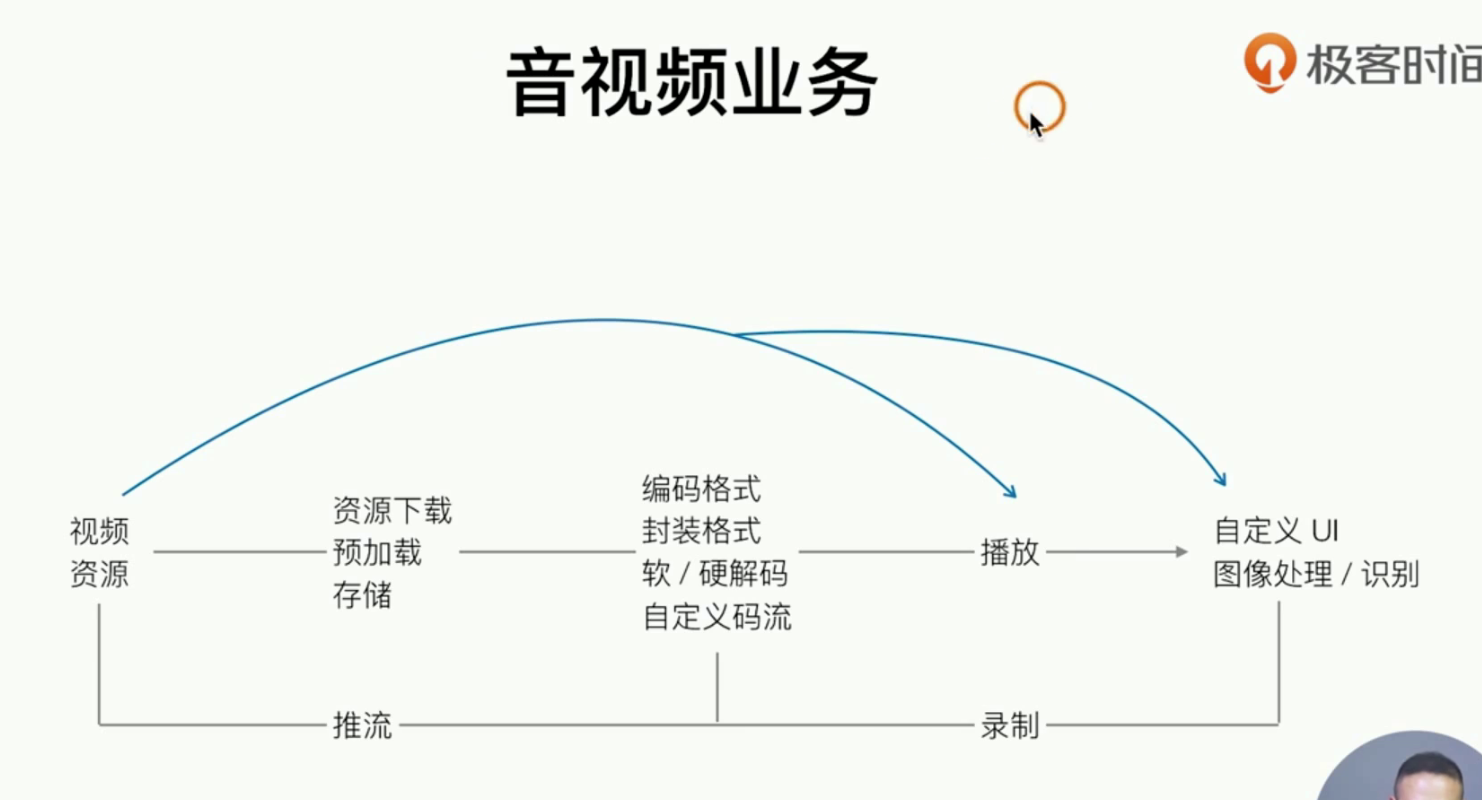
我们来聊聊IOS多媒体处理
音视频资源处理
理论知识
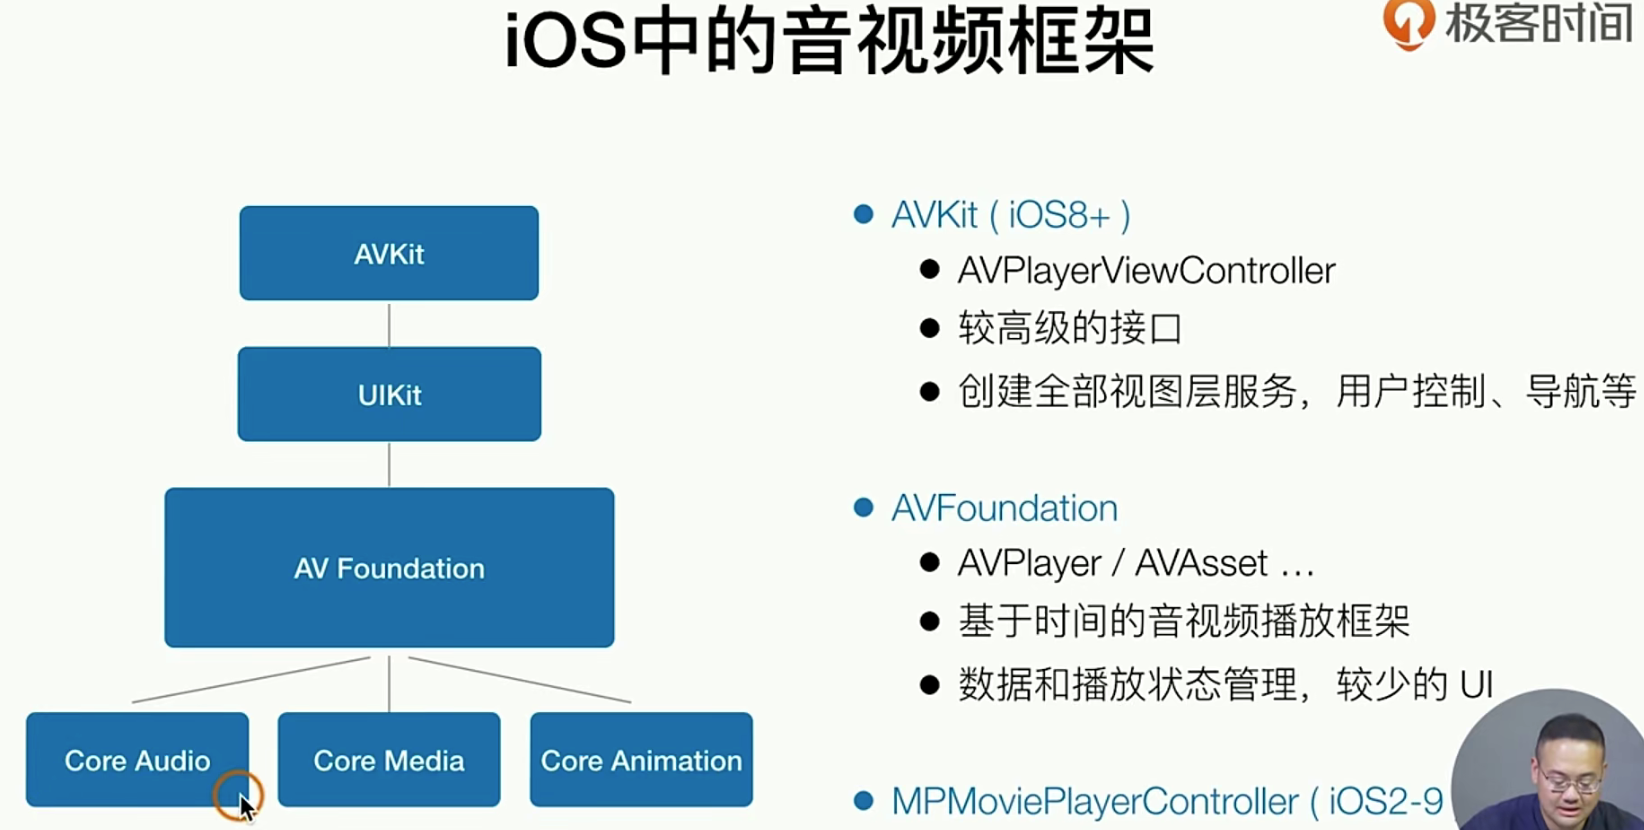
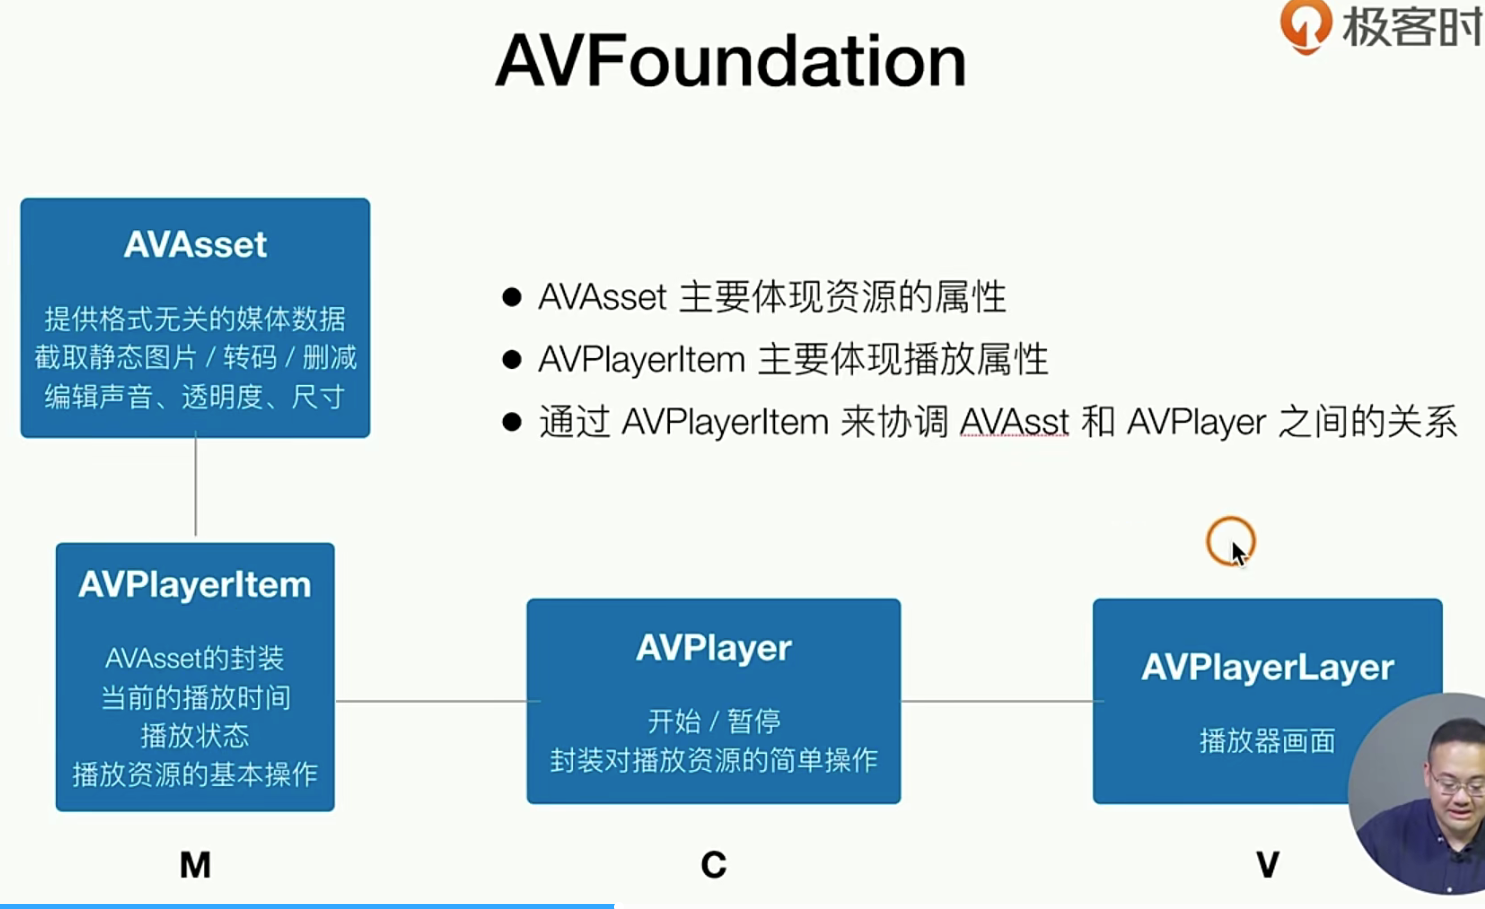
注意:这里有很多我们之前说过的知识 比如Layer而不是一个View , 对于IOS中的音视频,我们只需要掌握上面的三个就够了哈。

重构视频列表
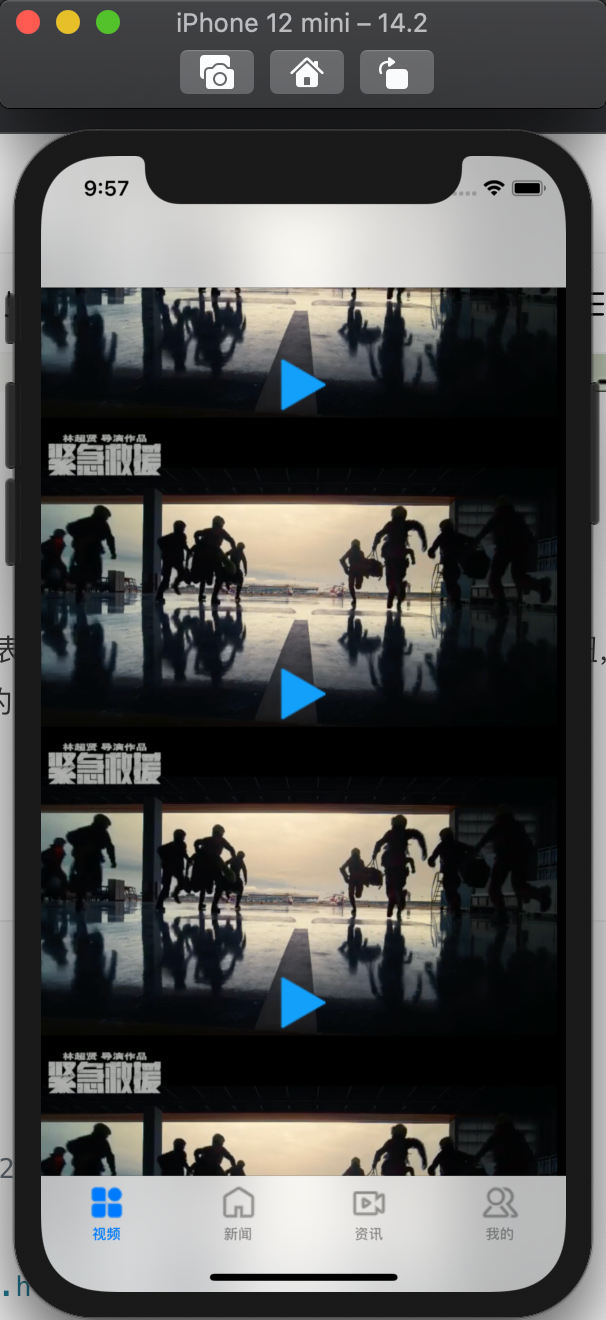
我们目前希望做的效果就是做先把视频列表做好,(取视频的第一征,和一个播放按钮,item组件初始化的时候需要自定义一个初始化函数可以把Video的第一征+视频url地址传入其中)
它呢大概就是长成了下面这个样子
# 第一步我们新增一个文件,h m 这两就是Item的组件类

# .h
#import <UIKit/UIKit.h>

NS_ASSUME_NONNULL_BEGIN

@interface GTVideioCoverCell : UICollectionViewCell
- (void) layoutWithVideoCoverUrl:(NSString *)videoCoverUrl  videoUrl: (NSString *)videoUrl;
@end

NS_ASSUME_NONNULL_END


# .m
#import "GTVideioCoverCell.h"

@interface GTVideioCoverCell()
@property(nonatomic, strong, readwrite) UIImageView *coverView;
@property(nonatomic, strong, readwrite) UIImageView *playButton;
@property(nonatomic, strong, readwrite) NSString *VideoUrl;
@end

@implementation GTVideioCoverCell

- (instancetype)initWithFrame:(CGRect)frame{
    self = [super initWithFrame:frame];
    if(self){
        [self addSubview:({
            _coverView  = [[UIImageView alloc] initWithFrame:CGRectMake(0, 0, frame.size.width, frame.size.height)];
            _coverView;
        })];

        [self addSubview:({
            _playButton  = [[UIImageView alloc] initWithFrame:CGRectMake((frame.size.width - 50) / 2, (frame.size.width - 50) / 2 , 50, 50)];
        })];

        UITapGestureRecognizer *tapGesture = [[UITapGestureRecognizer alloc] initWithTarget:self action:@selector(_tapClick)];
        [self addGestureRecognizer: tapGesture];
    }
    return  self;
};

#pragma mark - public method
- (void) layoutWithVideoCoverUrl:(NSString *)videoCoverUrl  videoUrl: (NSString *)videoUrl {
    _coverView.image = [UIImage imageNamed:videoCoverUrl];
    _playButton.image = [UIImage imageNamed:@"icon.bundle/palyer-start.png"];
    _VideoUrl = videoUrl;
};

#pragma mark - private method
- (void)_tapClick {
    NSLog(@"");
};
@end
然后我们在使用的时候只需要这样 传入数据就好了
# 这个就是我们之前做的 整个视频列表页面的Controller
//  CGVideoViewController.m
//  SimpelApp
//
//  Created by 李仕增 on 2021/10/22.
//

#import "CGVideoViewController.h"
#import "GTVideioCoverCell.h"


@interface CGVideoViewController ()<UICollectionViewDelegate,UICollectionViewDataSource>

@end
@implementation CGVideoViewController

- (instancetype) init {
    self = [super init];
    if (self) {
        self.view.backgroundColor = [UIColor orangeColor];
        self.tabBarItem.title =@"视频";
        self.tabBarItem.image = [UIImage imageNamed:@"icon.bundle/all.png"];
        self.tabBarItem.selectedImage = [UIImage imageNamed:@"icon.bundle/allActive.png"];
    }
    return  self;
};

- (void)viewDidLoad {
    [super viewDidLoad];

    UICollectionViewFlowLayout *flowLayout  = [[UICollectionViewFlowLayout alloc] init];
    flowLayout.minimumLineSpacing = 10;
    flowLayout.minimumInteritemSpacing = 10;
    // 做一个16 * 9  View
    flowLayout.itemSize = CGSizeMake( self.view.bounds.size.width,  self.view.bounds.size.width /16 * 9 );


    UICollectionView *collectionViee = [[UICollectionView alloc] initWithFrame:self.view.bounds collectionViewLayout:flowLayout];


    collectionViee.delegate =self;
    collectionViee.dataSource =self;

    [collectionViee registerClass:[GTVideioCoverCell class] forCellWithReuseIdentifier:@"GTVideioCoverCell"];
    [self.view addSubview:collectionViee];
};


- (NSInteger)collectionView:(UICollectionView *)collectionView numberOfItemsInSection:(NSInteger)section {
    return 20;
};


- (__kindof UICollectionViewCell *)collectionView:(UICollectionView *)collectionView cellForItemAtIndexPath:(NSIndexPath *)indexPath{
    // 默认的大小是50 * 50的大小哈
    UICollectionViewCell *cell = [collectionView dequeueReusableCellWithReuseIdentifier:@"GTVideioCoverCell" forIndexPath:indexPath];
    cell.backgroundColor = [UIColor systemPinkColor];
    // 处理一些特殊的逻辑
  ++++重点代码!
    if([cell isKindOfClass:[GTVideioCoverCell class]]){
        [((GTVideioCoverCell *) cell) layoutWithVideoCoverUrl:@"icon.bundle/cover.png" videoUrl:@"http://vfx.mtime.cn/Video/2019/03/19/mp4/190319222227698228.mp4"];
    }
    return cell;
};


@end
以上就是 最基础的视频列表的重构
现在让我们创建一个可以播放的视频
我们接下来要做一个 点击就能让视频播放的功能,最终的效果如下
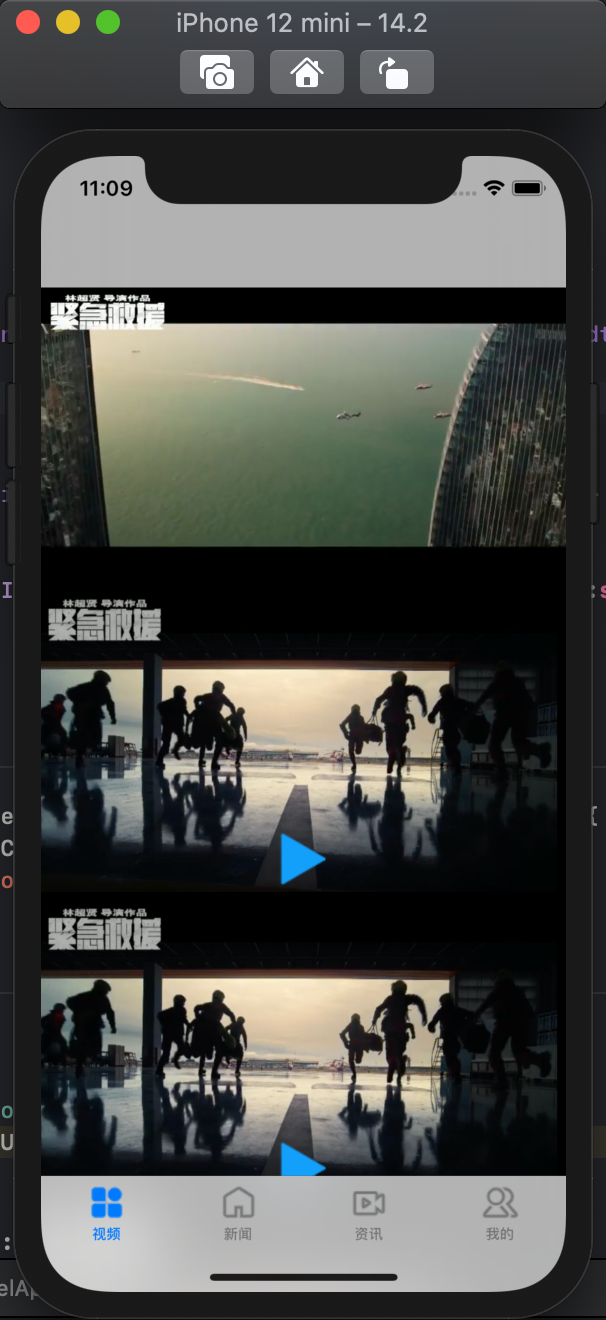
我们只需要在点击的时候 ,按照上面的步骤 ,就能创建一视频播放区域
+++++
#import "GTVideioCoverCell.h"
#import <AVFoundation/AVFoundation.h>  // 很重要!记得导入
+++++
# 修改一下这里,要不然按钮就叠加到视频layer之上
    if(self){
        [self addSubview:({
            _coverView  = [[UIImageView alloc] initWithFrame:CGRectMake(0, 0, frame.size.width, frame.size.height)];
            _coverView;
        })];

      // _coverView 上家subView
        [_coverView addSubview:({
            _playButton  = [[UIImageView alloc] initWithFrame:CGRectMake((frame.size.width - 50) / 2, (frame.size.width - 50) / 2 , 50, 50)];
        })];

        UITapGestureRecognizer *tapGesture = [[UITapGestureRecognizer alloc] initWithTarget:self action:@selector(_tapClick)];
        [self addGestureRecognizer: tapGesture];
    }
+++++
- (void)_tapClick {
//  使用URL生产一个Asset
    NSURL *videoURL = [NSURL URLWithString:_VideoUrl];
    AVAsset *asset = [AVAsset assetWithURL:videoURL];

//  使用asset 生产一个Player
    AVPlayer *avPlayer = [AVPlayer playerWithURL:videoURL];

//  生成一个Layer设置大写并且播放它
    AVPlayerLayer *palyerLayer = [AVPlayerLayer playerLayerWithPlayer:avPlayer];
    palyerLayer.frame = _coverView.bounds;
    [_coverView.layer addSublayer:palyerLayer];
    [avPlayer play];

};
试一下如何做一个更多的功比如暂停什么的
理论知识
在回顾一下 OC类与类通信方式deleagte(传函数回调,只能一对一)KVO(监听值变化,解决了一对一的问题)notiifcationi(一对多,就是一个广播事件)
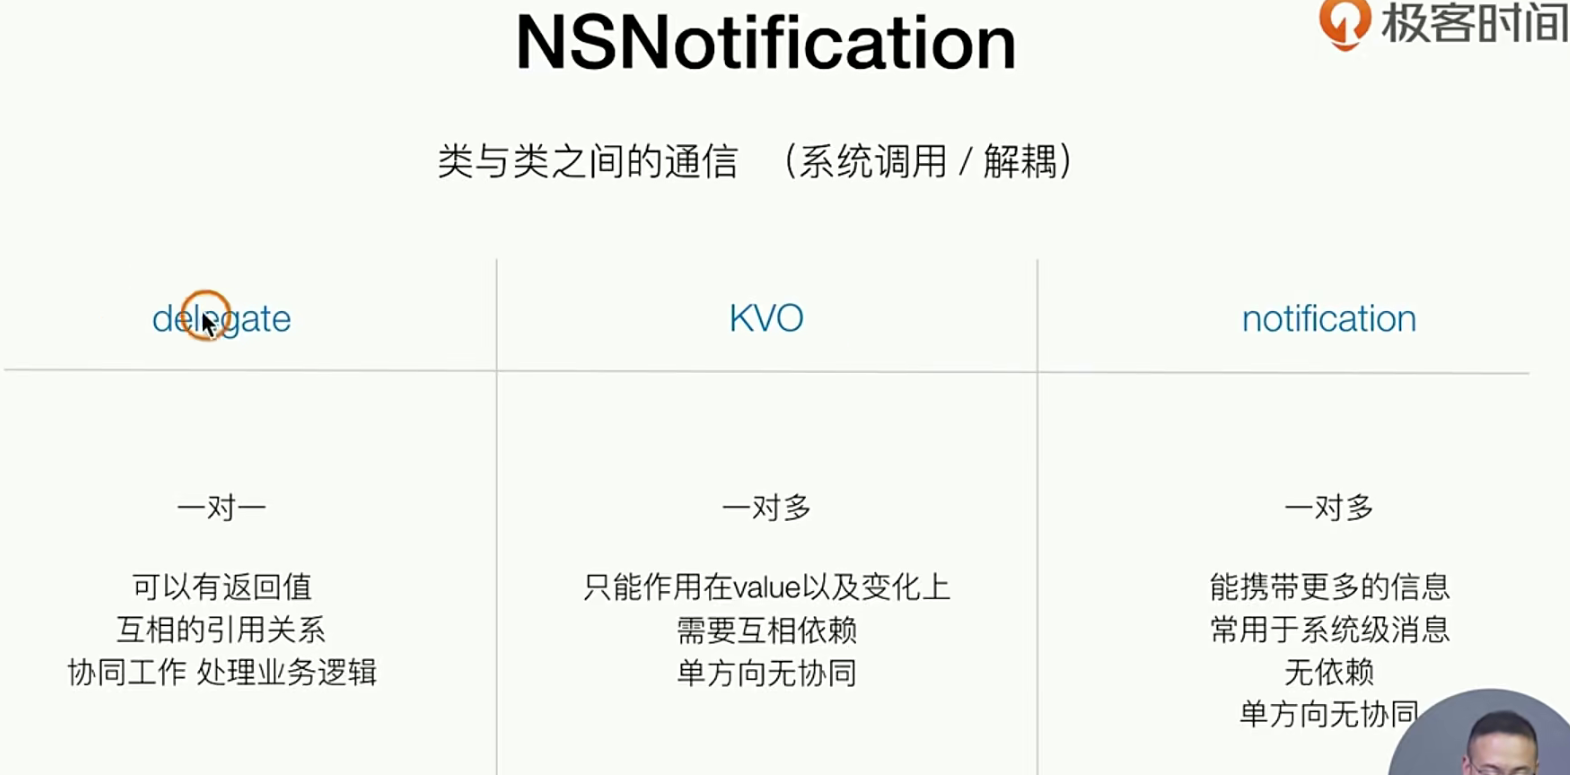
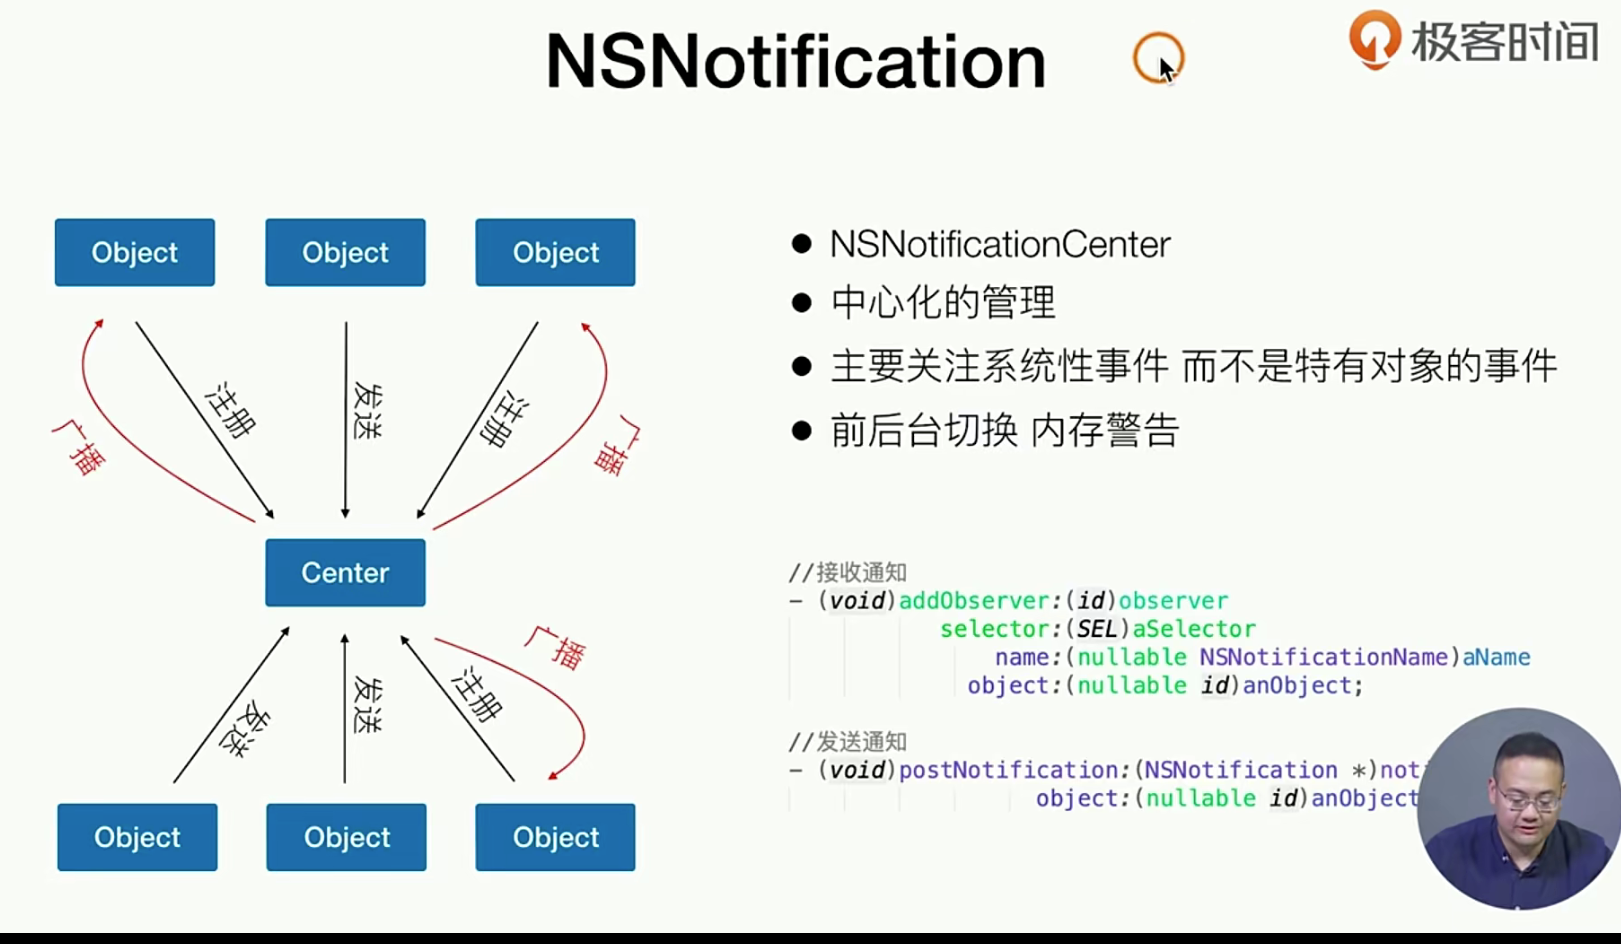
这个东西就是一个发布订阅很像但是又不是很像。如果你晓得发布订阅,和观察者模式 请看下面的文章:发布订阅 / 观察者模式
小试牛刀 Notification
下面我们的代码将会简单的通过Notifcationi 来监听播放完成的消息
++++
// 通过Notificatiion 实现类通信
- (instancetype)initWithFrame:(CGRect)frame{
  +++
[[NSNotificationCenter defaultCenter] addObserver:self selector:@selector(_handlePalyEnd) name:AVPlayerItemDidPlayToEndTimeNotification object:nil];
	+++
++++
// 首先我们需要定义  组件卸载的时候去掉notifation单例
#pragma mark - 组件卸载的时候去掉notifation单例
-  (void)dealloc {
    [[NSNotificationCenter defaultCenter] removeObserver:self];
};

#pragma mark - private method
- (void)_tapClick {
   // 这个方法改动一下,把所有的数据都存到属性上去
    //  使用URL生产一个Asset
        NSURL *videoURL = [NSURL URLWithString:_VideoUrl];
        AVAsset *asset = [AVAsset assetWithURL:videoURL];

    //  使用asset 生产一个Player
        _videoItem = [AVPlayerItem playerItemWithAsset:asset];
        _avPlayer = [AVPlayer playerWithPlayerItem:_videoItem];

    //  生成一个Layer设置大写并且播放它
        _palyerLayer = [AVPlayerLayer playerLayerWithPlayer:_avPlayer];
        _palyerLayer.frame = _coverView.bounds;
        [_coverView.layer addSublayer:_palyerLayer];
        [_avPlayer play];
};

// 播放结束的时候的回调函数
- (void) _handlePalyEnd {
    [_palyerLayer removeFromSuperlayer];
    _videoItem = nil;
    _avPlayer = nil;
};
使用KVO来监听
现在我们的需求如下: 使用KVO通信方案,监听视频是否加载完毕,加载完之后再播放
#pragma mark - 组件卸载的时候去掉notifation单例 和KVO
-  (void)dealloc {
    [[NSNotificationCenter defaultCenter] removeObserver:self];
    [_videoItem removeObserver:self forKeyPath:@"status"];
};
++++ 添加一个KVO监听
#pragma mark - private method
- (void)_tapClick {
+++++
    // 使用KVO了来监听视频是否被加载完毕 有新变化的时候处理
    [_videoItem addObserver:self forKeyPath:@"status" options:NSKeyValueObservingOptionNew context:nil];

+++++
};

++++ 监听看看 是否staus变化来
-(void) observeValueForKeyPath:(NSString *)keyPath ofObject:(id)object change:(NSDictionary<NSKeyValueChangeKey,id> *)change context:(void *)context {
    if ( [keyPath isEqualToString:@"status"] ) {
        if( ((NSNumber *)[change objectForKey:NSKeyValueChangeNewKey]).integerValue == AVPlayerItemStatusReadyToPlay ) {
            [_avPlayer play];
        }else {
            NSLog(@""); // 如果出错了
        }
    }
};
监听视频缓冲1
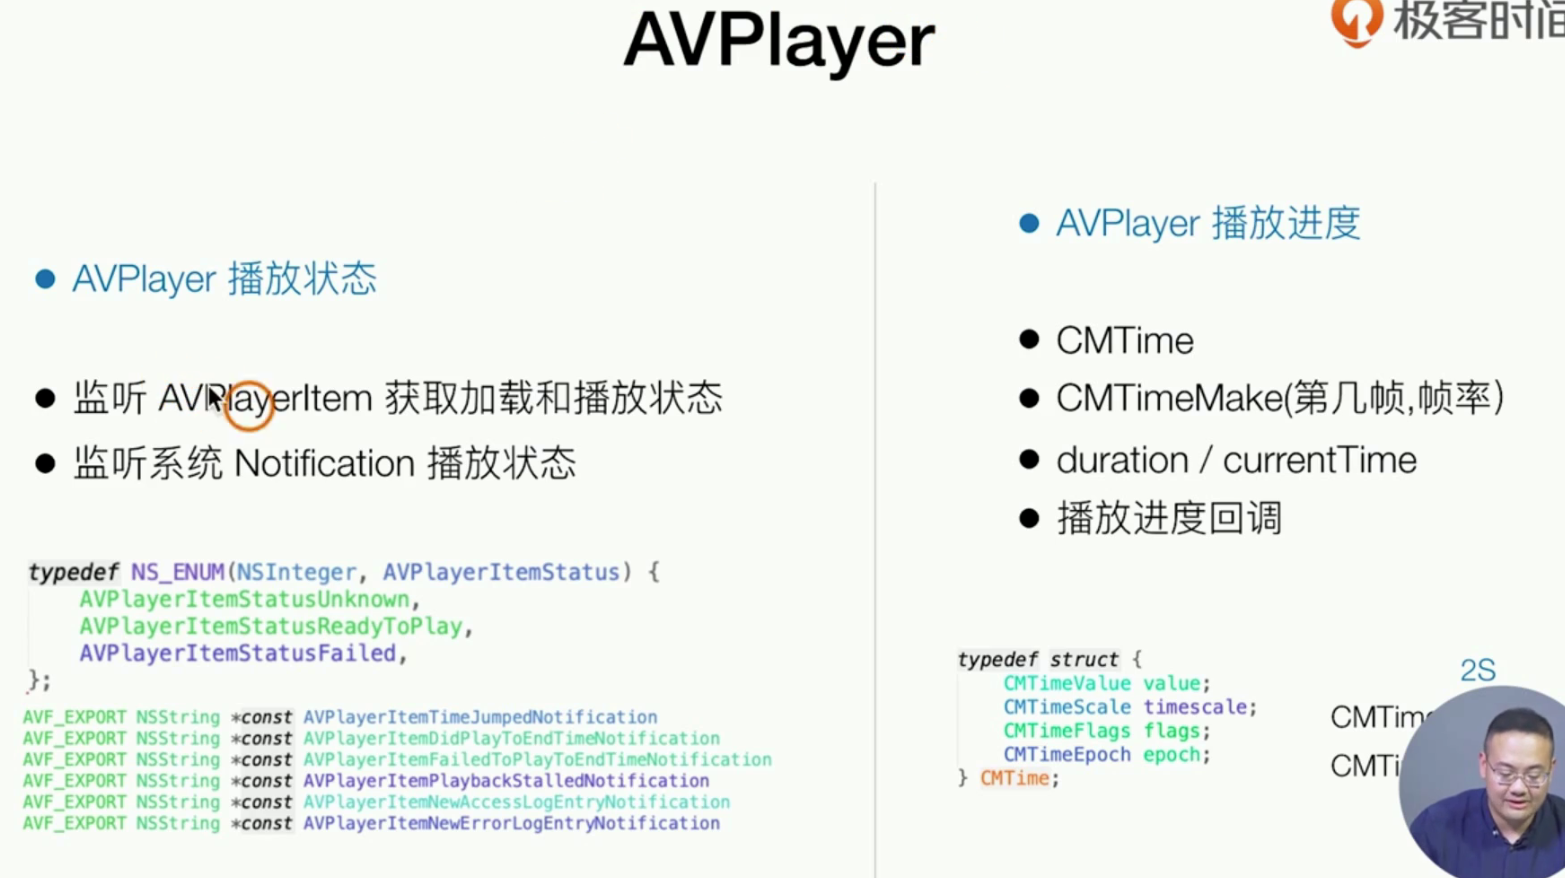
我们的需求如下: 获取 播放进度, 得到播放帧的控制器,获取缓冲进度 , 结合之前的播放结束时间做一个 无限循环播放的功能
# 多加几个监听,用来监听不同属性的变化
#pragma mark - private method
- (void)_tapClick {
    //  使用URL生产一个Asset
        NSURL *videoURL = [NSURL URLWithString:_VideoUrl];
        AVAsset *asset = [AVAsset assetWithURL:videoURL];

    //  使用asset 生产一个Player
        _videoItem = [AVPlayerItem playerItemWithAsset:asset];
        _avPlayer = [AVPlayer playerWithPlayerItem:_videoItem];

    // 使用KVO了来监听视频是否被加载完毕 有新变化的时候处理
    [_videoItem addObserver:self forKeyPath:@"status" options:NSKeyValueObservingOptionNew context:nil];
    // 监听播放进度,缓冲进度
    [_videoItem addObserver:self forKeyPath:@"loadedTimeRanges" options:NSKeyValueObservingOptionNew context:nil];
//    CMTime duratino = _videoItem.duration;
//    CGFloat videoDuratio = CMTimeGetSeconds(duratino) // 注意啊⚠️ 这个代码要放到视频加载再去拿
//    监听 播放的进度,这样需要说明一下CMTIm就是一个时间切片控制,控制帧 这里的1/1 就上代表 1s 1s回调一次,并且把这个放到主线程中去 _avPlayer 提供来一个简单的block 来实现这个监听功能
    [_avPlayer addPeriodicTimeObserverForInterval:CMTimeMake(1, 1) queue:dispatch_get_main_queue() usingBlock:^(CMTime time) {
        NSLog(@"播放进度:%@", @(CMTimeGetSeconds(time)));
    }];
    //  生成一个Layer设置大写并且播放它
        _palyerLayer = [AVPlayerLayer playerLayerWithPlayer:_avPlayer];
        _palyerLayer.frame = _coverView.bounds;
        [_coverView.layer addSublayer:_palyerLayer];
        [_avPlayer play];
};
# 别忘记 组件 要销毁监听器
#pragma mark - 组件卸载的时候去掉notifation单例
-  (void)dealloc {
    [[NSNotificationCenter defaultCenter] removeObserver:self];
    [_videoItem removeObserver:self forKeyPath:@"status"];
    [_videoItem removeObserver:self forKeyPath:@"loadedTimeRanges"];
};

# 另外也别忘记了 一定是资源加载完才有资源数据的问题
#pragma mark - KVO
-(void) observeValueForKeyPath:(NSString *)keyPath ofObject:(id)object change:(NSDictionary<NSKeyValueChangeKey,id> *)change context:(void *)context {

    if ( [keyPath isEqualToString:@"status"] ) {
        if( ((NSNumber *)[change objectForKey:NSKeyValueChangeNewKey]).integerValue == AVPlayerItemStatusReadyToPlay ) {
            [_avPlayer play];
        }else {
            NSLog(@""); // 如果出错了
        }

        CMTime duratino = _videoItem.duration;
        CGFloat videoDuratio = CMTimeGetSeconds(duratino);
        // 注意啊⚠️ 这个代码要放到视频加载再去拿
    } else if ( [keyPath isEqualToString:@"loadedTimeRanges"]) {
        NSLog(@"缓冲:%@",[change objectForKey:NSKeyValueChangeNewKey]);
    }
};

# 如何做循环播放?
- (void) _handlePalyEnd {
//    [_palyerLayer removeFromSuperlayer];
//    _videoItem = nil;
//    _avPlayer = nil;
//    如果要做重复播放 就是把_avPlayer的CMTime 帧给重组回0 就好了
    [_avPlayer seekToTime: CMTimeMake(0, 1)];
};
监听视频缓冲2
我们的需求如下:单例化 一下

第一步,我们需要新创一个文件专门用来放Video

第二步,把之前代码中的东西迁移出
# .h
//
//  GTVideoPlayer.h
//  SimpelApp
//
//  Created by 李仕增 on 2021/12/23.
//

#import <Foundation/Foundation.h>
#import <UIKit/UIKit.h>

NS_ASSUME_NONNULL_BEGIN

@interface GTVideoPlayer : NSObject
+ (GTVideoPlayer *)Player;
- (void) palytVideoByUrl:(NSString *)videoUrl  attachView: (UIView *)attachView;
@end

NS_ASSUME_NONNULL_END


# m实现
//
//  GTVideoPlayer.m
//  SimpelApp
//
//  Created by 李仕增 on 2021/12/23.
//

#import "GTVideoPlayer.h"
#import <AVFoundation/AVFoundation.h>

@interface GTVideoPlayer()
@property(nonatomic, strong, readwrite) AVPlayerItem *videoItem;
@property(nonatomic, strong, readwrite) AVPlayer *avPlayer;
@property(nonatomic, strong, readwrite) AVPlayerLayer *palyerLayer;
@end

@implementation GTVideoPlayer

// 使用GCD Distacp ones 实现一个单例
+ (GTVideoPlayer *)Player {
    static GTVideoPlayer *player;
    static dispatch_once_t onceToke;
    dispatch_once(&onceToke, ^{
        player = [[GTVideoPlayer alloc] init];
    });
    return  player;
};

- (void) palytVideoByUrl:(NSString *)videoUrl  attachView: (UIView *)attachView {
    [self _stopPalyer];  // 新创建播放器的时候销毁之前的播放器
    //  使用URL生产一个Asset
        NSURL *videoURL = [NSURL URLWithString:videoUrl];
        AVAsset *asset = [AVAsset assetWithURL:videoURL];

    //  使用asset 生产一个Player
        _videoItem = [AVPlayerItem playerItemWithAsset:asset];
        _avPlayer = [AVPlayer playerWithPlayerItem:_videoItem];

    // 使用KVO了来监听视频是否被加载完毕 有新变化的时候处理
    [_videoItem addObserver:self forKeyPath:@"status" options:NSKeyValueObservingOptionNew context:nil];
    // 监听播放进度,缓冲进度
    [_videoItem addObserver:self forKeyPath:@"loadedTimeRanges" options:NSKeyValueObservingOptionNew context:nil];
//    CMTime duratino = _videoItem.duration;
//    CGFloat videoDuratio = CMTimeGetSeconds(duratino) // 注意啊⚠️ 这个代码要放到视频加载再去拿
//    监听 播放的进度,这样需要说明一下CMTIm就是一个时间切片控制,控制帧 这里的1/1 就上代表 1s 1s回调一次,并且把这个放到主线程中去 _avPlayer 提供来一个简单的block 来实现这个监听功能
    [_avPlayer addPeriodicTimeObserverForInterval:CMTimeMake(1, 1) queue:dispatch_get_main_queue() usingBlock:^(CMTime time) {
        NSLog(@"播放进度:%@", @(CMTimeGetSeconds(time)));
    }];
    //  生成一个Layer设置大写并且播放它
        _palyerLayer = [AVPlayerLayer playerLayerWithPlayer:_avPlayer];
        _palyerLayer.frame = attachView.bounds;
        [attachView.layer addSublayer:_palyerLayer];
        [_avPlayer play];

    // 通过Notificatiion 实现类通信
    [[NSNotificationCenter defaultCenter] addObserver:self selector:@selector(_handlePalyEnd) name:AVPlayerItemDidPlayToEndTimeNotification object:nil];
}


#pragma mark - 组件卸载的时候去掉notifation单例
-  (void)dealloc {
    [[NSNotificationCenter defaultCenter] removeObserver:self];
    [_videoItem removeObserver:self forKeyPath:@"status"];
    [_videoItem removeObserver:self forKeyPath:@"loadedTimeRanges"];
};

#pragma mark - private method
- (void)_stopPalyer {
        [_palyerLayer removeFromSuperlayer];
        _videoItem = nil;
        _avPlayer = nil;

    [_videoItem removeObserver:self forKeyPath:@"status"];
    [_videoItem removeObserver:self forKeyPath:@"loadedTimeRanges"];

    [[NSNotificationCenter defaultCenter] removeObserver:self];
};

- (void) _handlePalyEnd {
//    如果要做重复播放 就是把_avPlayer的CMTime 帧给重组回0 就好了
    [_avPlayer seekToTime: CMTimeMake(0, 1)];
};

#pragma mark - KVO
-(void) observeValueForKeyPath:(NSString *)keyPath ofObject:(id)object change:(NSDictionary<NSKeyValueChangeKey,id> *)change context:(void *)context {

    if ( [keyPath isEqualToString:@"status"] ) {
        if( ((NSNumber *)[change objectForKey:NSKeyValueChangeNewKey]).integerValue == AVPlayerItemStatusReadyToPlay ) {
            [_avPlayer play];
        }else {
            NSLog(@""); // 如果出错了
        }

        CMTime duratino = _videoItem.duration;
        CGFloat videoDuratio = CMTimeGetSeconds(duratino);
        // 注意啊⚠️ 这个代码要放到视频加载再去拿
    } else if ( [keyPath isEqualToString:@"loadedTimeRanges"]) {
        NSLog(@"缓冲:%@",[change objectForKey:NSKeyValueChangeNewKey]);
    }
};

@end
第三步,清理之前的老代码逻辑
//
//  GTVideioCoverCell.m
//  SimpelApp
//
//  Created by 李仕增 on 2021/12/20.
//

#import "GTVideioCoverCell.h"
#import "GTVideoPlayer.h"

@interface GTVideioCoverCell()
@property(nonatomic, strong, readwrite) UIImageView *coverView;
@property(nonatomic, strong, readwrite) UIImageView *playButton;
@property(nonatomic, strong, readwrite) NSString *VideoUrl;
@end

@implementation GTVideioCoverCell

- (instancetype)initWithFrame:(CGRect)frame{
    self = [super initWithFrame:frame];
    if(self){
        [self addSubview:({
            _coverView  = [[UIImageView alloc] initWithFrame:CGRectMake(0, 0, frame.size.width, frame.size.height)];
            _coverView;
        })];

        [_coverView addSubview:({
            _playButton  = [[UIImageView alloc] initWithFrame:CGRectMake((frame.size.width - 50) / 2, (frame.size.height - 50) / 2 , 50, 50)];
        })];


        UITapGestureRecognizer *tapGesture = [[UITapGestureRecognizer alloc] initWithTarget:self action:@selector(_tapClick)];
        [self addGestureRecognizer: tapGesture];
    }
    return  self;
};

#pragma mark - 组件卸载的时候去掉notifation单例
-  (void)dealloc {
};

#pragma mark - public method
- (void) layoutWithVideoCoverUrl:(NSString *)videoCoverUrl  videoUrl: (NSString *)videoUrl {
    _coverView.image = [UIImage imageNamed:videoCoverUrl];
    _playButton.image = [UIImage imageNamed:@"icon.bundle/palyer-start.png"];
    _VideoUrl = videoUrl;
};

#pragma mark - private method
- (void)_tapClick {
    [[GTVideoPlayer Player] palytVideoByUrl:_VideoUrl attachView:(_coverView)];
};

@end
最后:调试, 以上就是所有的代码了!

回顾一下整个IOS设备的视频播放的业务逻辑
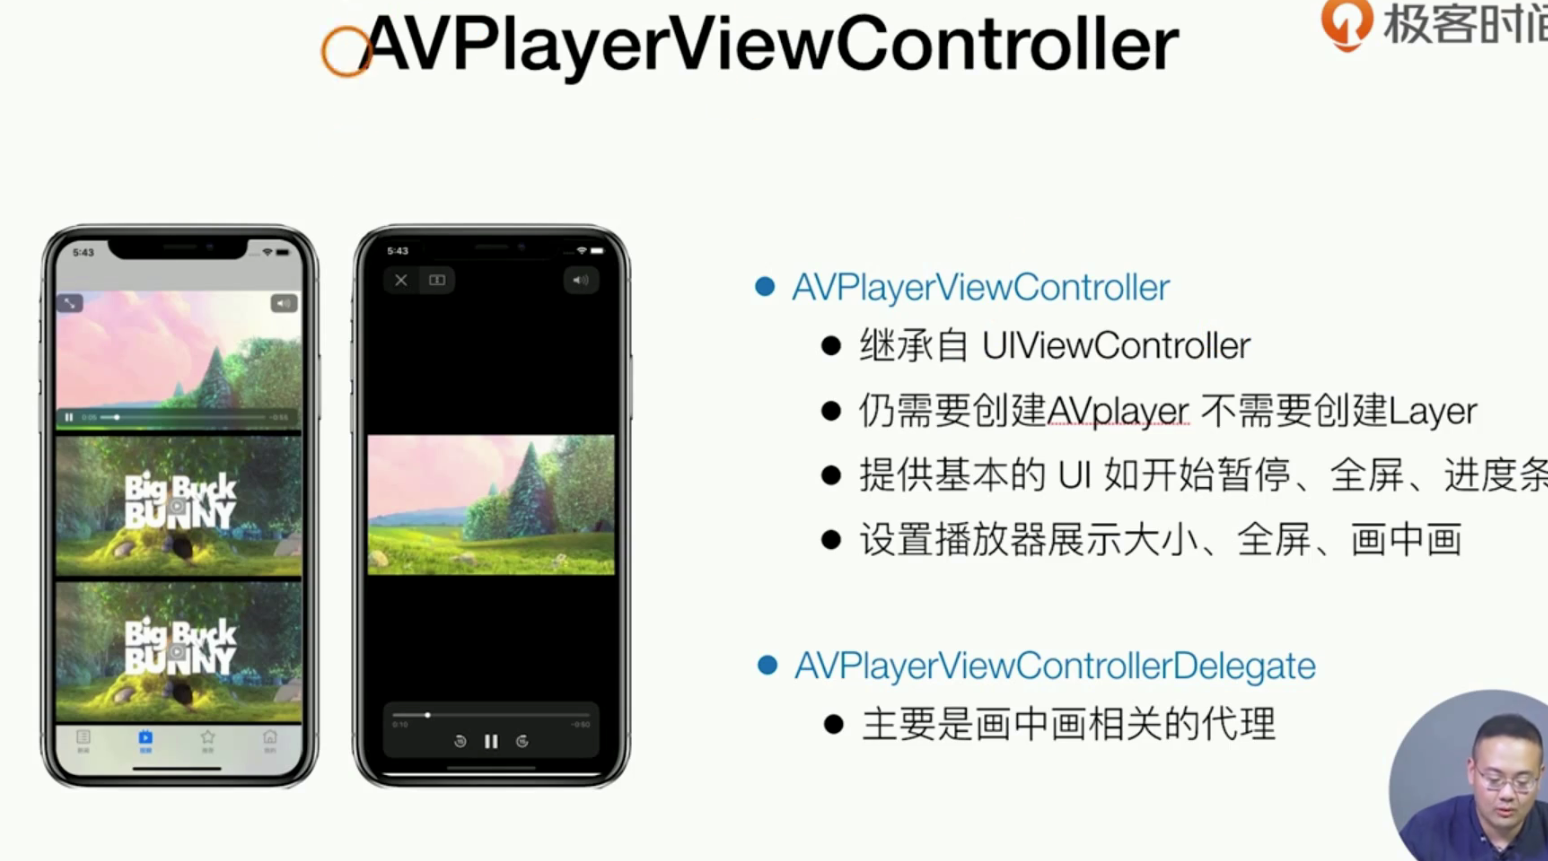
上面的逻辑就是纯手写,现在我们调用一个系统已经集成好的播放器 (包括了进度条,缓冲条 全屏xxx等很多功能)
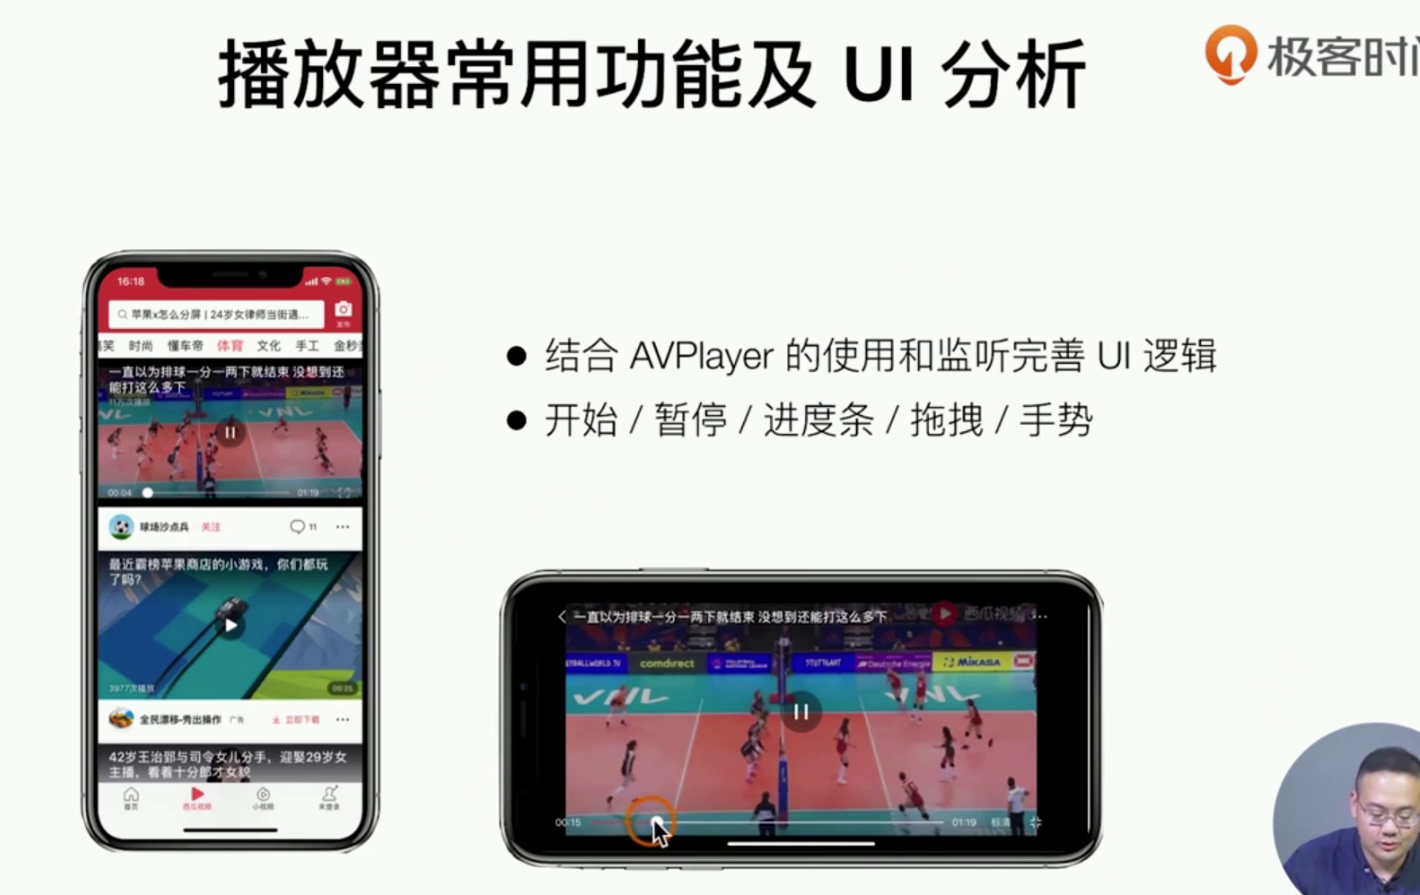
代码实现逻辑如下:xx
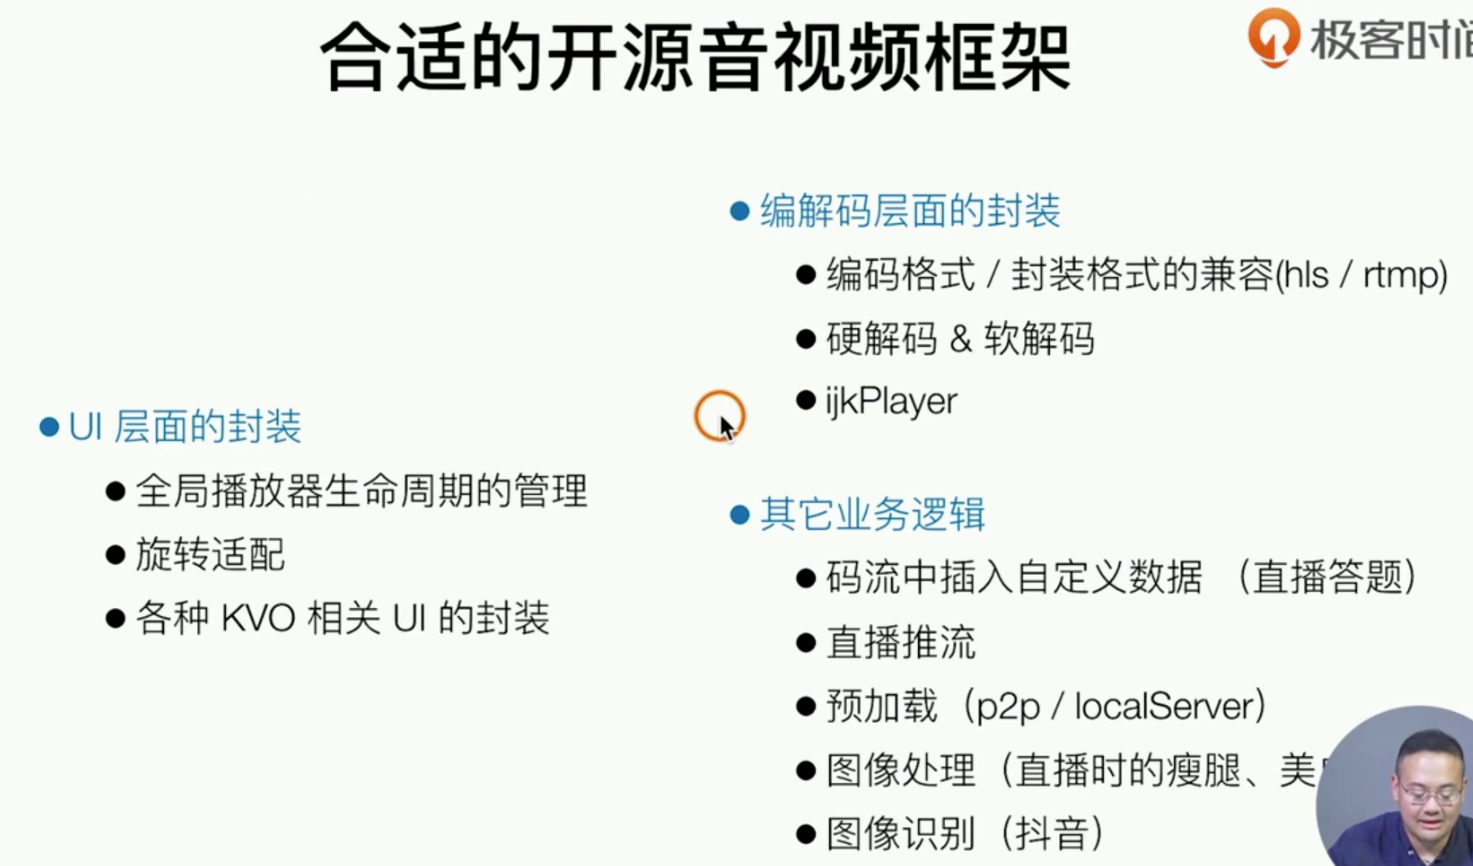
上述就是很多开源的视频播放解决方案,目前老李在Newegg这里有一个直播App使用阿里云的直播推流SDK 做了一个直播的App 也是这样的实现的。感兴趣下来可以研究一下,(等待加入的连接🔗有时间研究一下 这个播放看看如何做)
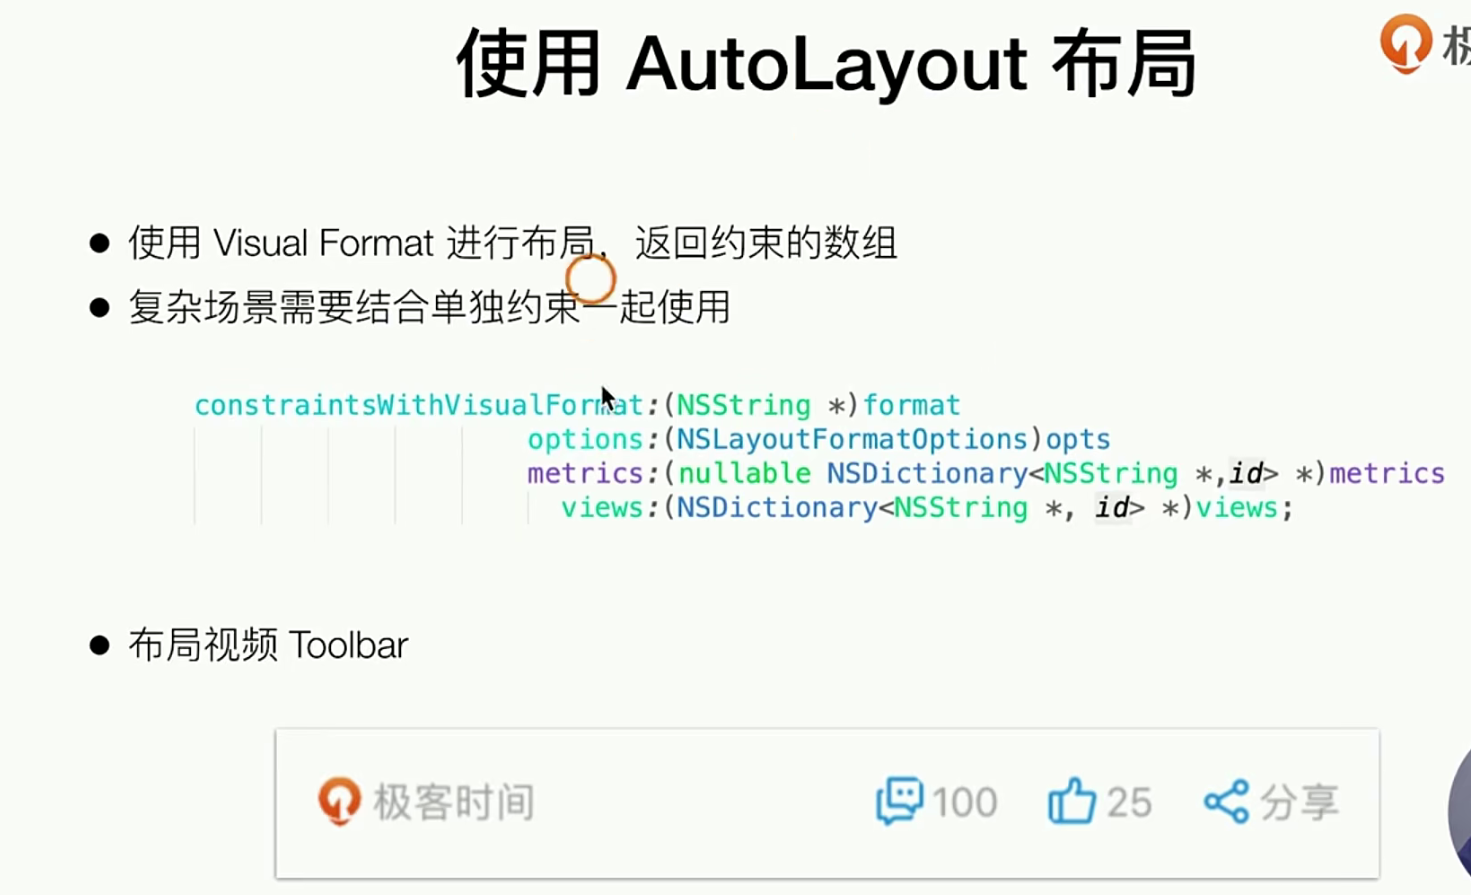
IOS中的布局AutoLayout
简介和理论知识
我们之前写的布局都是定高定框 和定XY坐标实现的布局(Frame)
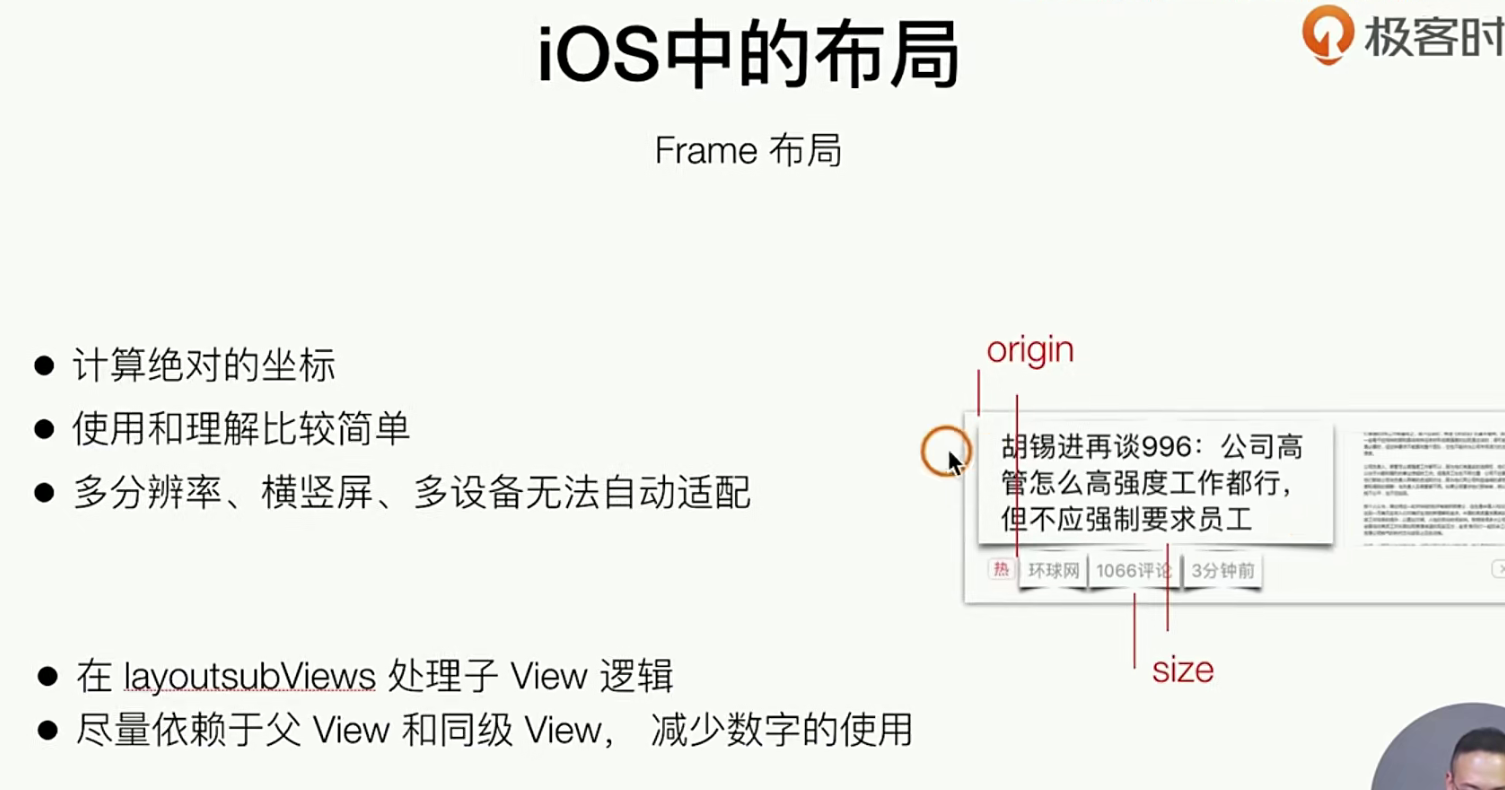
autoLayouter就是这样的一个自适应的布局
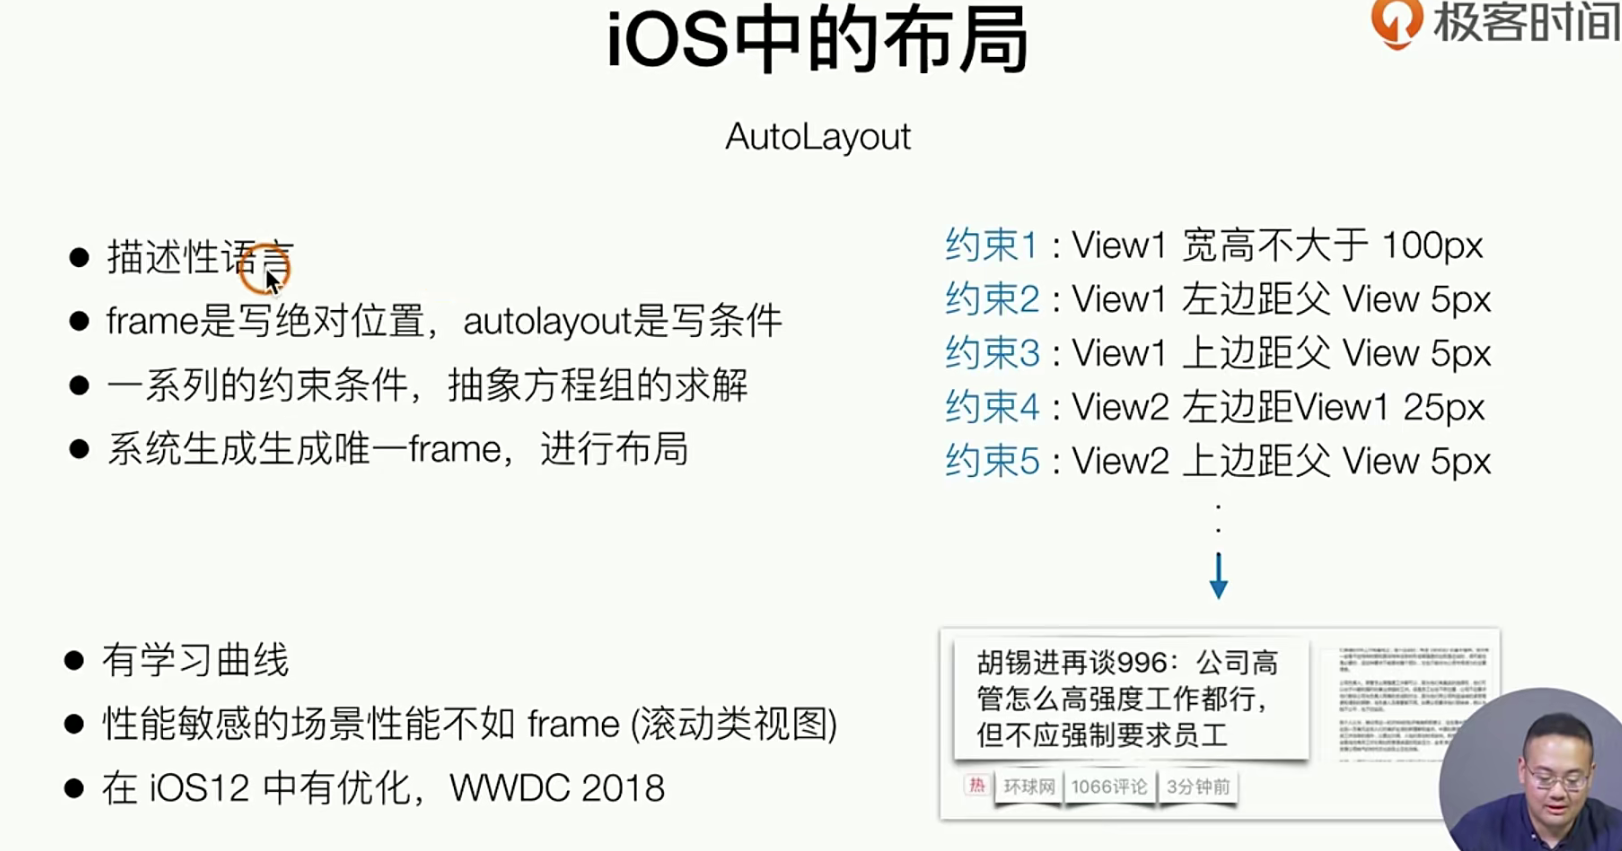
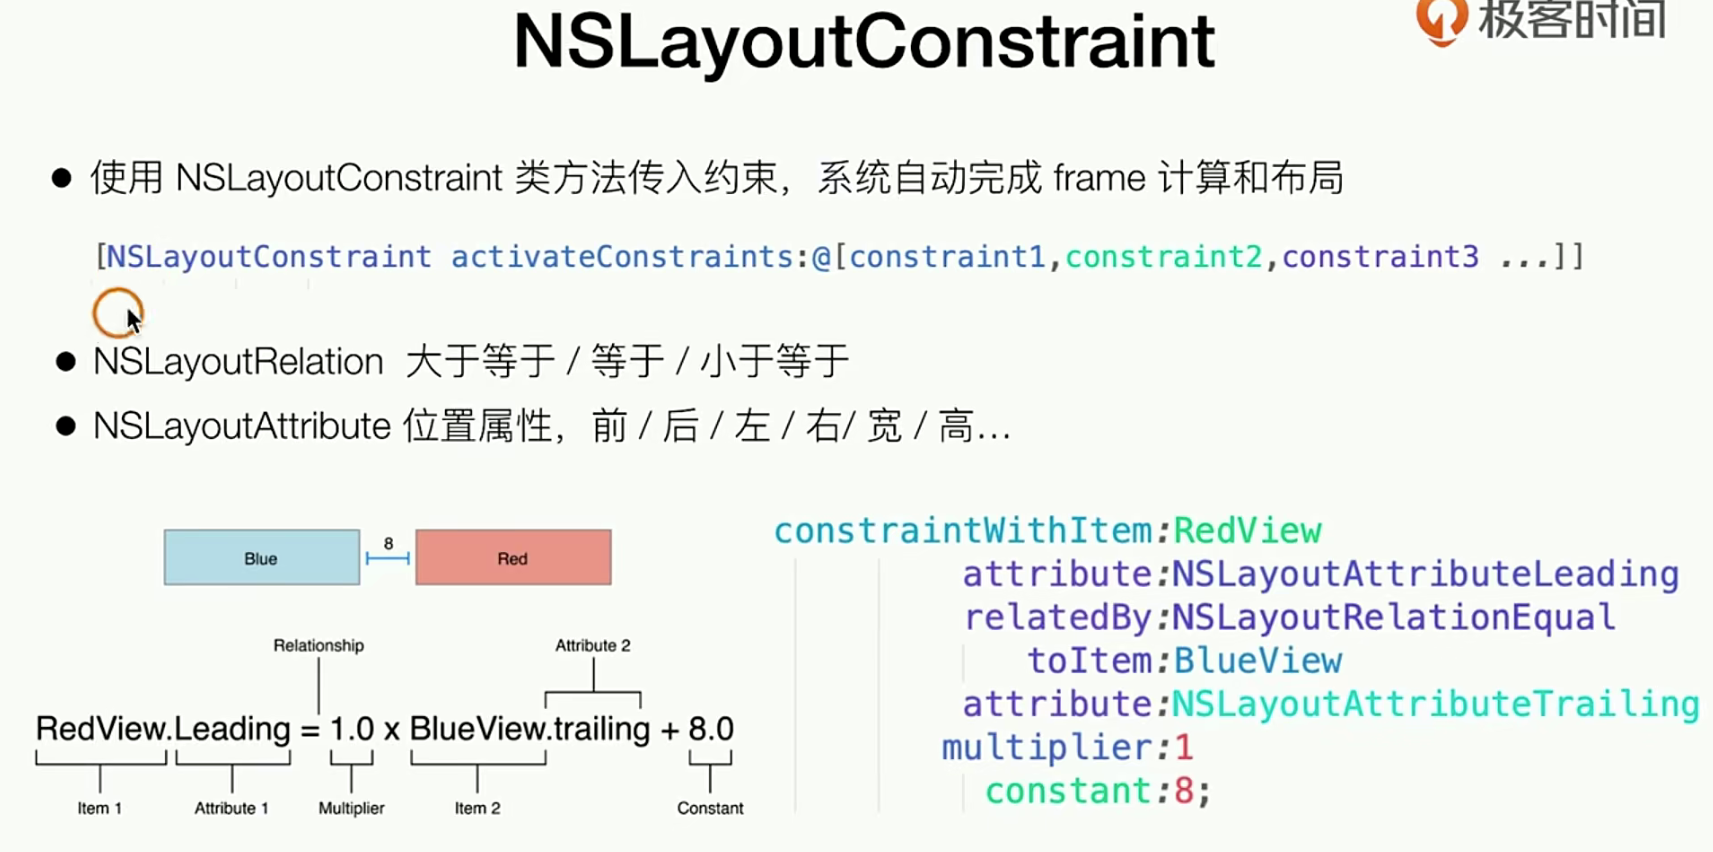
AutoLayoue实际上就是加“约束” 来实现一个自动计算 frame
上面的这个东西就是一个 使用预
上面的描述实在是太复杂了,因此我需要使用一个新的解决方案来简化 布局开发
使用
我们前面的已经把理论知识说的差不多了,现在我们实现一个😂
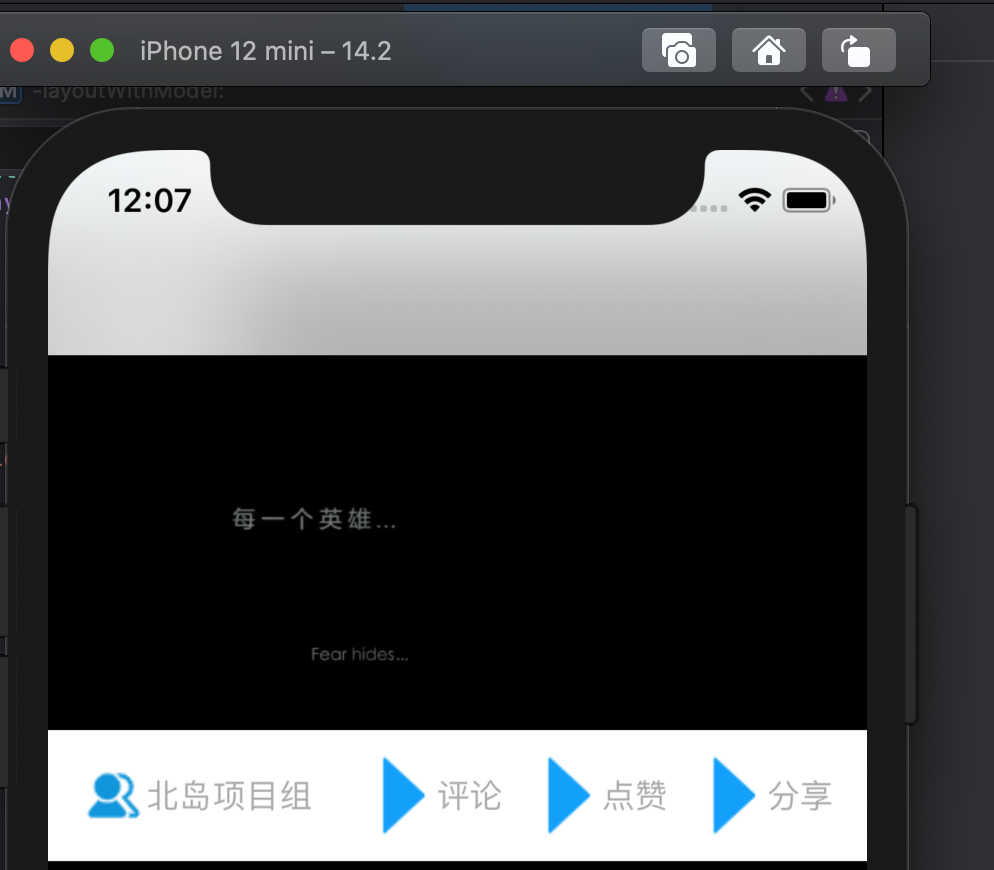
我们需要达到这样的效果
第一步要新来一个toobar组件
//
//  GTVideoToobar.h
//  SimpelApp
//
//  Created by 李仕增 on 2021/12/23.
//

#import <UIKit/UIKit.h>

NS_ASSUME_NONNULL_BEGIN

// 定义一个高度
#define GTVideoToobarHeight 60
@interface GTVideoToobar : UIView
- (void)layoutWithModel:(id)modle;
@end

NS_ASSUME_NONNULL_END


//
//  GTVideoToobar.m
//  SimpelApp
//
//  Created by 李仕增 on 2021/12/23.
//

#import "GTVideoToobar.h"

@interface GTVideoToobar()
@property(nonatomic, strong, readwrite) UIImageView *avatorImageView;
@property(nonatomic, strong, readwrite) UILabel *nickLable;

@property(nonatomic, strong, readwrite) UIImageView *commonImgaeView;
@property(nonatomic, strong, readwrite) UILabel *commonLable;

@property(nonatomic, strong, readwrite) UIImageView *linkImagView;
@property(nonatomic, strong, readwrite) UILabel *linkLable;

@property(nonatomic, strong, readwrite) UIImageView *shareImageView;
@property(nonatomic, strong, readwrite) UILabel *shareLable;

@end

@implementation GTVideoToobar
- (instancetype)initWithFrame:(CGRect)frame{
    self = [super initWithFrame:frame];
    if ( self ) {
        self.backgroundColor = [UIColor whiteColor];

        [self addSubview: ({
            _avatorImageView = [[UIImageView alloc] initWithFrame:CGRectZero];
            _avatorImageView.layer.masksToBounds = YES;
            _avatorImageView.layer.cornerRadius = 15;
            _avatorImageView.translatesAutoresizingMaskIntoConstraints = NO;
            _avatorImageView;
        })];
        [self addSubview: ({
            _nickLable = [[UILabel alloc] init];
            _nickLable.font = [UIFont systemFontOfSize:15 ];
            _nickLable.textColor = [UIColor lightGrayColor];
            _nickLable.translatesAutoresizingMaskIntoConstraints = NO;
            _nickLable;
        })];

        [self addSubview: ({
            _commonImgaeView = [[UIImageView alloc] initWithFrame:CGRectZero];
            _commonImgaeView.layer.masksToBounds = YES;
            _commonImgaeView.layer.cornerRadius = 15;
            _commonImgaeView.translatesAutoresizingMaskIntoConstraints = NO;
            _commonImgaeView;
        })];
        [self addSubview: ({
            _commonLable = [[UILabel alloc] init];
            _commonLable.font = [UIFont systemFontOfSize:15 ];
            _commonLable.textColor = [UIColor lightGrayColor];
            _commonLable.translatesAutoresizingMaskIntoConstraints = NO;
            _commonLable;
        })];

        [self addSubview: ({
            _linkImagView = [[UIImageView alloc] initWithFrame:CGRectZero];
            _linkImagView.layer.masksToBounds = YES;
            _linkImagView.layer.cornerRadius = 15;
            _linkImagView.translatesAutoresizingMaskIntoConstraints = NO;
            _linkImagView;
        })];
        [self addSubview: ({
            _linkLable = [[UILabel alloc] init];
            _linkLable.font = [UIFont systemFontOfSize:15 ];
            _linkLable.textColor = [UIColor lightGrayColor];
            _linkLable.translatesAutoresizingMaskIntoConstraints = NO;
            _linkLable;
        })];

        [self addSubview: ({
            _shareImageView = [[UIImageView alloc] initWithFrame:CGRectZero];
            _shareImageView.layer.masksToBounds = YES;
            _shareImageView.layer.cornerRadius = 15;
            _shareImageView.translatesAutoresizingMaskIntoConstraints = NO;
            _shareImageView;
        })];
        [self addSubview: ({
            _shareLable = [[UILabel alloc] init];
            _shareLable.font = [UIFont systemFontOfSize:15 ];
            _shareLable.textColor = [UIColor lightGrayColor];
            _shareLable.translatesAutoresizingMaskIntoConstraints = NO;
            _shareLable;
        })];
    };
    return  self;
};

// 设计一个初始化的方法
- (void)layoutWithModel:(id)modle {

}

@end
第二步 把toobar 贴到合适的位置,并且修改原来的属性
//  GTVideioCoverCell.m
//  SimpelApp
//
//  Created by 李仕增 on 2021/12/20.
//

#import "GTVideioCoverCell.h"
#import "GTVideoPlayer.h"
#import "GTVideoToobar.h"
++++
# initWithFrame;里追加一个
  [_coverView addSubview:({
            _playButton  = [[UIImageView alloc] initWithFrame:CGRectMake((frame.size.width - 50) / 2, (frame.size.height -
                                                                                                       GTVideoToobarHeight -
                                                                                                       50) / 2 , 50, 50)];
        })];
++++
#pragma mark - public method
- (void) layoutWithVideoCoverUrl:(NSString *)videoCoverUrl  videoUrl: (NSString *)videoUrl {
    _coverView.image = [UIImage imageNamed:videoCoverUrl];
    _playButton.image = [UIImage imageNamed:@"icon.bundle/palyer-start.png"];
    _VideoUrl = videoUrl;
    [_toobar layoutWithModel:nil];
};
++++


//
//  CGVideoViewController.m
//  SimpelApp
//
//  Created by 李仕增 on 2021/10/22.
//

- (void)viewDidLoad {
    [super viewDidLoad];
++++
++++
 // 做一个16 * 9  View
    flowLayout.itemSize = CGSizeMake( self.view.bounds.size.width,  self.view.bounds.size.width /16 * 9 + GTVideoToobarHeight );
++++
}
第三步 修改布局方式
- (void)layoutWithModel:(id)modle {
_avatorImageView.image = [UIImage imageNamed:@"icon.bundle/CustomerActive.png"];
_nickLable.text = @"北岛项目组";
_commonImgaeView.image = [UIImage imageNamed:@"icon.bundle/palyer-start.png"];
_commonLable.text = @"评论";
_linkImagView.image = [UIImage imageNamed:@"icon.bundle/palyer-start.png"];
_linkLable.text = @"点赞";
_shareImageView.image = [UIImage imageNamed:@"icon.bundle/palyer-start.png"];
_shareLable.text = @"分享";
[NSLayoutConstraint activateConstraints:@[
[NSLayoutConstraint constraintWithItem:_avatorImageView
attribute:NSLayoutAttributeCenterY // xxx 对象 的xxx属性 【条件】 相对于的xxx对象 的xxx属性 的倍数 加上额外的值
relatedBy:NSLayoutRelationEqual
toItem:self
attribute:NSLayoutAttributeCenterY
multiplier:1
constant:0],
[NSLayoutConstraint constraintWithItem:_avatorImageView
attribute:NSLayoutAttributeLeft
relatedBy:NSLayoutRelationEqual
toItem:self
attribute:NSLayoutAttributeLeft
multiplier:1
constant:15],
[NSLayoutConstraint constraintWithItem:_avatorImageView
attribute:NSLayoutAttributeWidth
relatedBy:NSLayoutRelationEqual
toItem:nil
attribute:NSLayoutAttributeNotAnAttribute // 为空的时候用这个
multiplier:1
constant:30],
[NSLayoutConstraint constraintWithItem:_avatorImageView
attribute:NSLayoutAttributeHeight
relatedBy:NSLayoutRelationEqual
toItem:nil
attribute:NSLayoutAttributeNotAnAttribute
multiplier:1
constant:30],
[NSLayoutConstraint constraintWithItem:_nickLable
attribute:NSLayoutAttributeCenterY
relatedBy:NSLayoutRelationEqual
toItem:_avatorImageView
attribute:NSLayoutAttributeCenterY
multiplier:1
constant:0],
[NSLayoutConstraint constraintWithItem:_nickLable
attribute:NSLayoutAttributeLeft
relatedBy:NSLayoutRelationEqual
toItem:_avatorImageView
attribute:NSLayoutAttributeRight
multiplier:1
constant:0],
]];
// 下面的就是建议的算法
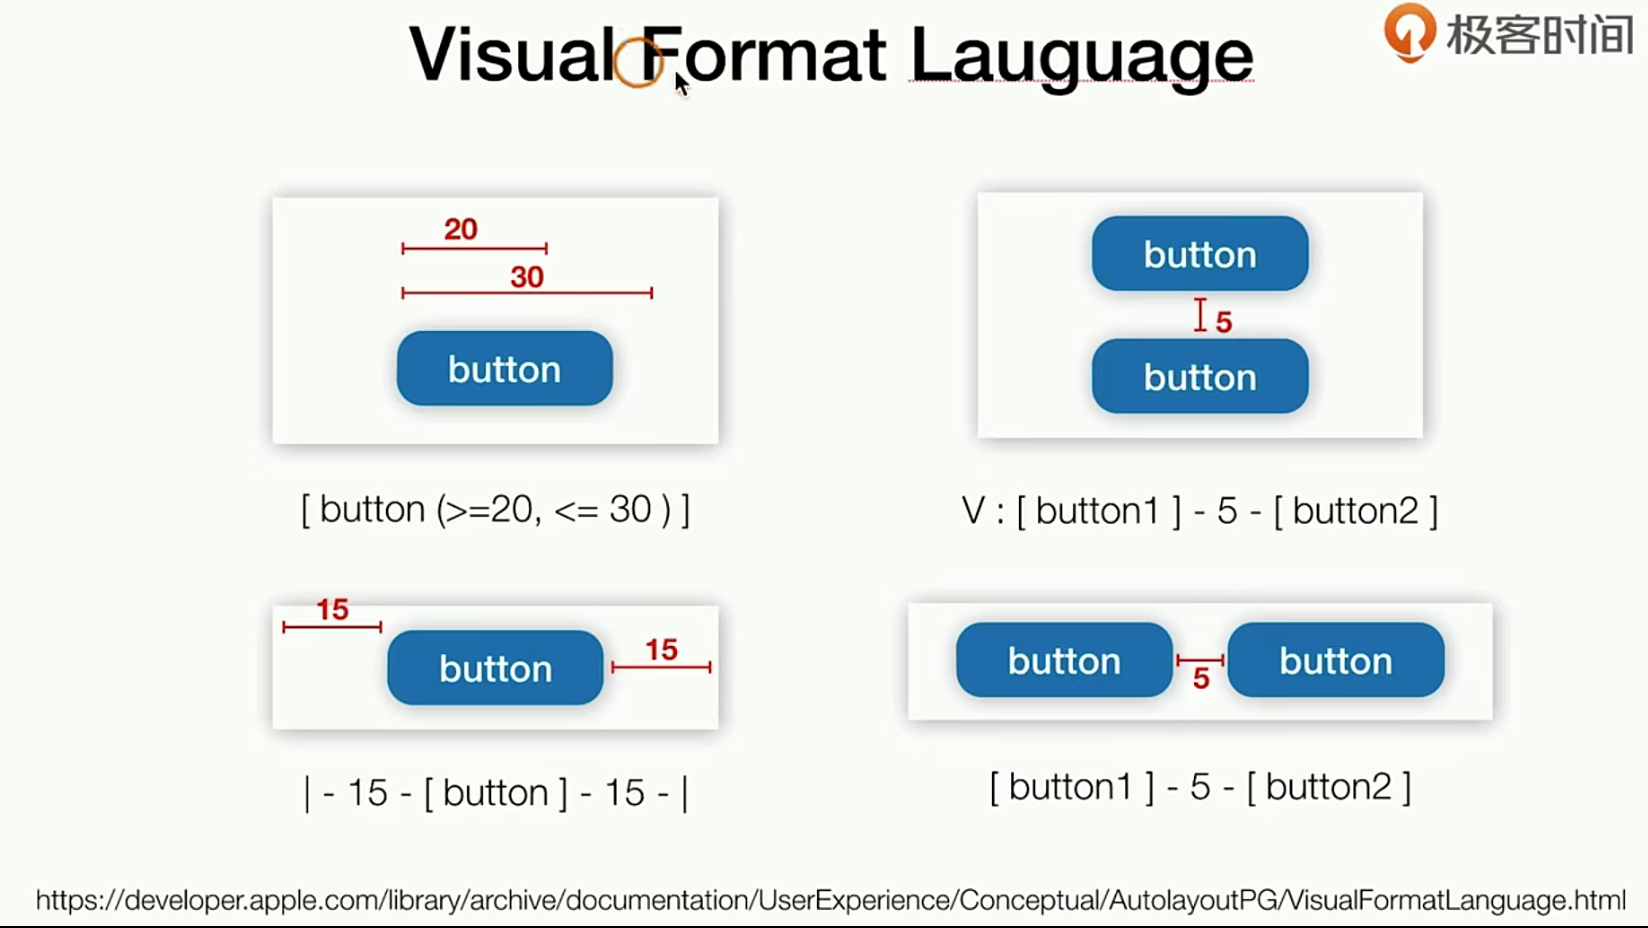
NSString *vflString = @"H:|-15-[_avatorImageView]-0-[_nickLable]-(>=0)-[_commonImgaeView(==_avatorImageView)]-0-[_commonLable]-15-[_linkImagView(==_avatorImageView)]-0-[_linkLable]-15-[_shareImageView(==_avatorImageView)]-0-[_shareLable]-15-|";
[NSLayoutConstraint activateConstraints:[NSLayoutConstraint constraintsWithVisualFormat:vflString options:NSLayoutFormatAlignAllCenterY metrics:nil views:NSDictionaryOfVariableBindings(_avatorImageView, _nickLable, _commonImgaeView, _commonLable, _linkImagView, _linkLable, _shareImageView, _shareLable)]];
}IOS中布局方式的选择
我们来看看社区的开源实现
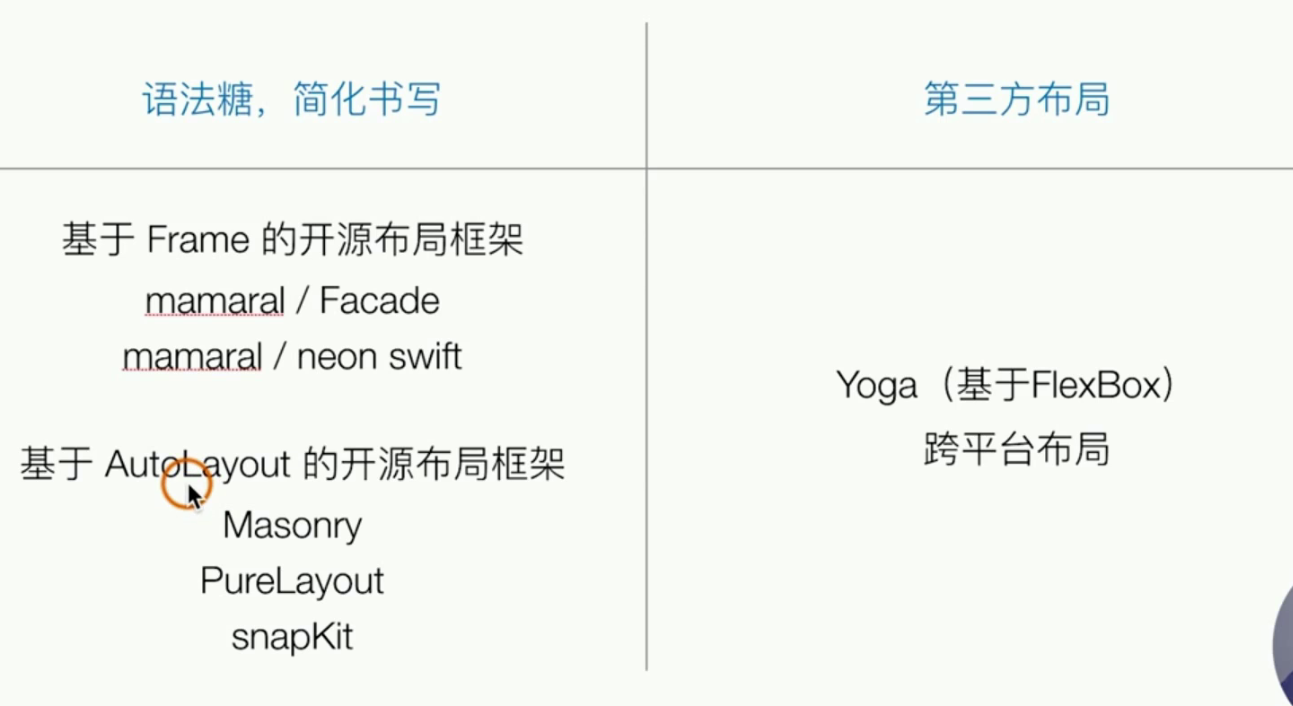 我们现在的布局还是太麻烦了,上面就是社区的开源框架
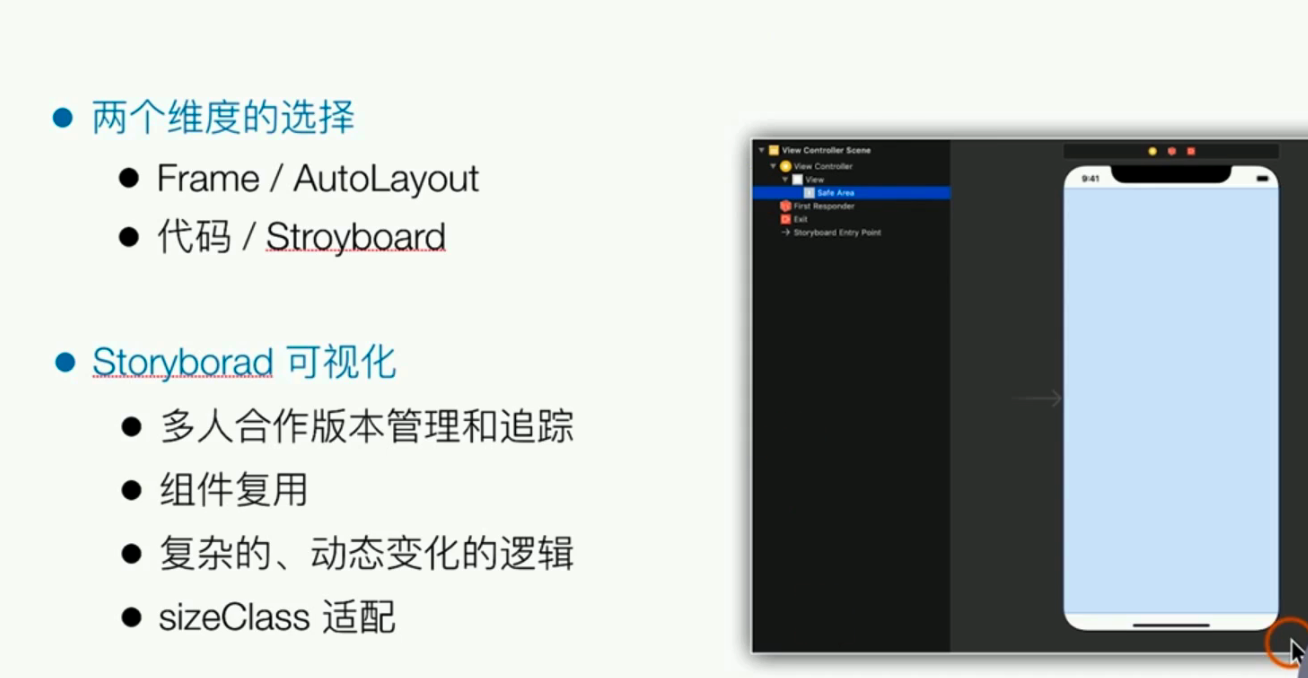
实际上我们在xcode中可以使用可视化的方式去搞布局(主要是团队合作不会用,因为缺点比较多 没有代码更改 没有可用的逻辑等。。。)
IOS适配问题
在早期 是不需要考虑IOS适配等,整体就是下面三个维度 来做适配
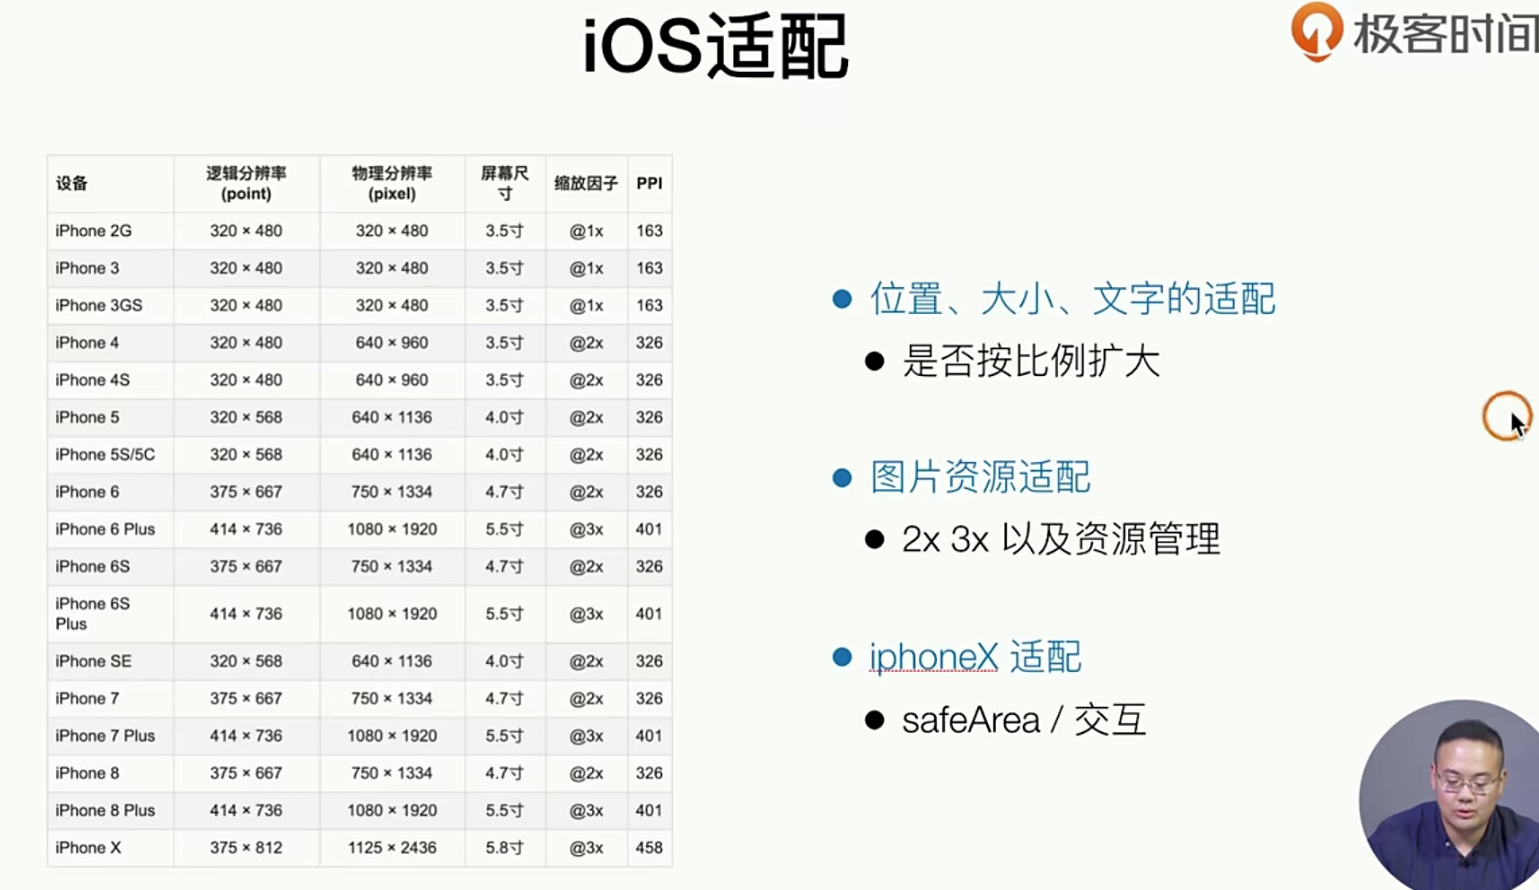
逻辑分辨率
理论知识
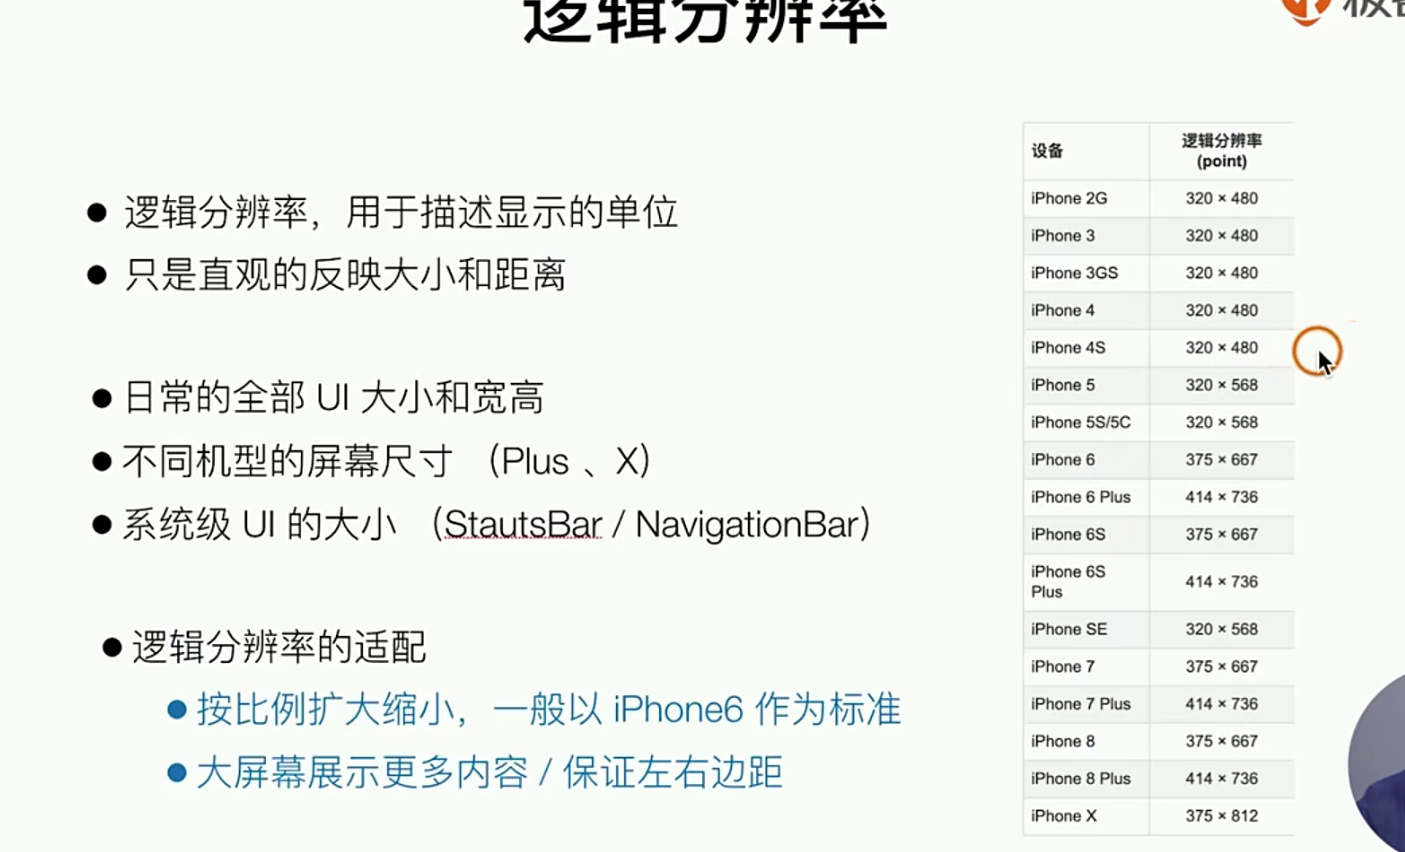
逻辑分辨率都是一个直观的大小,我们平时写的时候也是 逻辑分辨率,我们使用下面的👇的系统API 来做此功能
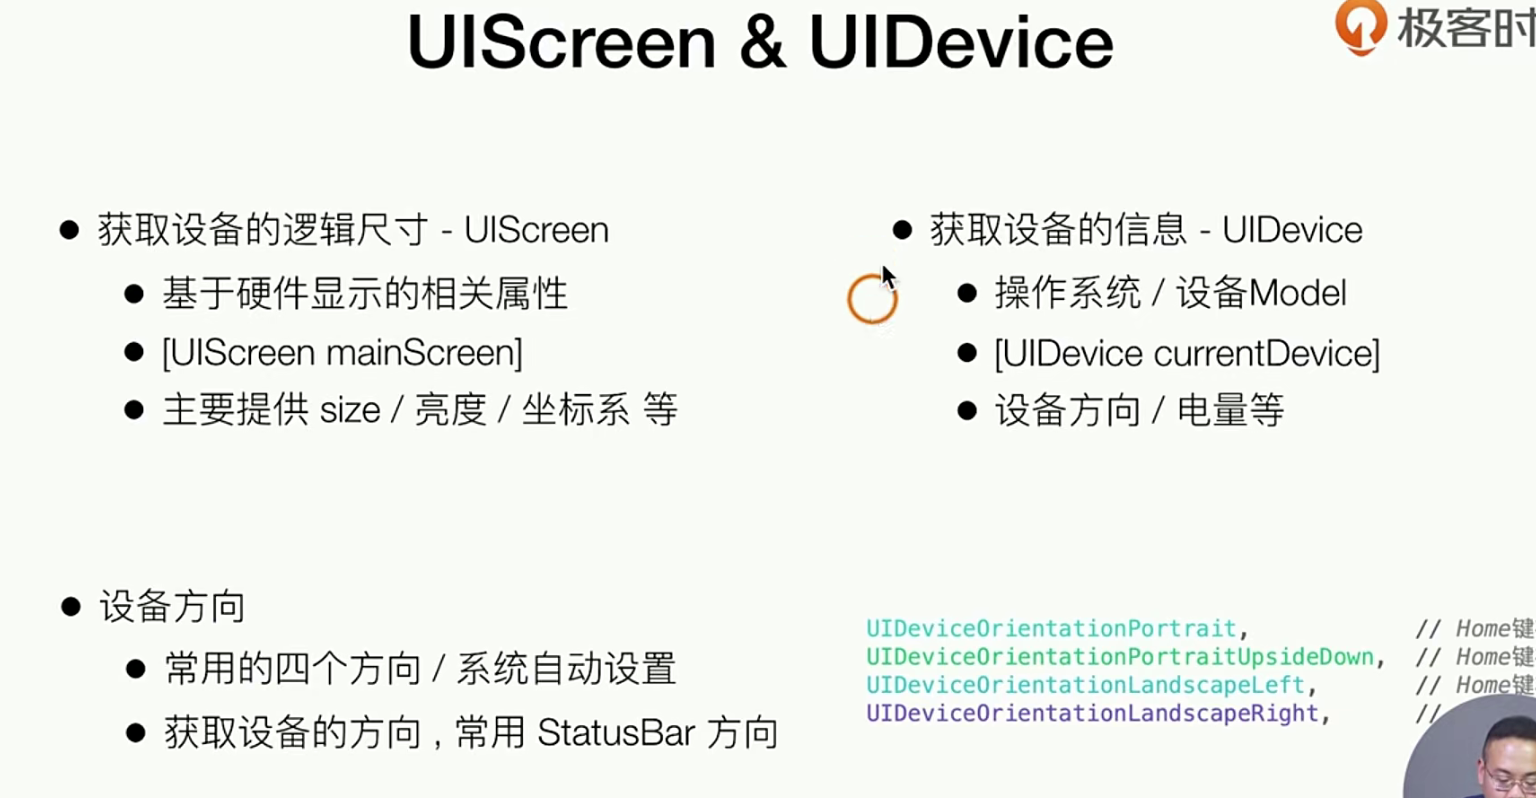
UIScreen反应的屏幕的消息,Device 是设备的信息
对于适配 最简单的方法就是 以 某个机型 做标准,然后其他的机型 使用 UIScreen 获取设备的屏幕信息,然后*一个系数就好了
代码实践
我们就简单的使用 一个类 去写几个 计算比例的 函数就好了
新建一个UIView 叫做 Screen 集成自NSObject
//
//  GTScreen.h
//  SimpelApp
//
//  Created by 李仕增 on 2022/1/6.
//

#import <UIKit/UIKit.h>

NS_ASSUME_NONNULL_BEGIN

// 使用两个宏 1.是否是横向屏幕 2. 定义屏幕的宽度 3. 定义屏幕的高度 (都需要注意屏幕横向问题)
#define IS_LANDSCAPE (UIInterfaceOrientationIsLandscape([ [UIApplication sharedApplication] statusBarOrientation  ]))

#define SCREEN_WIDTH (IS_LANDSCAPE ? [[UIScreen mainScreen] bounds].size.height :  [[UIScreen mainScreen] bounds].size.width )
#define SCREEN_HEIGHT (IS_LANDSCAPE ? [[UIScreen mainScreen] bounds].size.width :  [[UIScreen mainScreen] bounds].size.height )

//我们在定义两个函数的别名 (又是两个宏)
#define UI(x) UIAdapter(x)
#define UIRect(x,y,width,height) UIRectAdapter(x,y,width,height)

// 定义一个内联函数 用于按照比例的进行缩放操作
static inline NSInteger UIAdapter (float x) {
//    1. 分机型
//    2. 按屏幕比例去做适配
    CGFloat scale = 414 / SCREEN_WIDTH;
    return (NSInteger) x / scale;
};

// 对一些布局的适配比如 四边的配置
static inline CGRect UIRectAdapter(x,y,width,height) {
    return  CGRectMake(UIAdapter(x), UIAdapter(y), UIAdapter(width), UIAdapter(height));
};

@interface GTScreen : NSObject

@end

NS_ASSUME_NONNULL_END


# ====== .m没有做任何逻辑的处理

# 找我们之前的新闻列表的 cell 试试看 主要是把宏都给套上就好了
//
//  CGPtTableViewCell.m
//  SimpelApp
//
//  Created by 李仕增 on 2021/10/23.
//

#import "CGPtTableViewCell.h"
#import "GTLIstItem.h"
#import "SDWebImage.h"
#import "GTScreen.h"

@interface CGPtTableViewCell ()

@property(nonatomic, strong, readwrite) UILabel *titleLabel;
@property(nonatomic, strong, readwrite) UILabel *sourceLabel;
@property(nonatomic, strong, readwrite) UILabel *commentLabel;
@property(nonatomic, strong, readwrite) UILabel *timeLabel;
@property(nonatomic, strong, readwrite) UIImageView *rightImageView;
@property(nonatomic, strong, readwrite) UIButton *myButton;

@end

@implementation CGPtTableViewCell

- (instancetype) initWithStyle:(UITableViewCellStyle)style reuseIdentifier:(nullable NSString *)reuseIdentifier {

    self=[super initWithStyle:style reuseIdentifier:reuseIdentifier];

    if(self){
        // 创建自己的cell
        [self.contentView addSubview:({
            self.titleLabel = [[UILabel alloc] initWithFrame:UIRect( 20, 15, 250, 50)];
//            self.titleLabel.backgroundColor = [UIColor redColor];
            self.titleLabel.font = [UIFont systemFontOfSize:16];
            self.titleLabel.textColor = [UIColor blackColor];
            self.titleLabel;
        })];

        [self.contentView addSubview:({
            self.sourceLabel = [[UILabel alloc] initWithFrame:UIRect(20, 80, 50, 20)];
//            self.sourceLabel.backgroundColor = [UIColor redColor];
            self.sourceLabel.font = [UIFont systemFontOfSize:12];
            self.sourceLabel.textColor = [UIColor grayColor];
            self.sourceLabel;
        })];

        [self.contentView addSubview:({
            self.commentLabel = [[UILabel alloc] initWithFrame:UIRect(100, 80, 50, 20)];
//            self.commentLabel.backgroundColor = [UIColor redColor];
            self.commentLabel.font = [UIFont systemFontOfSize:12];
            self.commentLabel.textColor = [UIColor grayColor];
            self.commentLabel;
        })];

        [self.contentView addSubview:({
            self.timeLabel = [[UILabel alloc] initWithFrame:UIRect(150, 80, 50, 20)];
//            self.timeLabel.backgroundColor = [UIColor redColor];
            self.timeLabel.font = [UIFont systemFontOfSize:12];
            self.timeLabel.textColor = [UIColor grayColor];
            self.timeLabel;
        })];

//        这里我们来加一个UIImageVIew
        [self.contentView addSubview:({
            self.rightImageView = [[UIImageView alloc] initWithFrame:UIRect(260, 25, 100, 60)];
            self.rightImageView.backgroundColor = [UIColor redColor];
//          先给一个图片的自适应模式
            self.rightImageView.contentMode =UIViewContentModeScaleAspectFit;
            self.rightImageView;
        })];

//        这里我们来加一个UIButton
        [self.contentView addSubview:({
            self.myButton = [[UIButton alloc] initWithFrame:UIRect(260, 35, 30, 30)];
            [self.myButton setTitle:@"X" forState:UIControlStateNormal];
            [self.myButton setTitle:@"V" forState:UIControlStateHighlighted];
            self.myButton.backgroundColor = [UIColor systemBlueColor];
//            添加一个事件
            [self.myButton addTarget:self action:@selector(myButtonClick) forControlEvents:UIControlEventTouchUpInside];

//            添加圆角
            self.myButton.layer.cornerRadius = UI(10) ;
            self.myButton.layer.masksToBounds = YES ;
            self.myButton.layer.borderColor = [UIColor lightGrayColor ].CGColor;
            self.myButton.layer.borderWidth = UI(2);
            self.myButton;
        })];


    }
    return  self;
}

@end
物理分辨率
我们来看看如何做物理分辨率的适配
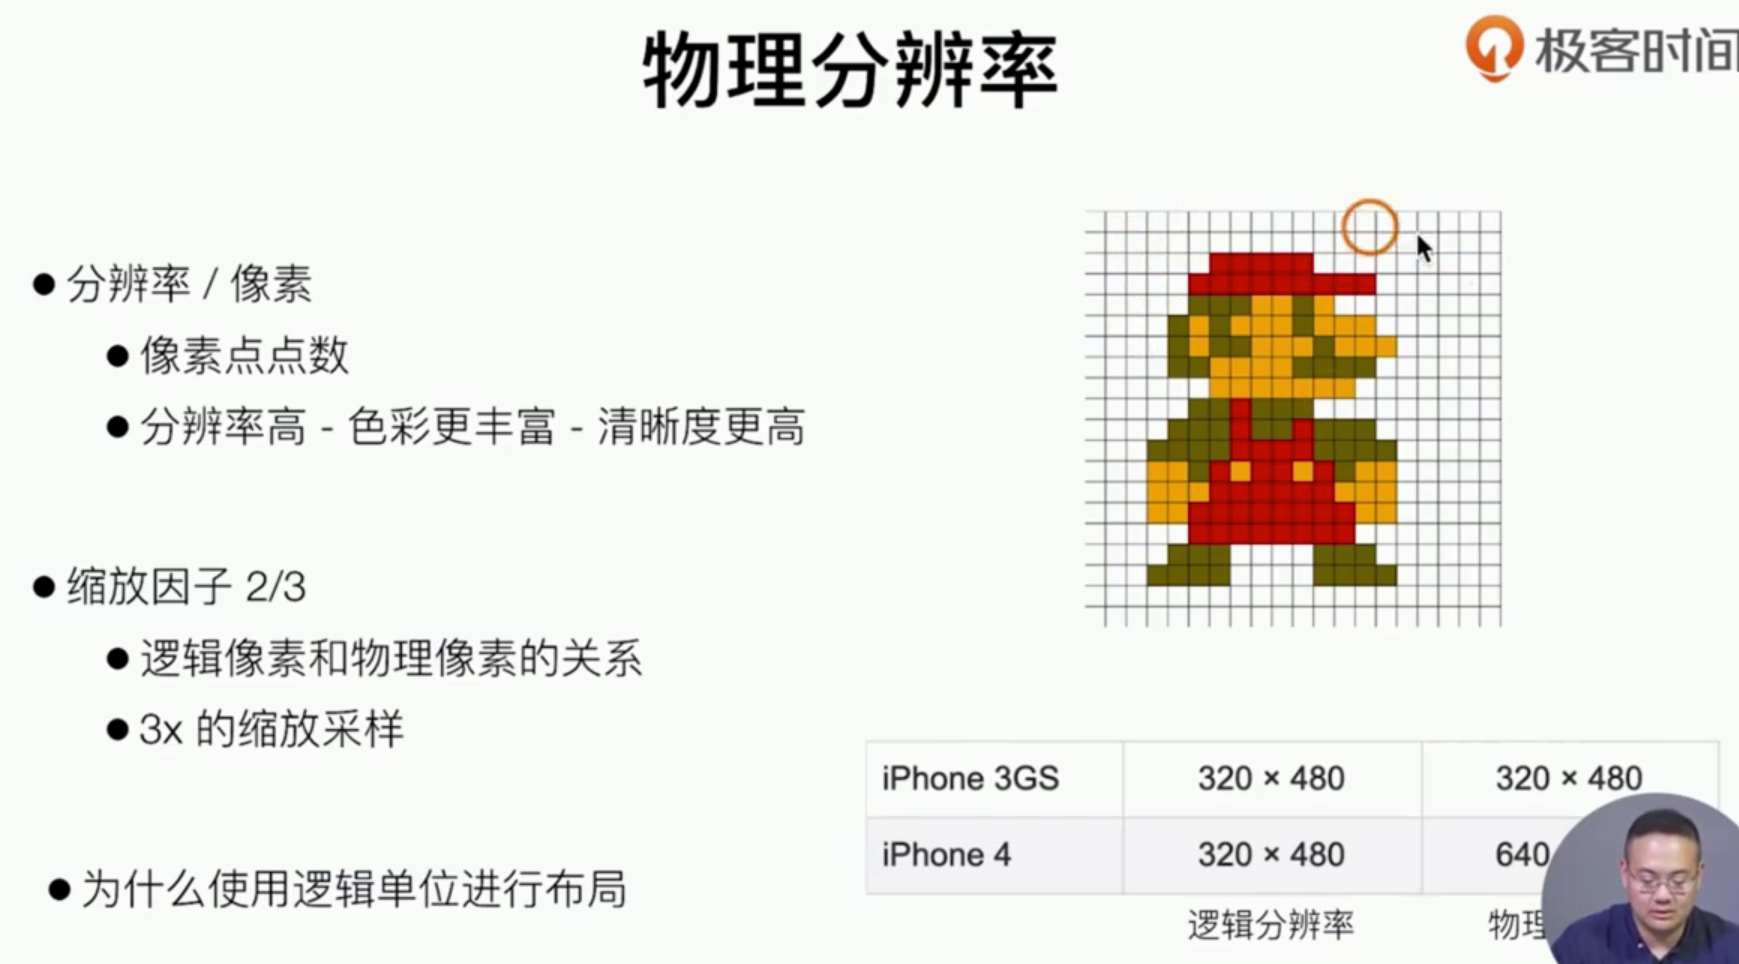
实际上物理分辨率 主要是用在物理分辨率上就是倍图( 前端知识 这里就不过多讲解了 ),对于布局我们还是使用逻辑分辨率 ,物理分辨率的适配底层就是对象素的适配

实际上 使用代码的的方式你就需要明确@2ximg.png什么的,才能正确的展示 ,那么有没有更好的实现方式呢 ImagerAsset 就是一种解决方案
使用ImagerAsset做适配
我们之前的图片都放到了bundle中 (实际上它就 是一个文件夹)。如果需要自动化适配的话 在xcoode中之需要放到ImageAsset就好了,系统在编译时期就能实现自动优化

实践指南
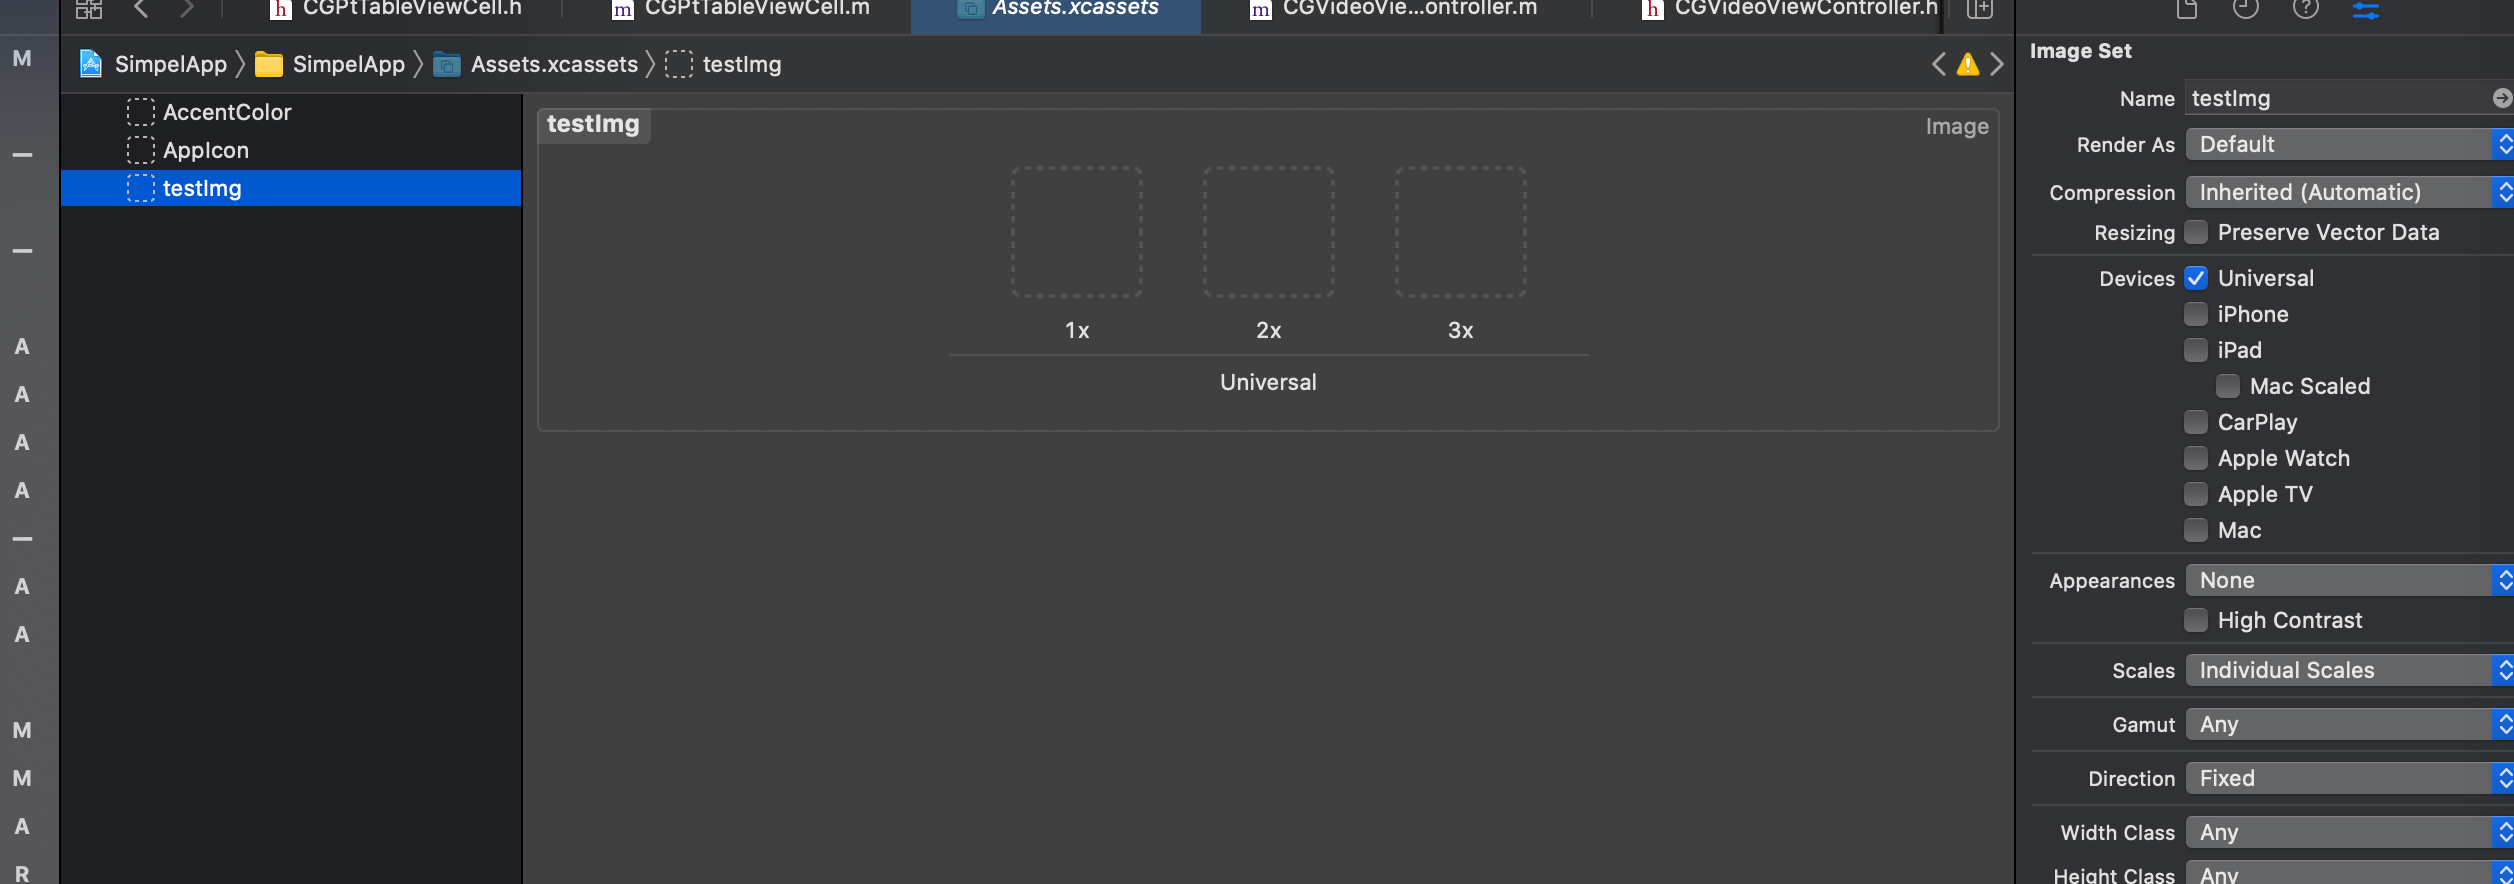
拖入图片就好了
用的时候只需要写名字就好了系统会自动的优化和选择
self.tabBarItem.image = [UIImage imageNamed:@"testImg"]; // 这样就足够了171614 3665
使用Iphonex做适配
这里主要指的是 拥有刘海屏幕和下巴的机型
理论知识
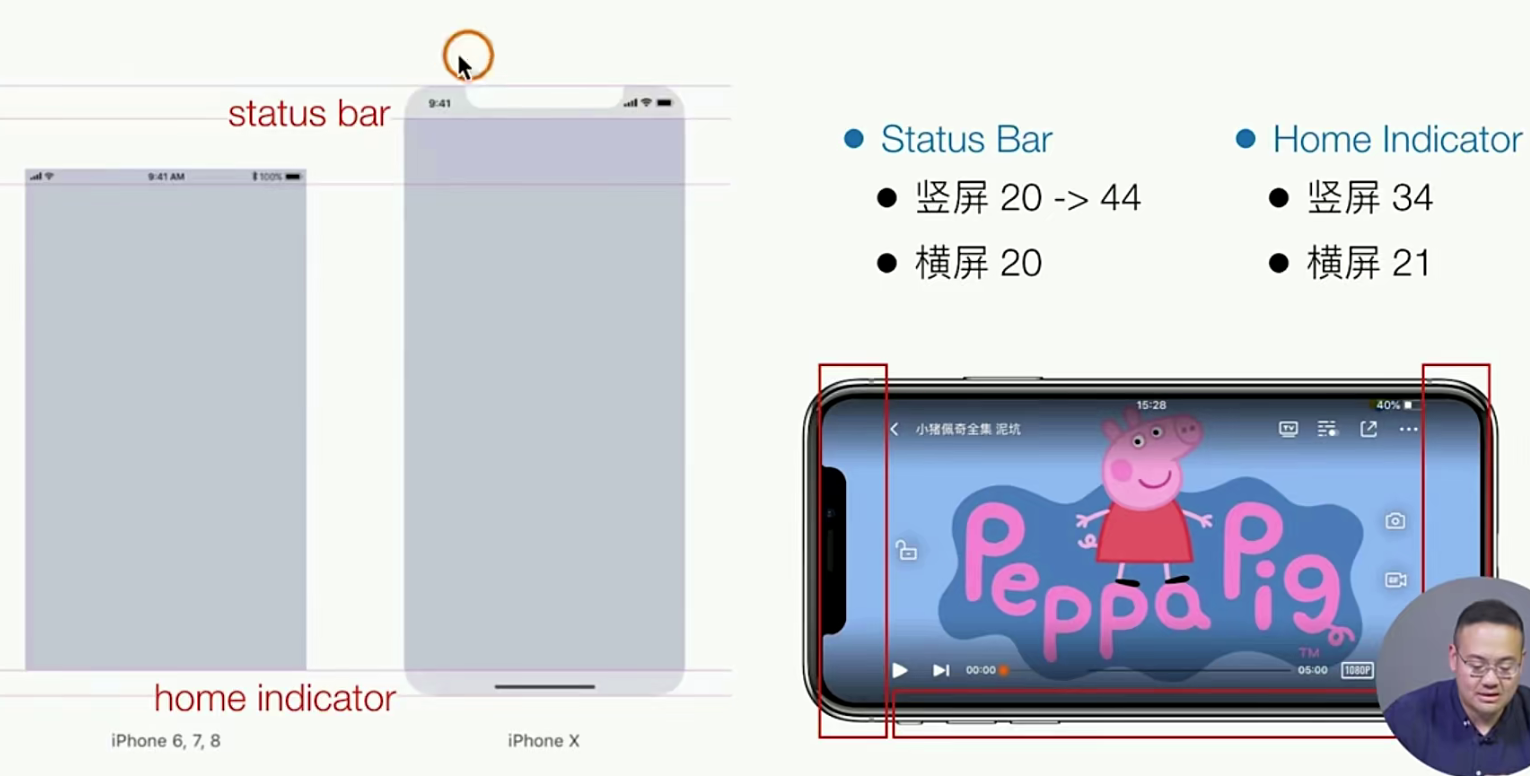
主要实现就是 “让出距离”
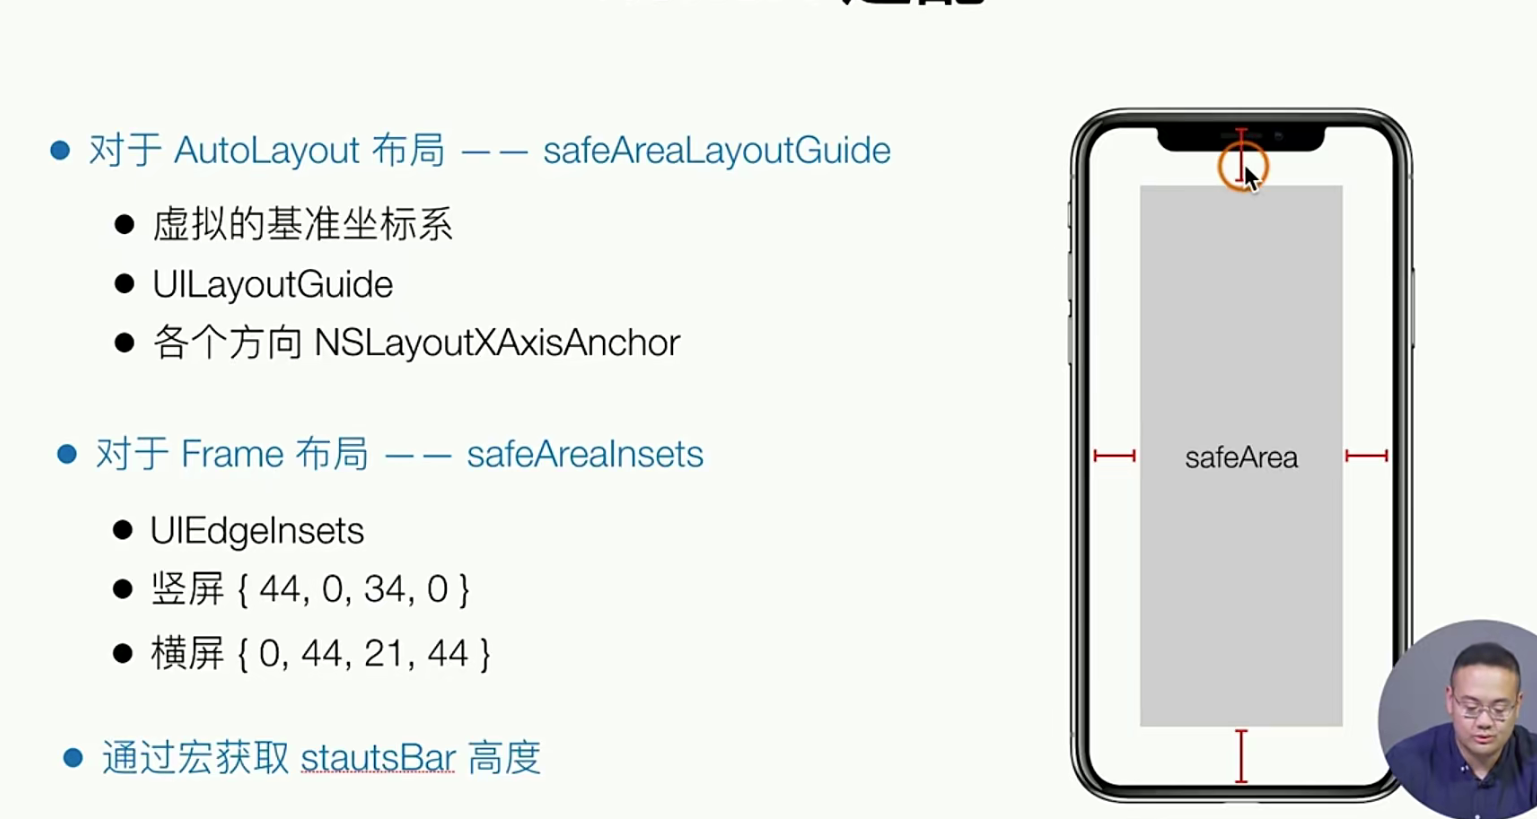
我们如果使用frme布局就比较好做 ,如果其他布局就需要另外的方案 autuLayout也有方案,上面都已经给出了
关于如何设置 距离 就是使用系统提供的 宏
实践指南
//
//  GTScreen.h
//  SimpelApp
//
//  Created by 李仕增 on 2022/1/6.
//

#import <UIKit/UIKit.h>

NS_ASSUME_NONNULL_BEGIN

// 使用两个宏 1.是否是横向屏幕 2. 定义屏幕的宽度 3. 定义屏幕的高度 (都需要注意屏幕横向问题)
#define IS_LANDSCAPE (UIInterfaceOrientationIsLandscape([ [UIApplication sharedApplication] statusBarOrientation  ]))

#define SCREEN_WIDTH (IS_LANDSCAPE ? [[UIScreen mainScreen] bounds].size.height :  [[UIScreen mainScreen] bounds].size.width )
#define SCREEN_HEIGHT (IS_LANDSCAPE ? [[UIScreen mainScreen] bounds].size.width :  [[UIScreen mainScreen] bounds].size.height )

//我们在定义两个函数的别名 (又是两个宏)
#define UI(x) UIAdapter(x)
#define UIRect(x,y,width,height) UIRectAdapter(x,y,width,height)

// 宏 手写判断机型 实际上 是哟UIDeivec也很香啊! 下面的全局都与特殊屏幕的适配
#define IS_IPHONE_X_XR_MAX (IS_IPHONE_X || IS_IPHONE_XR || IS_IPHONE_XMAX)
#define IS_IPHONE_X (SCREEN_WIDTH  == [GTScreen sizeFor58Inch].width && SCREEN_HEIGHT  == [GTScreen sizeFor58Inch].height)
#define IS_IPHONE_XR (SCREEN_WIDTH  == [GTScreen sizeFor61Inch].width && SCREEN_HEIGHT  == [GTScreen sizeFor61Inch].height &&  [UIScreen mainScreen].scale == 2)
#define IS_IPHONE_XMAX (SCREEN_WIDTH  == [GTScreen sizeFor65Inch].width && SCREEN_HEIGHT  == [GTScreen sizeFor65Inch].height &&   [UIScreen mainScreen].scale == 3)

//44和20 就是 x xr max 的不同的bar 高度
#define STATUSBARHEIGHT (IS_IPHONE_X_XR_MAX ? 46 :20)

// 定义一个内联函数 用于按照比例的进行缩放操作
static inline NSInteger UIAdapter (float x) {
//    1. 分机型
//    2. 按屏幕比例去做适配
    CGFloat scale = 414 / SCREEN_WIDTH;
    return (NSInteger) x / scale;
};

// 对一些布局的适配比如 四边的配置
static inline CGRect UIRectAdapter(x,y,width,height) {
    return  CGRectMake(UIAdapter(x), UIAdapter(y), UIAdapter(width), UIAdapter(height));
};


@interface GTScreen : NSObject
+(CGSize) sizeFor65Inch;
+(CGSize) sizeFor61Inch; // 注意⚠️XR 和X 大小一样但是屏幕分辨率不一样
+(CGSize) sizeFor58Inch;
@end

NS_ASSUME_NONNULL_END


# .m
//
//  GTScreen.m
//  SimpelApp
//
//  Created by 李仕增 on 2022/1/6.
//

#import "GTScreen.h"

@implementation GTScreen

// 直接使用类方法 去搞 刘海屏适配 但是也要集合宏 因为是全局用 哈哈
//iphone xs max
+(CGSize) sizeFor65Inch {
    return CGSizeMake(414, 896);
};

//iphone xr
+(CGSize) sizeFor61Inch {
    return CGSizeMake(414, 896);
};

//iphonex
+(CGSize) sizeFor58Inch {
    return CGSizeMake(375, 812);
};

//更多
@end


# 我们之前的webView 去改一下
#pragma DidLoad
- (void)viewDidLoad {
    [super viewDidLoad];

//    设置一个WKWebView
    [self.view addSubview:({
        self.webView = [[WKWebView alloc] initWithFrame:CGRectMake(0,STATUSBARHEIGHT + 44, self.view.frame.size.width, self.view.frame.size.height - STATUSBARHEIGHT -44 )];
        self.webView;
    })];

//    设置它的delegate
    self.webView.navigationDelegate = self;

//    给定一个网页去加载它

    [self.webView loadRequest:[NSURLRequest requestWithURL:[NSURL URLWithString:self.articleUrl]]];

//    搞上一个KVO观察者模式 1. 注册 监听某些属性的变化,比如这里监听的是estimatedProgress变化时,该属性如何变化时触发方法呢(estimatedProgress属性新变化的时候触发)? 需要传递什么参数呢,
    [self.webView addObserver:self forKeyPath:@"estimatedProgress" options:(NSKeyValueObservingOptionNew) context:(nil)];

    //    KVO设置一个进度条 4. 建立一个进度条 view
    [self.view addSubview:({
        self.webProgreess = [[UIProgressView alloc] initWithFrame:CGRectMake(0, STATUSBARHEIGHT + 44, self.view.frame.size.width, 30) ];
        self.webProgreess;
    })];
}


# 注意我们对于list 就是layot布局的需要调整一点点🤏
// IOS11 之后有一个方法 用来禁止 滚动适配 (默认系统自动设置) 我们要自己实现,因为我们还要兼容 低版本的设备
collectionViee.contentInsetAdjustmentBehavior = UIScrollViewContentInsetAdjustmentNever;
IOS适配问题总结
官方适配

“两个维度 三个方面” 去做适配 (逻辑分辨率 和物流分辨率维度,大小缩放布局适配,Iphonex适配,图片的适配x倍图)