iOS 开发基础:从 Hello World 到常用组件详解
June 18, 2025 (1y ago)
写这个教程的目的: 目前本人做前端做了三年 移动端方向做了2年,从狭义来说:
- IOS / Android / fultter 是直击移动端的根源
- 学习IOS 开发能成为了你的第二个技能,一个会OC 的前端 很NB
- 工作中遇到的一些东西 ,必须要Naitive全解决
我要成为一个资深前端:会OC 会Go 会运维知识Docker K8s Mysql MongoDB MQ;会RN ,会React 会NG 会Vue 但是我只做前端 React方向,我是掌握多技能的资深前端开发
MVC 和 Delegate 是IOS 最常用的设计模式
在ios设备上做一个Hello word!
简介以及常见的App类型和技术架构
目前流程的App架构类型
- 从业务上来分类
| 类型 | 技术侧重点 | 例子 |
|---|---|---|
| 通信类的 | 重点IM 和存储 | 微信 钉钉 QQ 办公软件 |
| 流媒体类的 | 重点是 推流 音视频 技术 | 抖音,西瓜视频等视频软件 |
| 工具类的 | 重点是 专业领域的技术 如果处理视频的处理图片的 | 美图秀秀,剪影... |
| 资讯类的 | 重点是信息的及时更新 | 今日头条 |
| 生活消费类的... | 重点是性能和安全以及展示 | 淘宝 |
- 从技术实现角度来分类
一般来说,分类比较多但是App在Native端得通用架构是不变的,变的是侧重点
| 纯IOS开发 | 优点 | 缺点 | 举例 |
|---|---|---|---|
| Native + H5 混合APp | |||
| Native + RN / Flutter第三方底层渲染框架混编 | |||
| Native + RN/Flutter + H5 混编 |
关于App通用的技术架构如下(这里仅仅是简单的列举了几种不同场景下的最佳实践方案)
| 场景 | 涉及知识点 |
|---|---|
| App展示界面 + 动画 | 底部TabBar Navigation 列表 ImageVIew Button/Label TextView WebView 动画 |
| App通用技术架构 | 网络,存储,图片,音视频,数据解析,布局/渲染(性能),启动。日志,上报 |
| App常用功能 | 复杂内容页面,登录,deepLink,推送,上架等 |
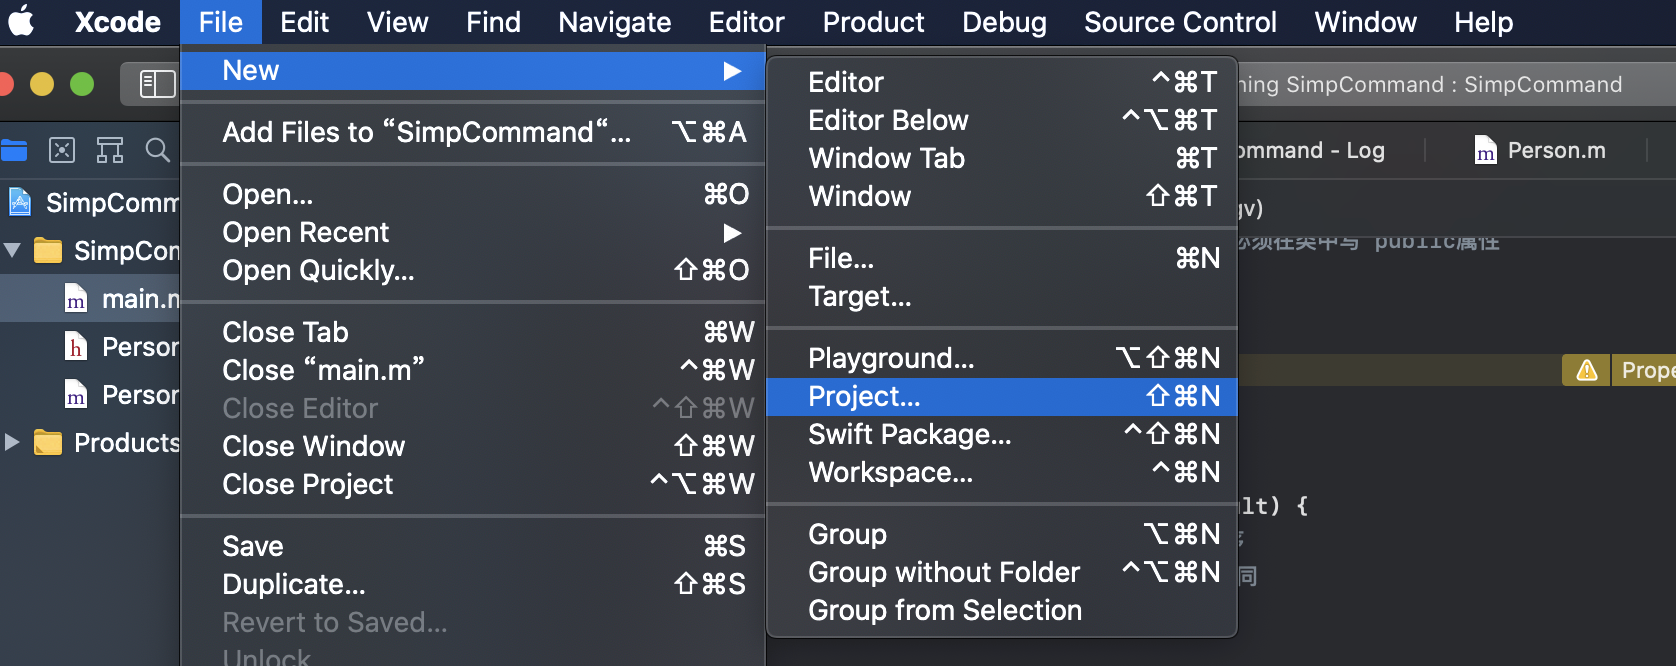
来吧!使用xcode 做个页面看看
先按照下面的步骤来创建一个App
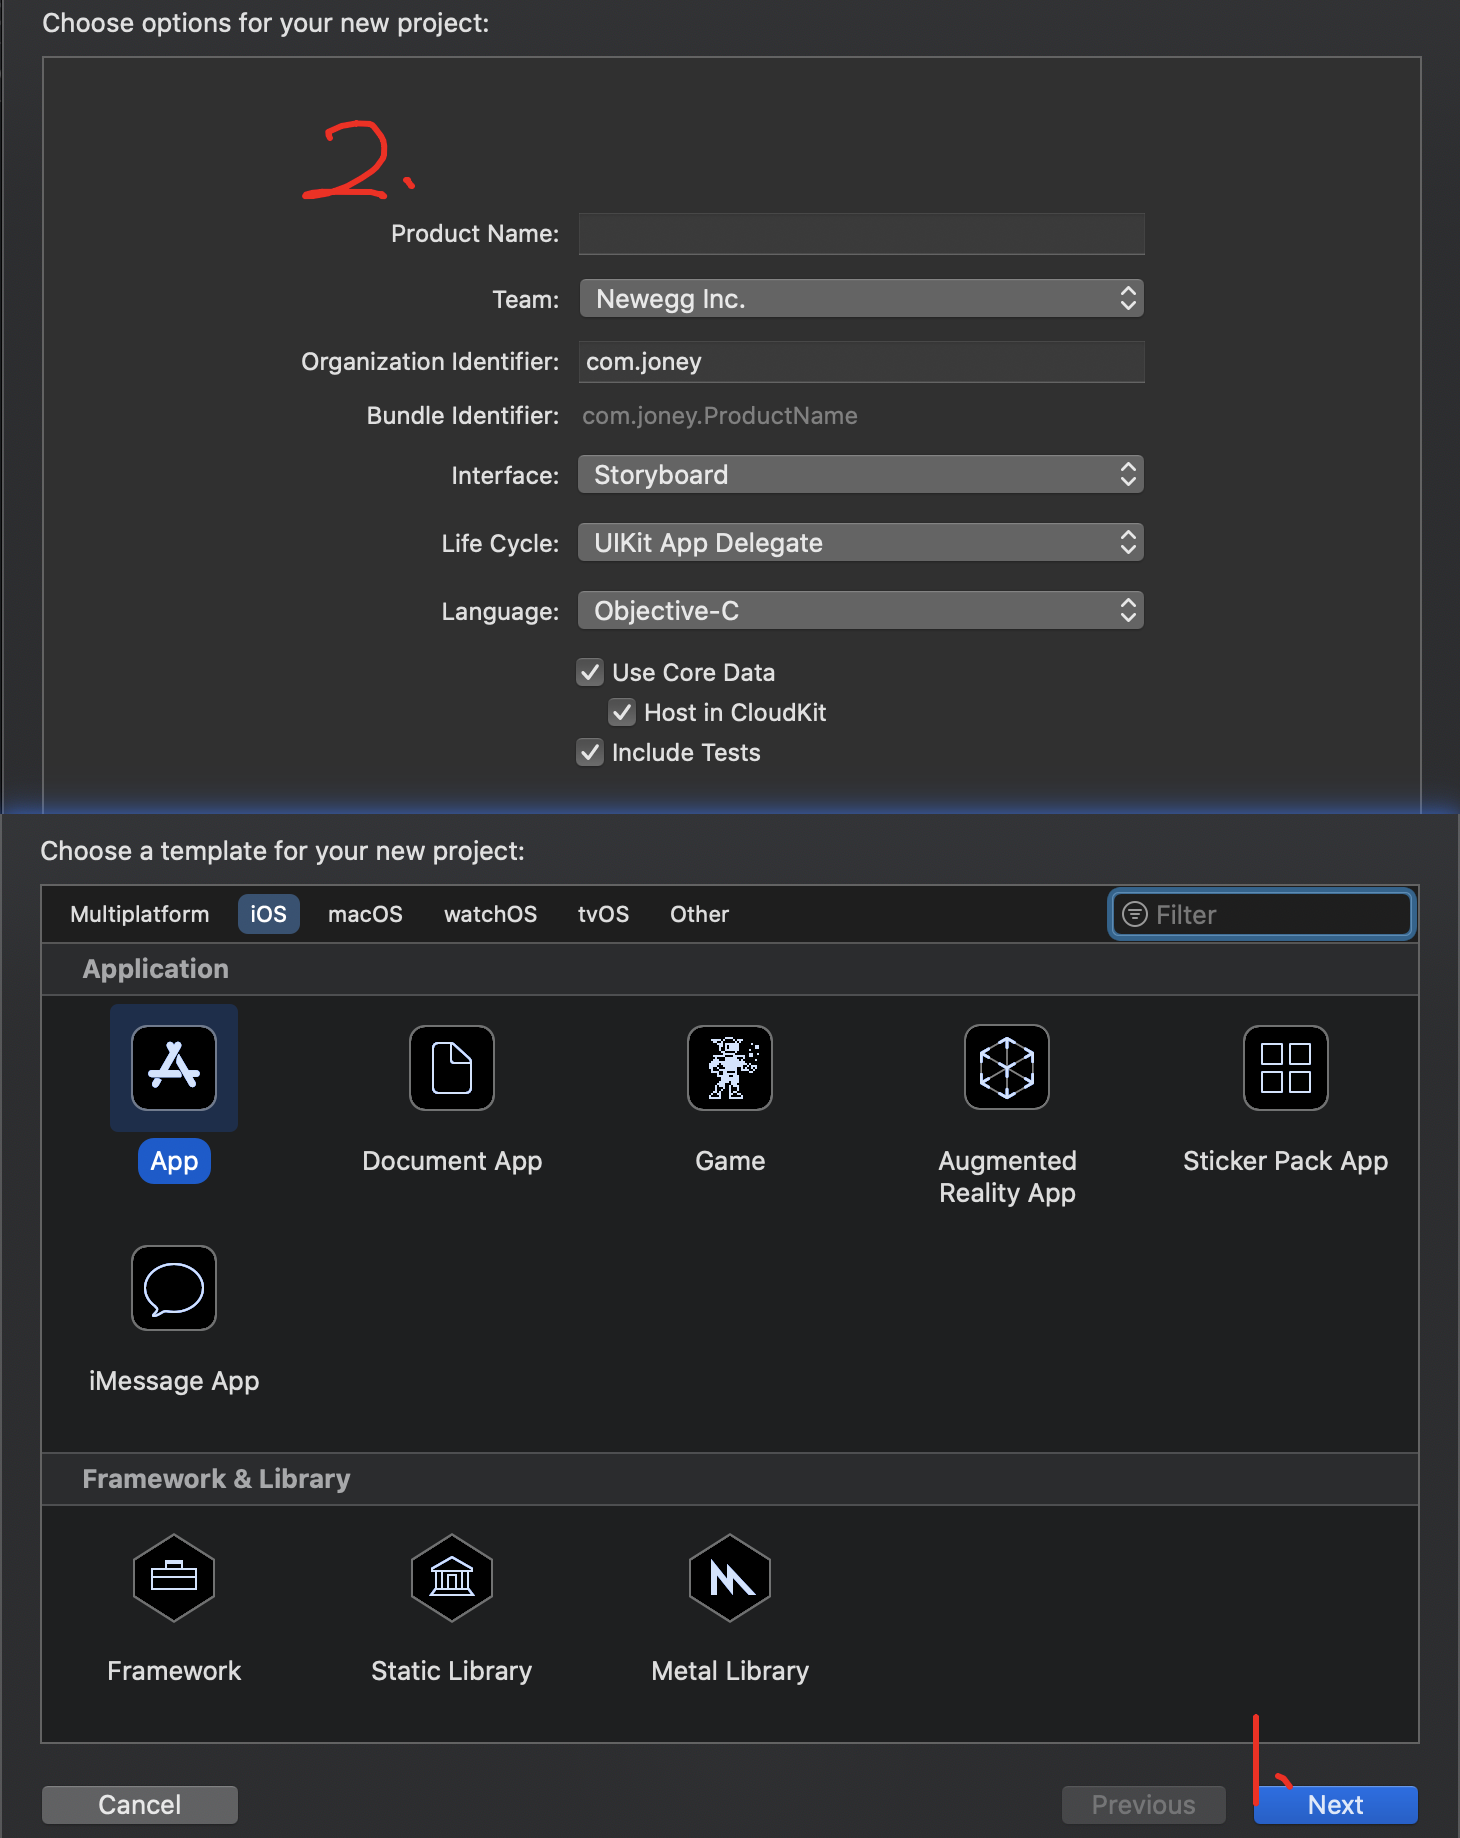
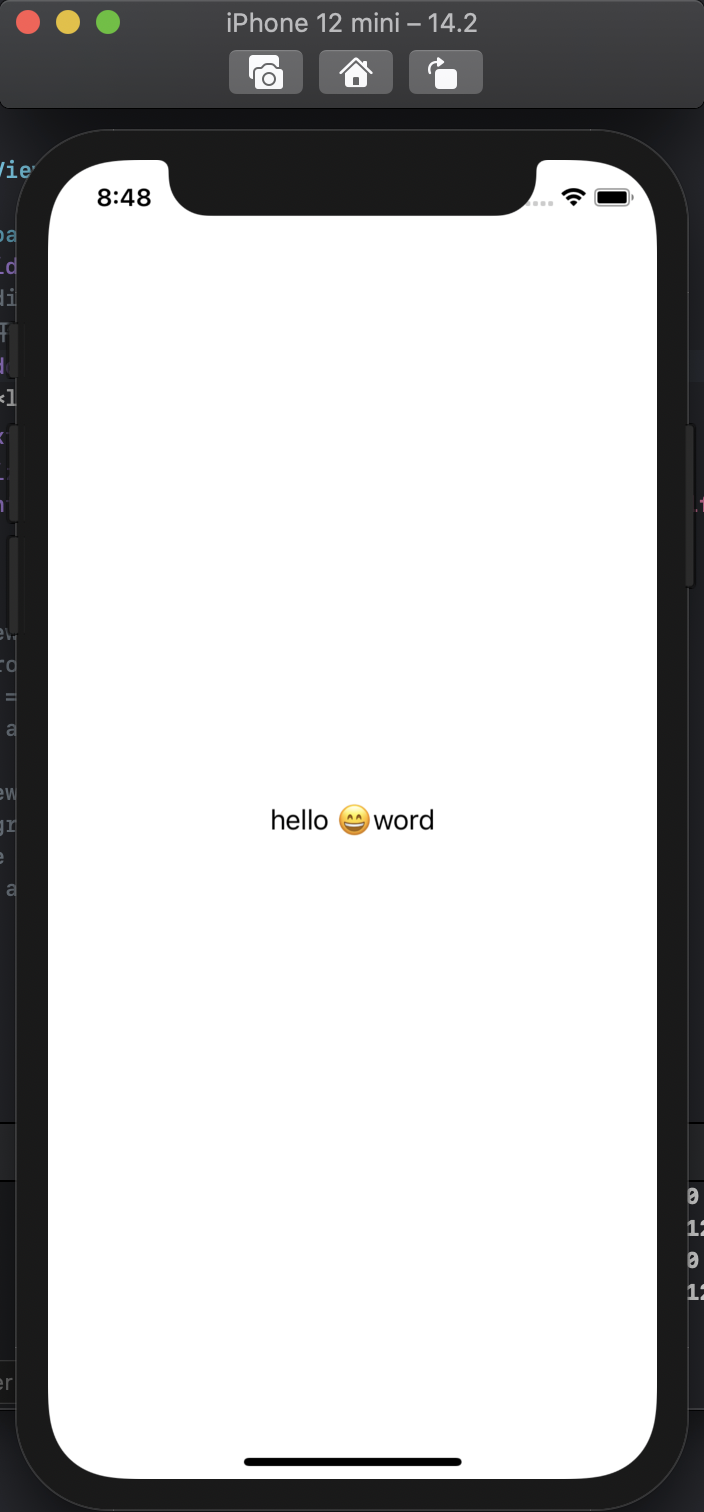
现在我们有了基础的结构,然后我们写点东东然后run一下

实际的效果如下:
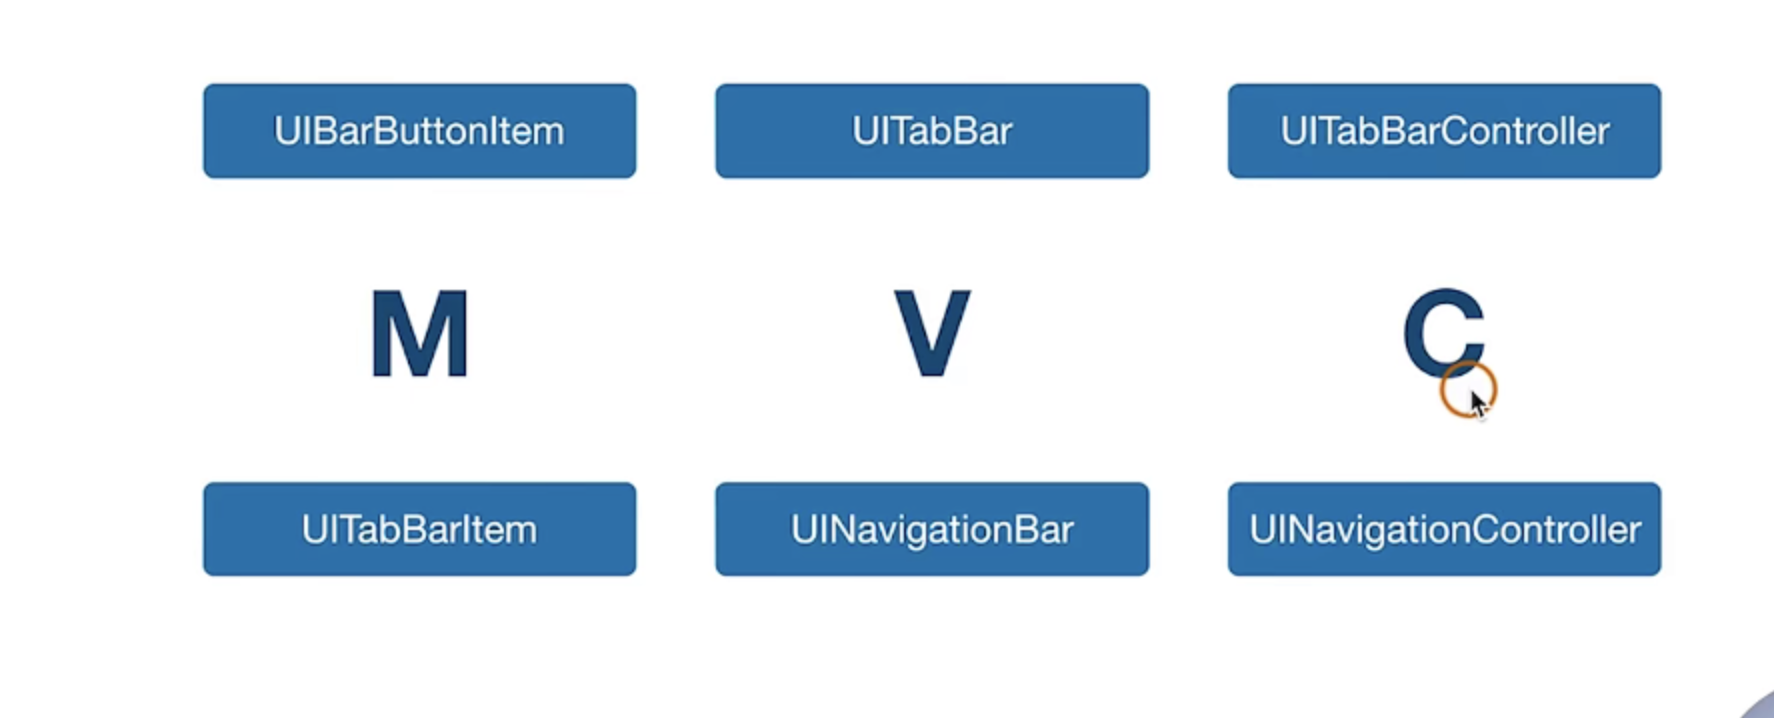
基础的IOS MVC架构
IOS 开发中的 基础框架 就是一个**MV( UIView )C (UIVIewController)**
UIKit的一些工具
前端角度说就是系统的组件库
UIView以及其生命周期
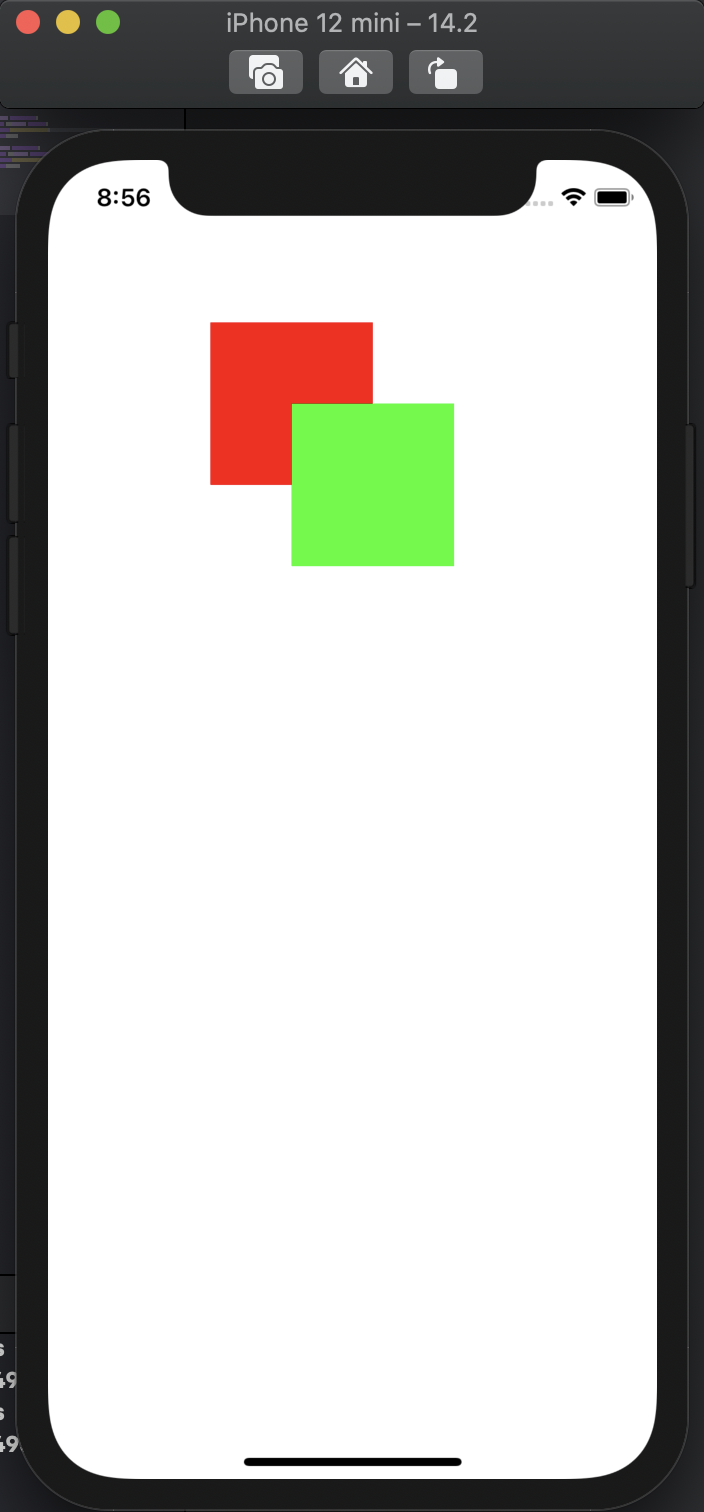
现在我们简单的创建两个UIVIew
#import "ViewController.h"

@interface ViewController ()

@end

@implementation ViewController

- (void)viewDidLoad {
    [super viewDidLoad];

    UIView *view = [[UIView alloc] init];
    view.backgroundColor = [UIColor redColor];
    view.frame = CGRectMake(100,100, 100, 100);
    [self.view addSubview:view];

    UIView *view2 = [[UIView alloc] init];
    view2.backgroundColor = [UIColor greenColor];
    view2.frame = CGRectMake(150,150, 100, 100);
    [self.view addSubview:view2];
    // 注意啊 在页面的效果是依次添加和叠加的效果哈

}


@end
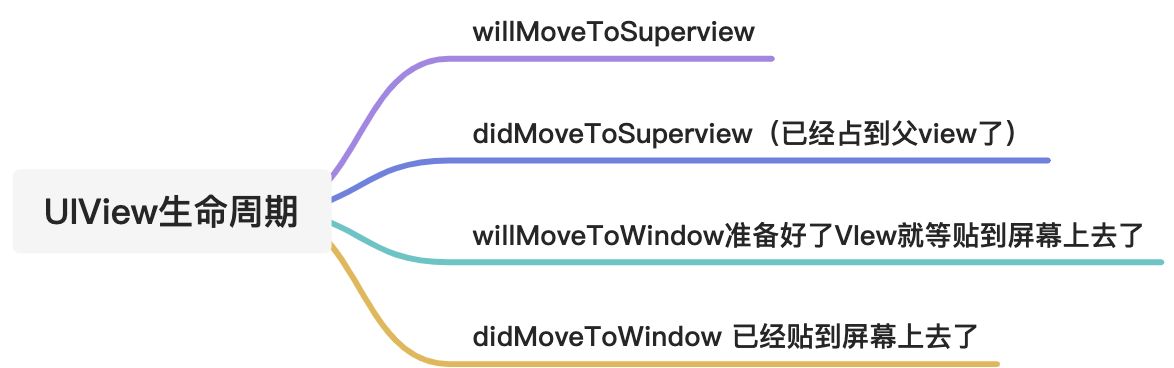
我们来看看UIView的内部逻辑和生命周期
我们通过重载几个UIView的方法,再打几个断点 来观察执行的流程
#import "ViewController.h"


@interface TextView : UIView

@end

// 重载几个方法
@implementation TextView

- (instancetype) init {
    self = [super init];
    if (self) {

    }
    return self;
}

- (void)willMoveToSuperview:(nullable UIView *)newSuperview {
    [super willMoveToSuperview:<#newSuperview#>];
};
- (void)didMoveToSuperview {
    [super didMoveToSuperview];
};
- (void)willMoveToWindow:(nullable UIWindow *)newWindow {
    [super willMoveToWindow:<#newWindow#>];
};
- (void)didMoveToWindow {
    [super didMoveToWindow];
};

@end
@interface ViewController ()
@end

@implementation ViewController

- (void)viewDidLoad {
    [super viewDidLoad];

    TextView *view = [[TextView alloc] init];
    view.backgroundColor = [UIColor redColor];
    view.frame = CGRectMake(100,100, 100, 100);
    [self.view addSubview:view];


}


@end
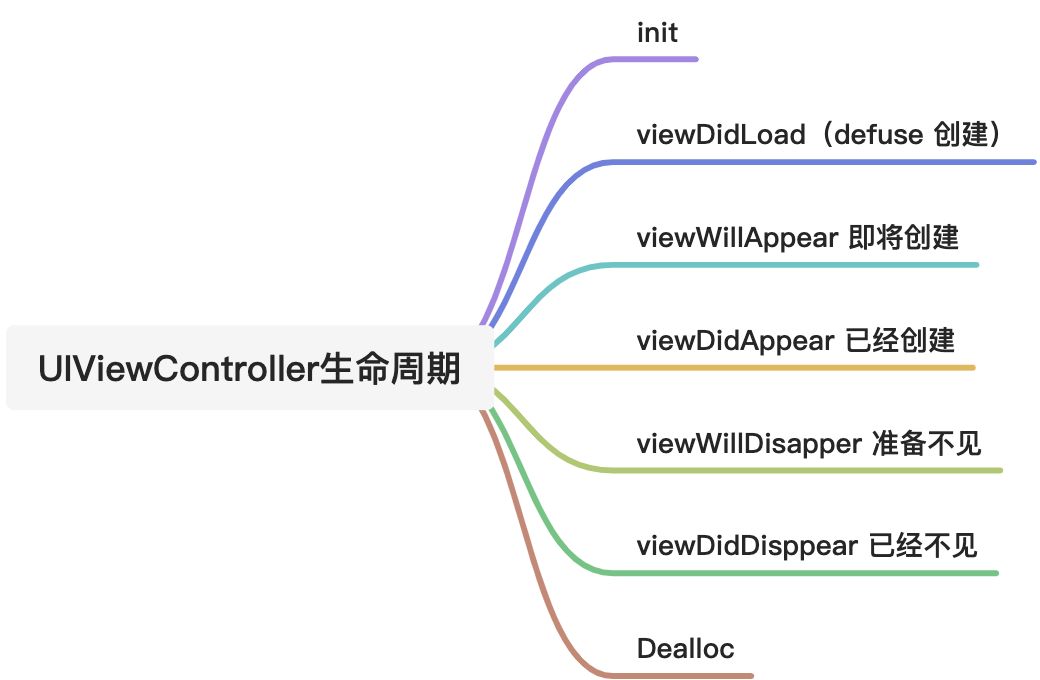
UIViewController
前面我们讲了MVC中的VIew现在我们来看看 C
这个东西不仅仅是控制View 它本身就是一个VIew 只不过它是一个父类更大的view 用用承载管理更多的子view
功能如下
- 管理VIew 视图 生命周期
- 反馈用户操作
- 和App整体交互 视图切换
- 作为䘝容器管理跟多的Contaoller
#import "ViewController.h"


@implementation ViewController

- (instancetype) init {
    self = [super init];
    if (self) {

    }
    return self;
}
- (void)viewWillAppear:(BOOL)animated {
    [super viewWillAppear: animated];
};
- (void)viewDidAppear:(BOOL)animated {
    [super viewDidAppear: animated];
};
- (void)viewWillDisappear:(BOOL)animated {
    [super viewWillDisappear: animated];
};
- (void)viewDidDisappear:(BOOL)animated {
    [super viewDidDisappear: animated];
};

- (void)viewDidLoad {
    [super viewDidLoad];
    // Do any additional setup after loading the view.


    UIView *view = [[UIView alloc] init];
    view.backgroundColor = [UIColor redColor];
    view.frame = CGRectMake(100,100, 100, 100);
    [self.view addSubview:view];

}


@end
其生命周期如下:测试代码如上👆🏻
UITabBarController
类似于多页面切换哈
理论知识
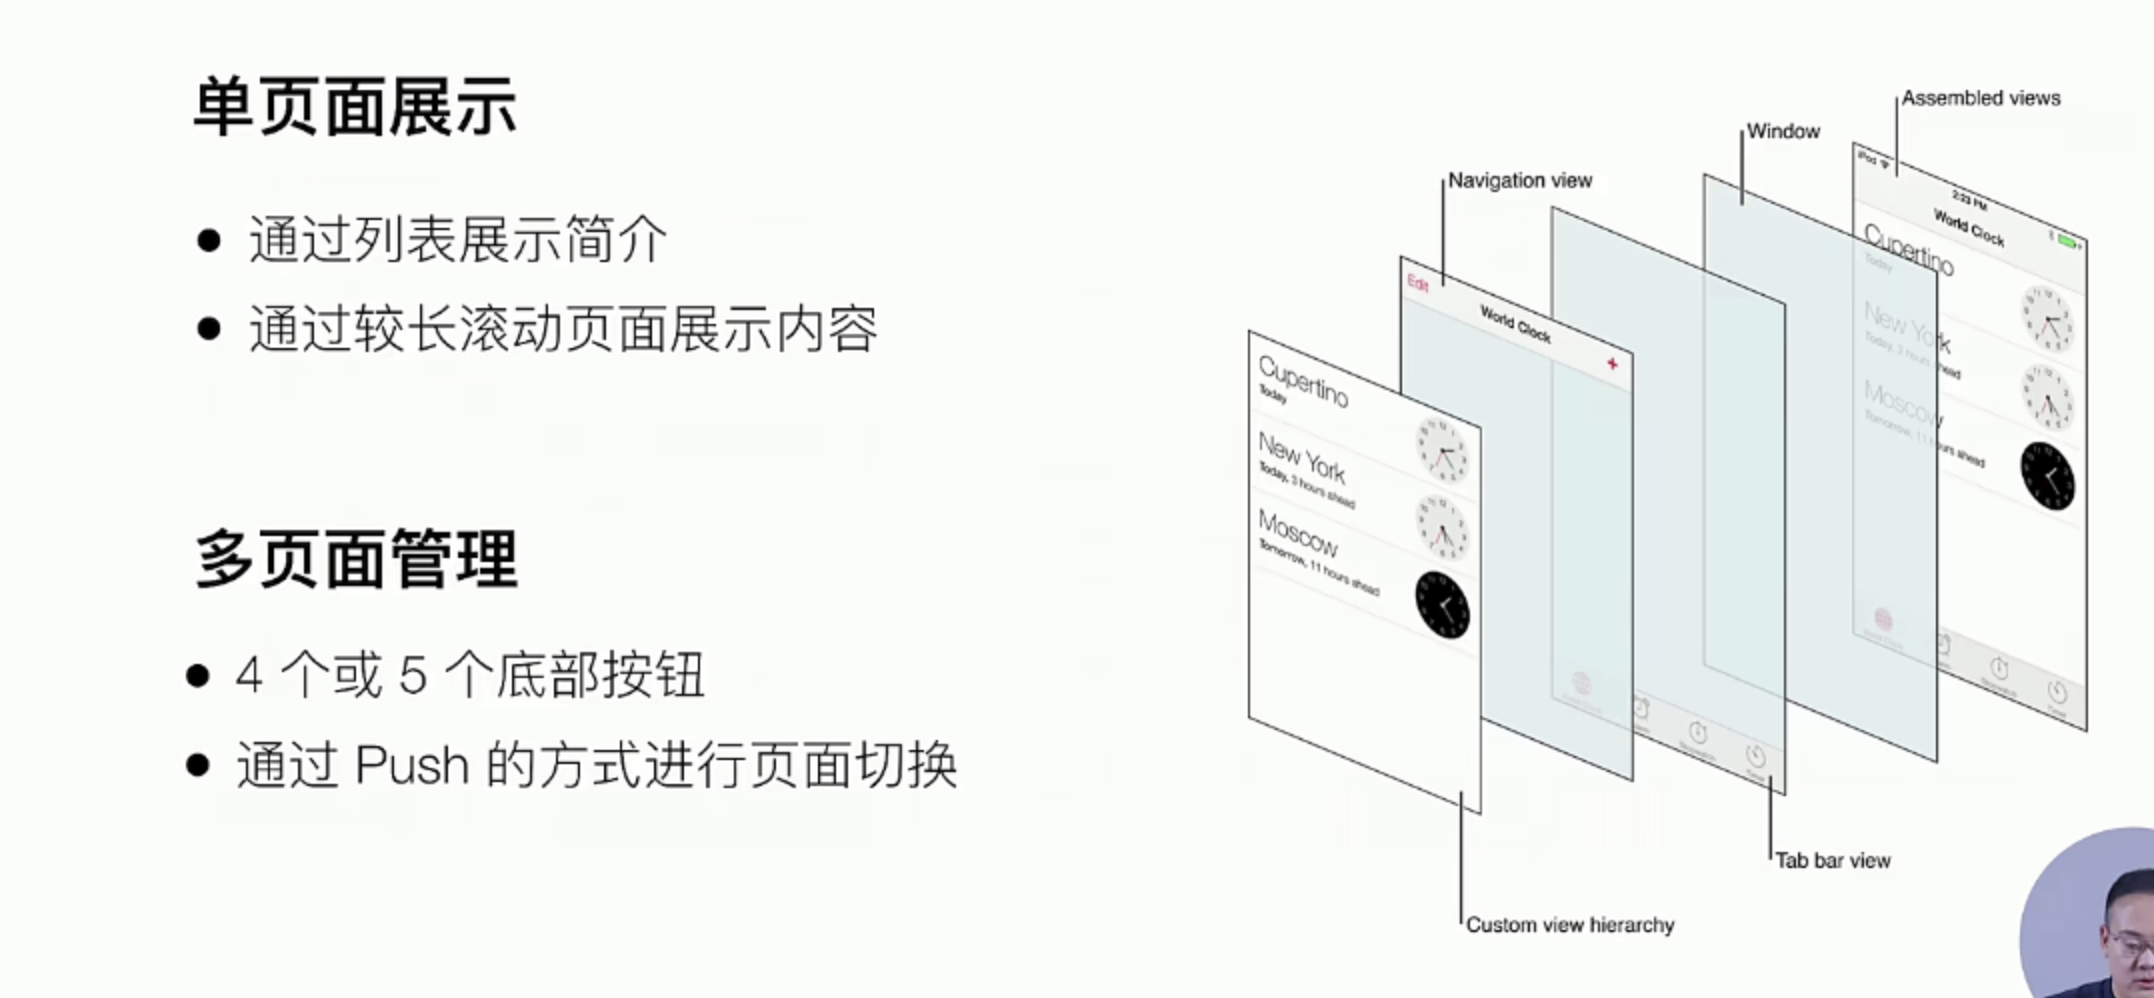
常见的App页面
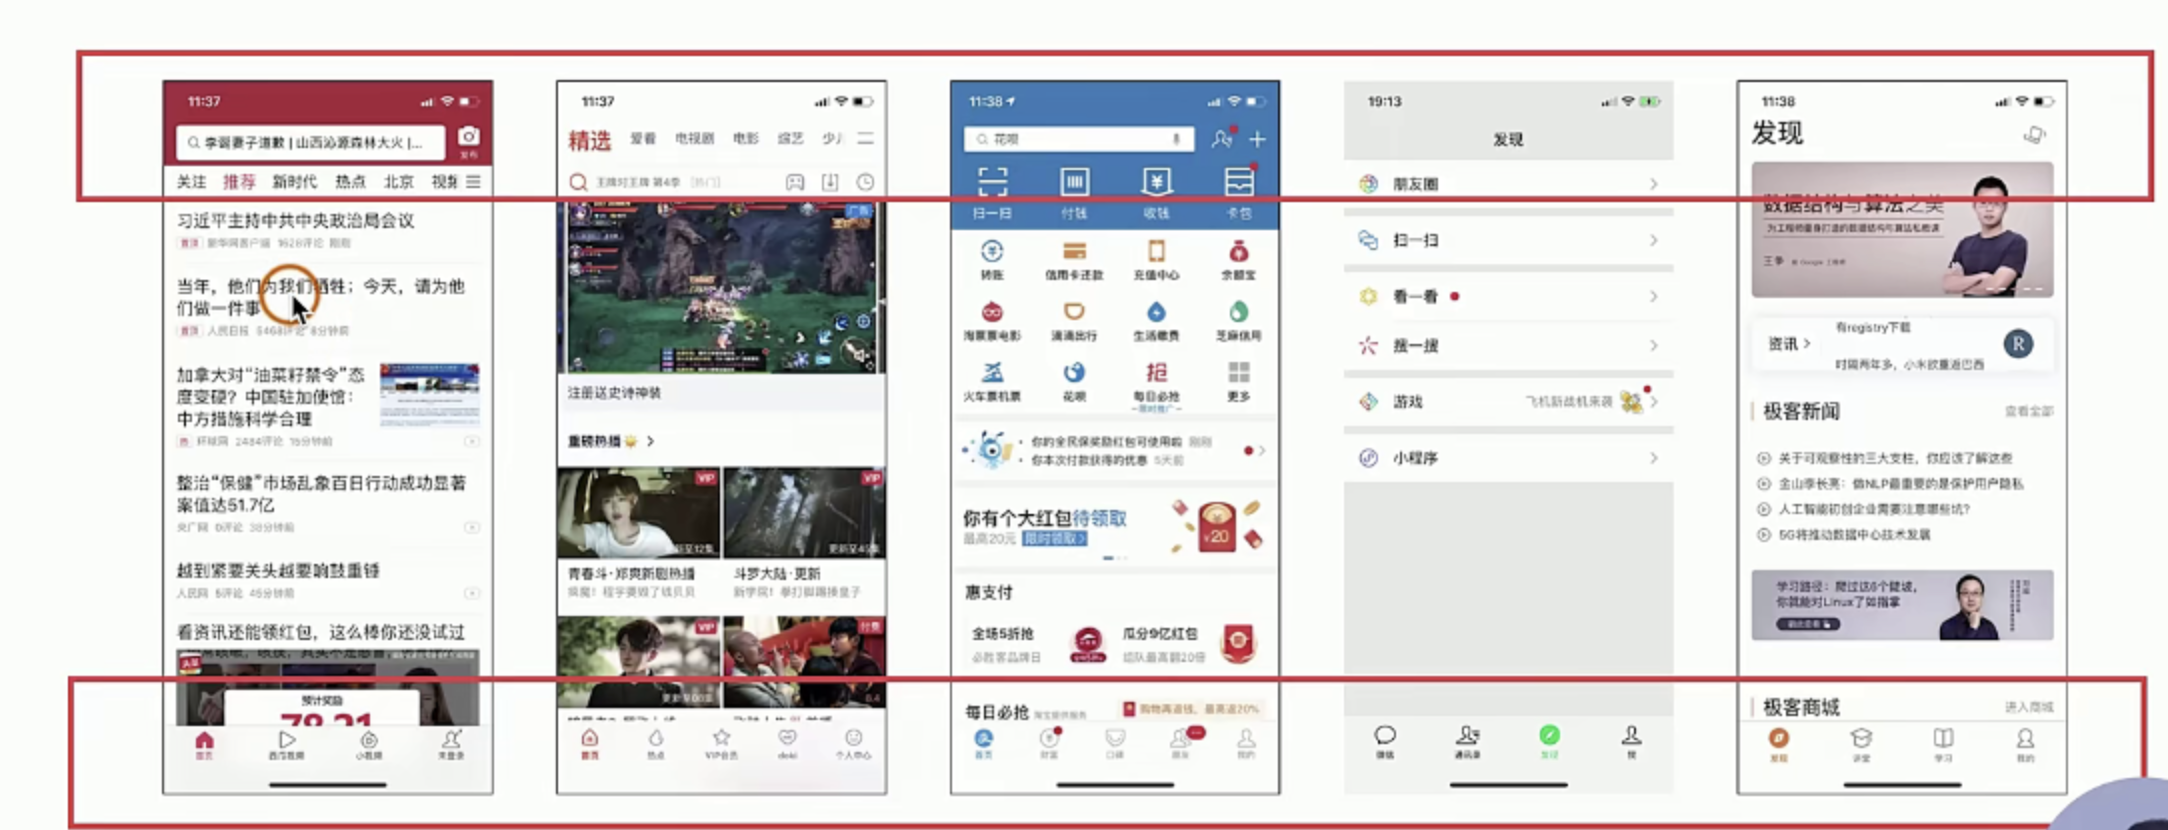
其具体的技术的结构又可以分如下
接下来我们来实现 TabBar实际上就是一个UITabBarController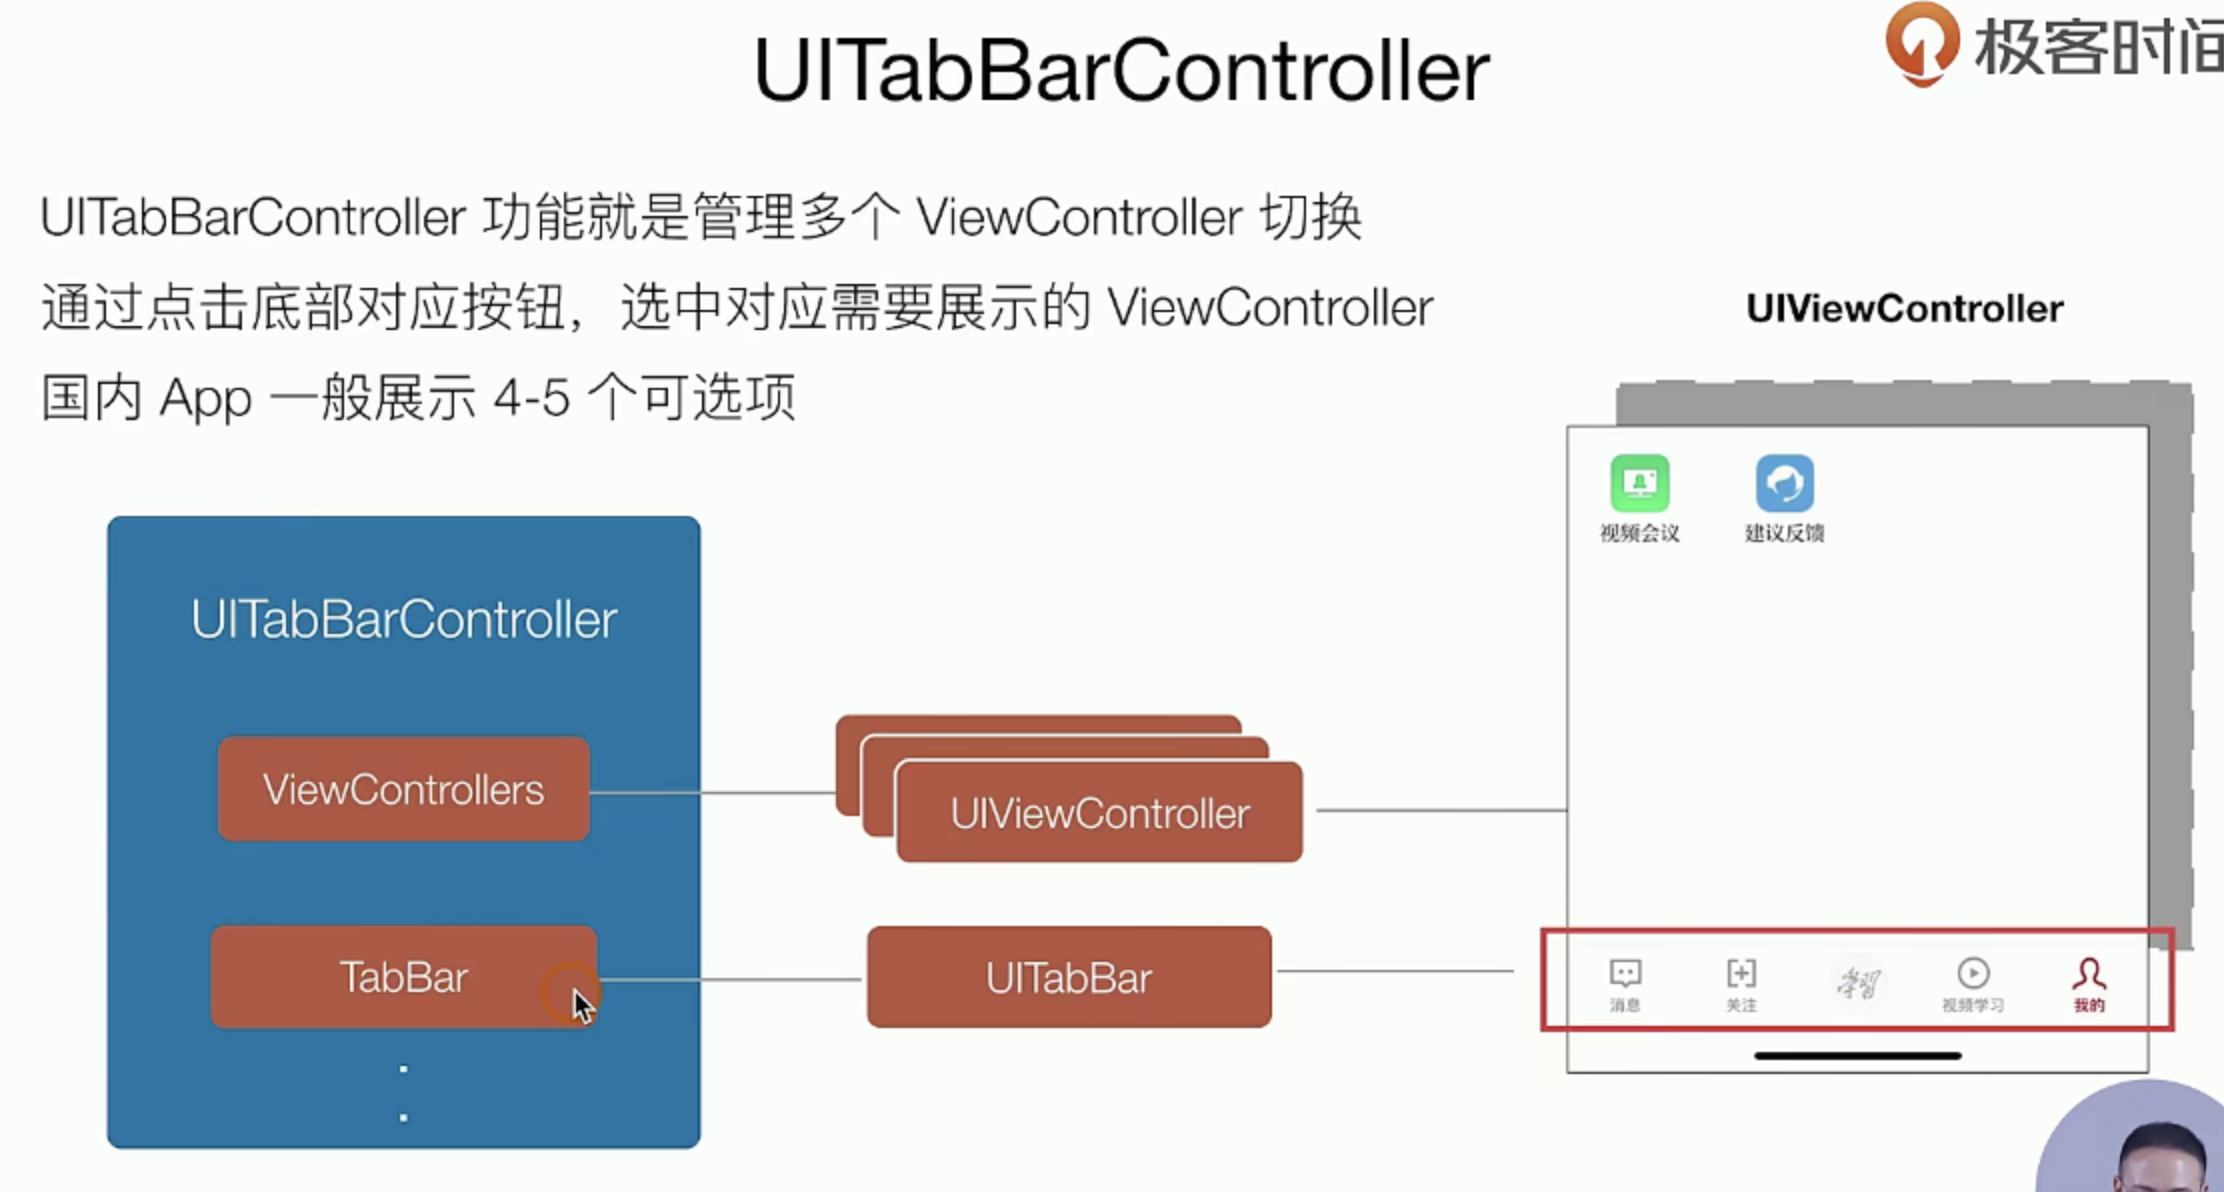
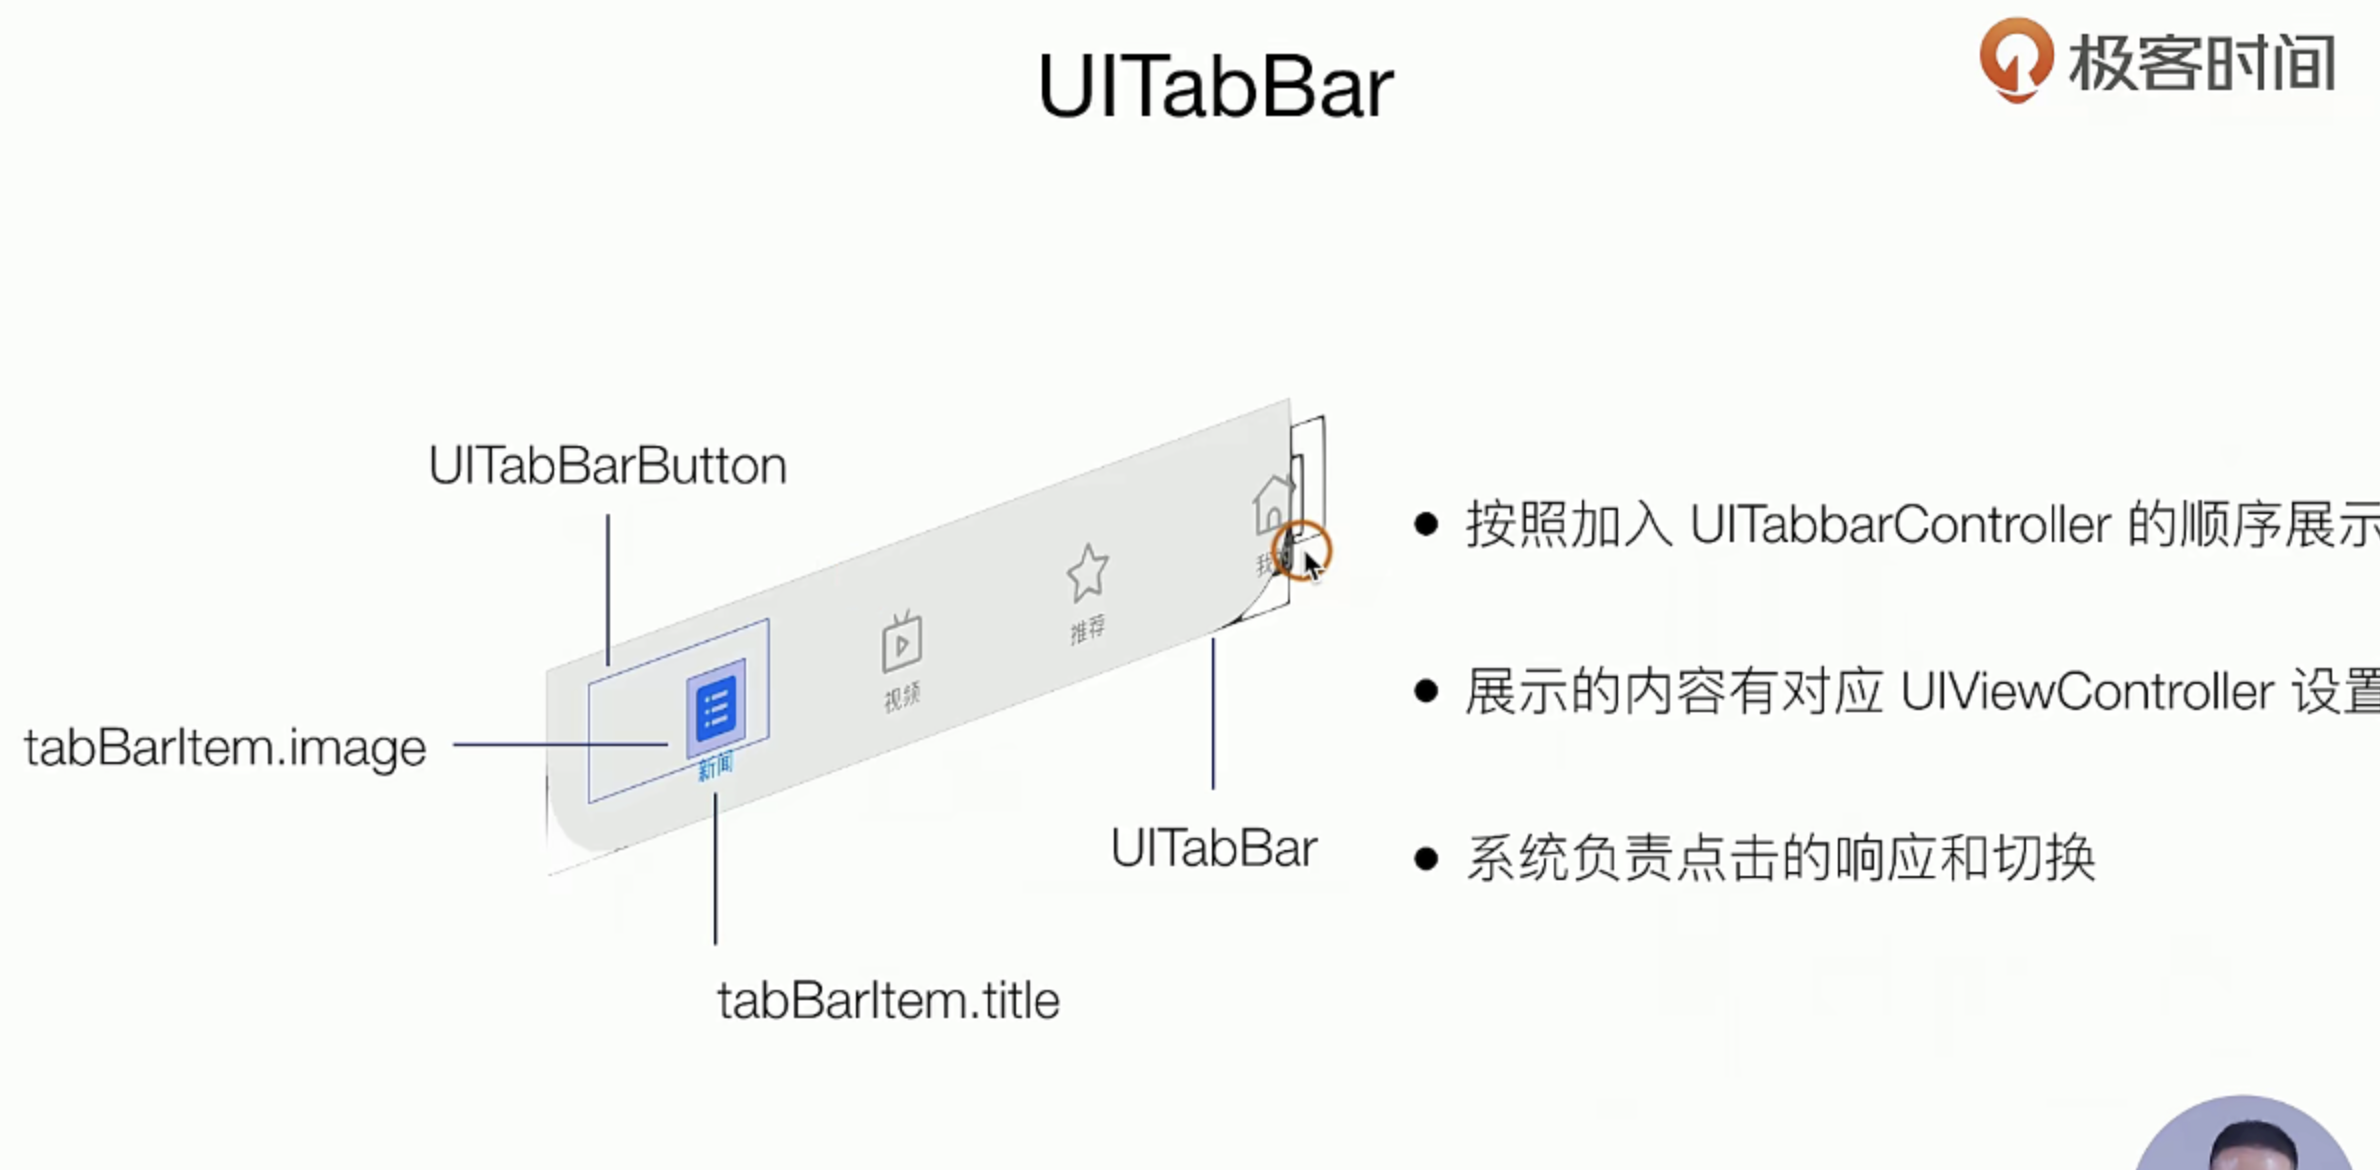
其UITabBar组件又如下:
实操指南:
我们把这次事件分三个部分
- 有坑的地方说明和前期准备:
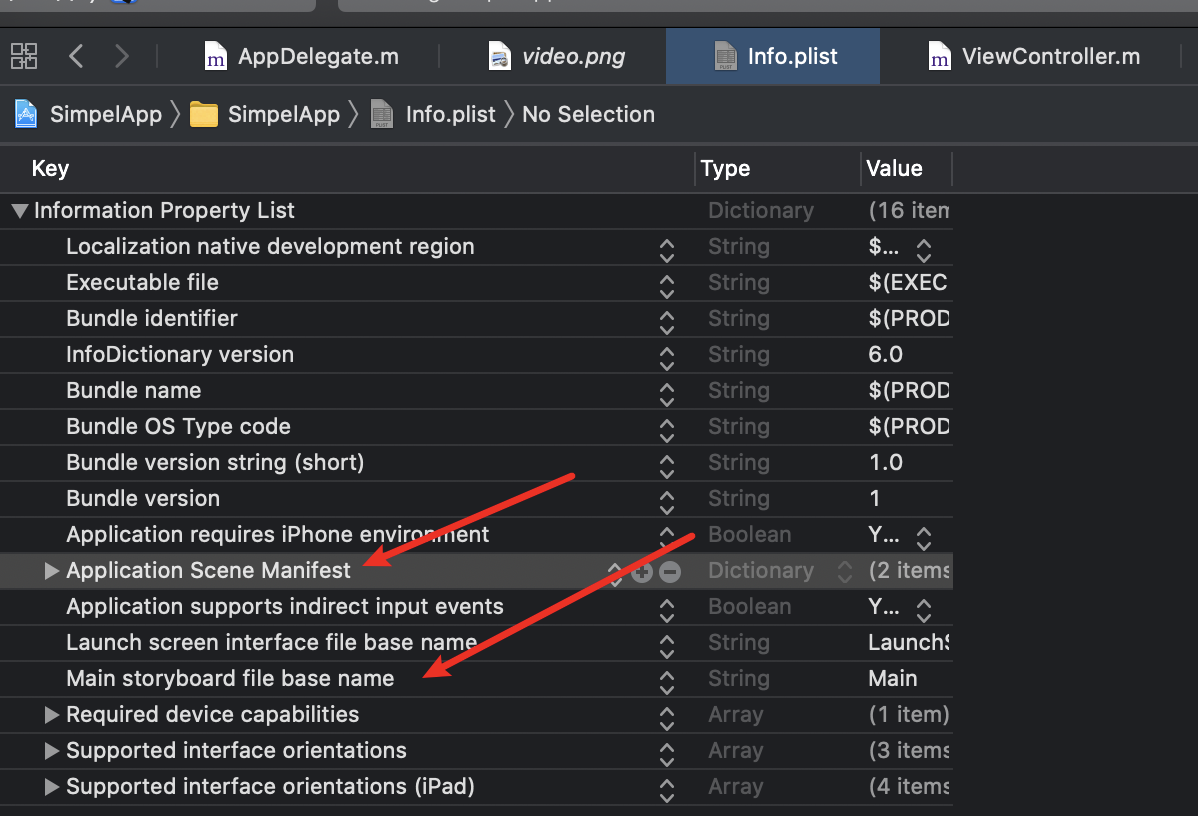
- 替换一个APPWindow的容器:
(安装操作来,后续我们会详细的说明这个东西的原理),首先我们把xcode12 创建项目的时候的Main storyboard,删除,如何去info,list中删除下面的配置项
- 删除不要的配置和引用
- 重写APPDelegate文件的两个方法
//- (UISceneConfiguration *)application:(UIApplication *)application configurationForConnectingSceneSession:(UISceneSession *)connectingSceneSession options:(UISceneConnectionOptions *)options {
//    // Called when a new scene session is being created.
//    // Use this method to select a configuration to create the new scene with.
//    return [[UISceneConfiguration alloc] initWithName:@"Default Configuration" sessionRole:connectingSceneSession.role];
//}
//
//
//- (void)application:(UIApplication *)application didDiscardSceneSessions:(NSSet<UISceneSession *> *)sceneSessions {
//    // Called when the user discards a scene session.
//    // If any sessions were discarded while the application was not running, this will be called shortly after application:didFinishLaunchingWithOptions.
//    // Use this method to release any resources that were specific to the discarded scenes, as they will not return.
//}
-
准备Icon
新建一个📂 文件夹,命令叫做icon.bundle,然后把你的Icon加入进去就好了,这里我选择的Incofont上的随便几张图直接放了进去,特别需要注意的图的尺寸,我用的大小是32的和48的就好了,而且要求是png的哈。
- 编码中
- 详细就是下面的代码
#AppDelegate.m 文件中
// +++++

- (BOOL)application:(UIApplication *)application didFinishLaunchingWithOptions:(NSDictionary *)launchOptions {
    self.window = [[UIWindow alloc] initWithFrame:[[UIScreen mainScreen] bounds]];
//    ViewController *viewController = [[ViewController alloc] init];
    // 搞一个TabBar
    UITabBarController *tabbarController = [[UITabBarController alloc] init];

    UIViewController *controller1 = [[UIViewController alloc] init];
    controller1.view.backgroundColor = [UIColor redColor];
    controller1.tabBarItem.title =@"新闻";
    controller1.tabBarItem.image = [UIImage imageNamed:@"icon.bundle/home.png"];
    controller1.tabBarItem.selectedImage = [UIImage imageNamed:@"icon.bundle/homeActive.png"];

    UIViewController *controller2 = [[UIViewController alloc] init];
    controller2.view.backgroundColor = [UIColor orangeColor];
    controller2.tabBarItem.title =@"资讯";
    controller2.tabBarItem.image = [UIImage imageNamed:@"icon.bundle/all.png"];
    controller2.tabBarItem.selectedImage = [UIImage imageNamed:@"icon.bundle/allActive.png"];

    UIViewController *controller3 = [[UIViewController alloc] init];
    controller3.view.backgroundColor = [UIColor grayColor];
    controller3.tabBarItem.title =@"视频";
    controller3.tabBarItem.image = [UIImage imageNamed:@"icon.bundle/video.png"];
    controller3.tabBarItem.selectedImage = [UIImage imageNamed:@"icon.bundle/videoActive.png"];

    UIViewController *controller4 = [[UIViewController alloc] init];
    controller4.view.backgroundColor = [UIColor systemPinkColor];
    controller4.tabBarItem.title =@"我的";
    controller4.tabBarItem.image = [UIImage imageNamed:@"icon.bundle/Customer.png"];
    controller4.tabBarItem.selectedImage = [UIImage imageNamed:@"icon.bundle/CustomerActive.png"];

    [tabbarController setViewControllers:@[controller1,controller2,controller3,controller4]];

    self.window.rootViewController = tabbarController;
    [self.window makeKeyAndVisible];
    return YES;
}

// +++++- 测试验证
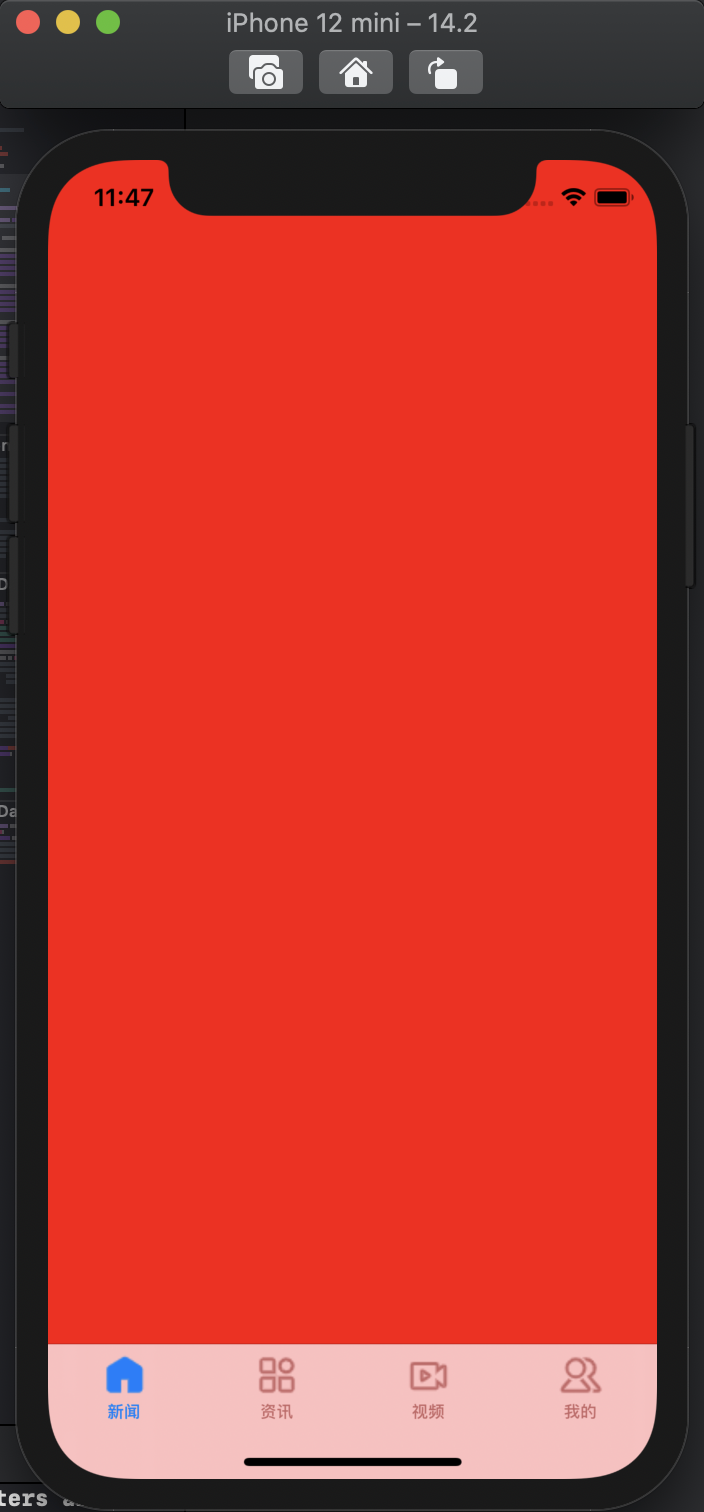
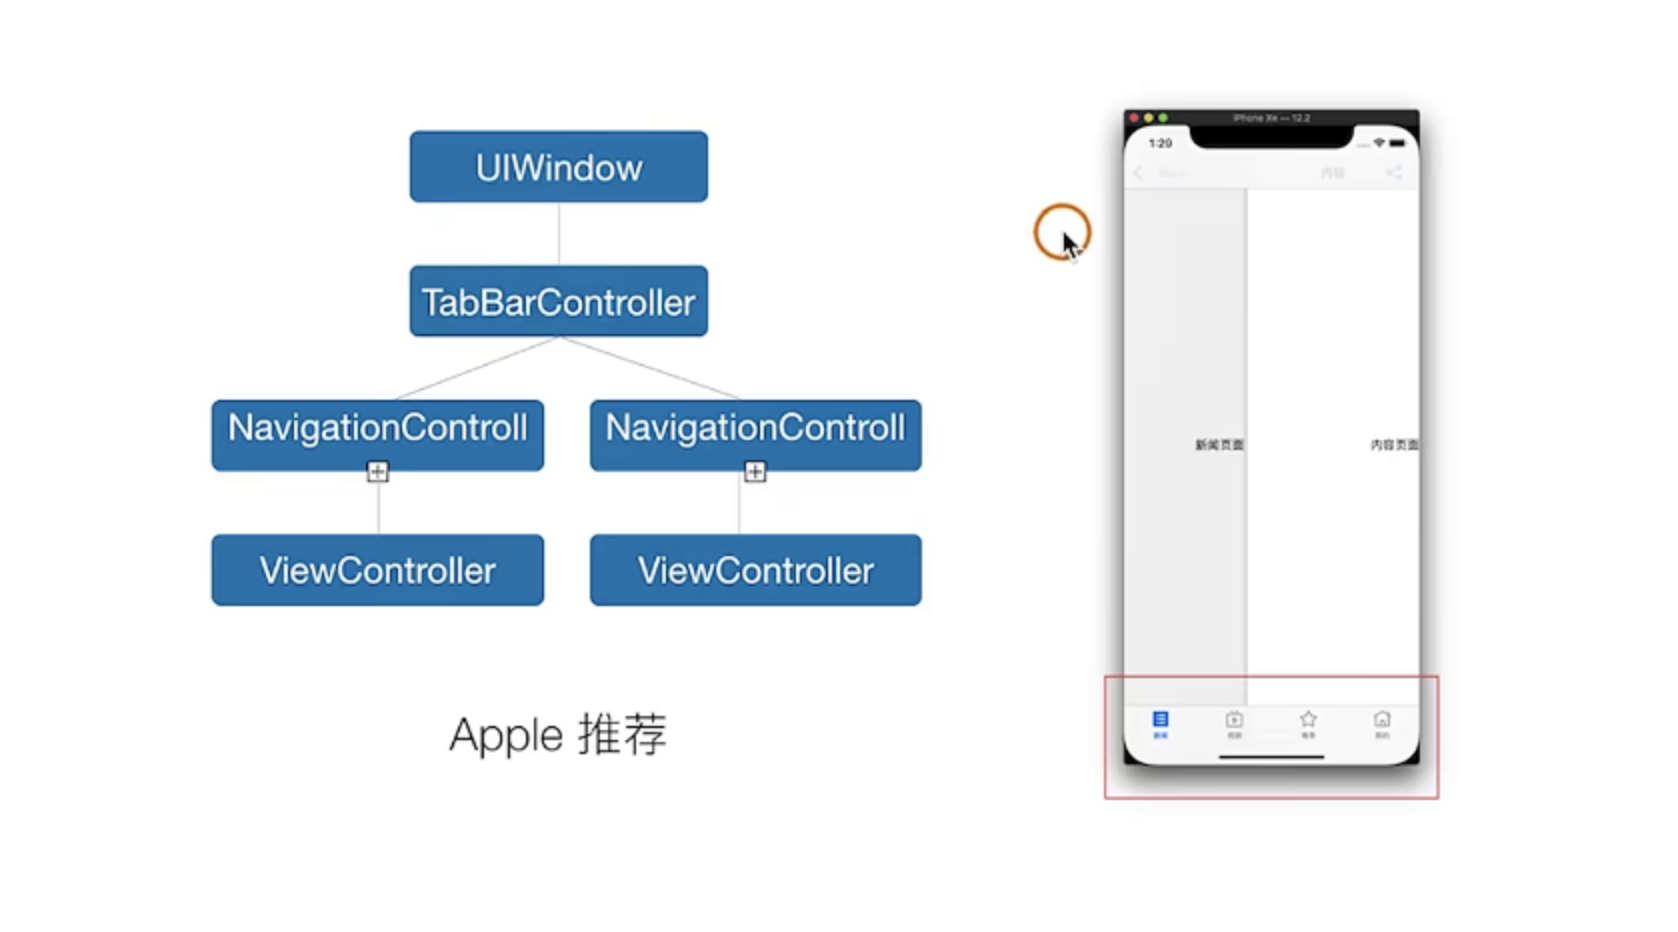
UINavigationController
理论知识

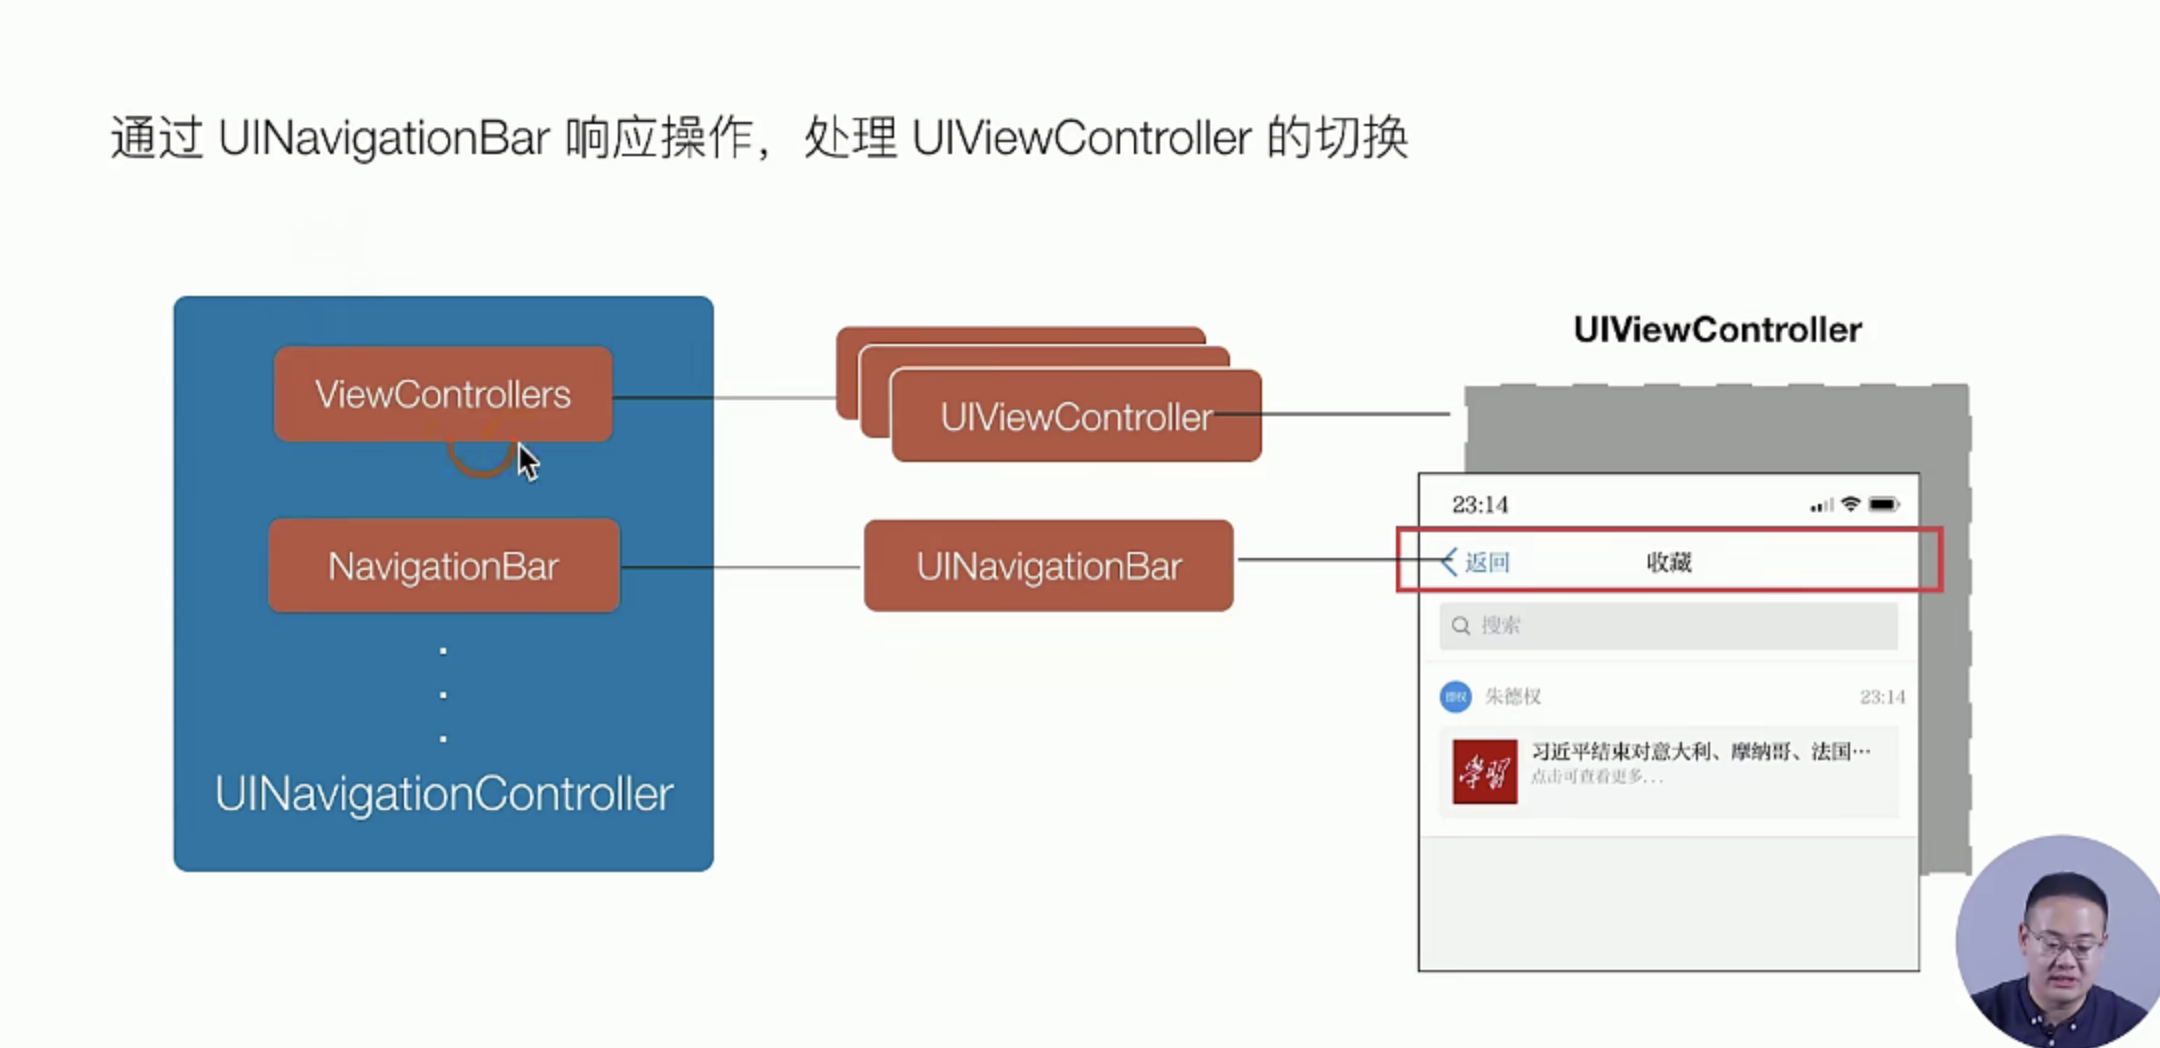
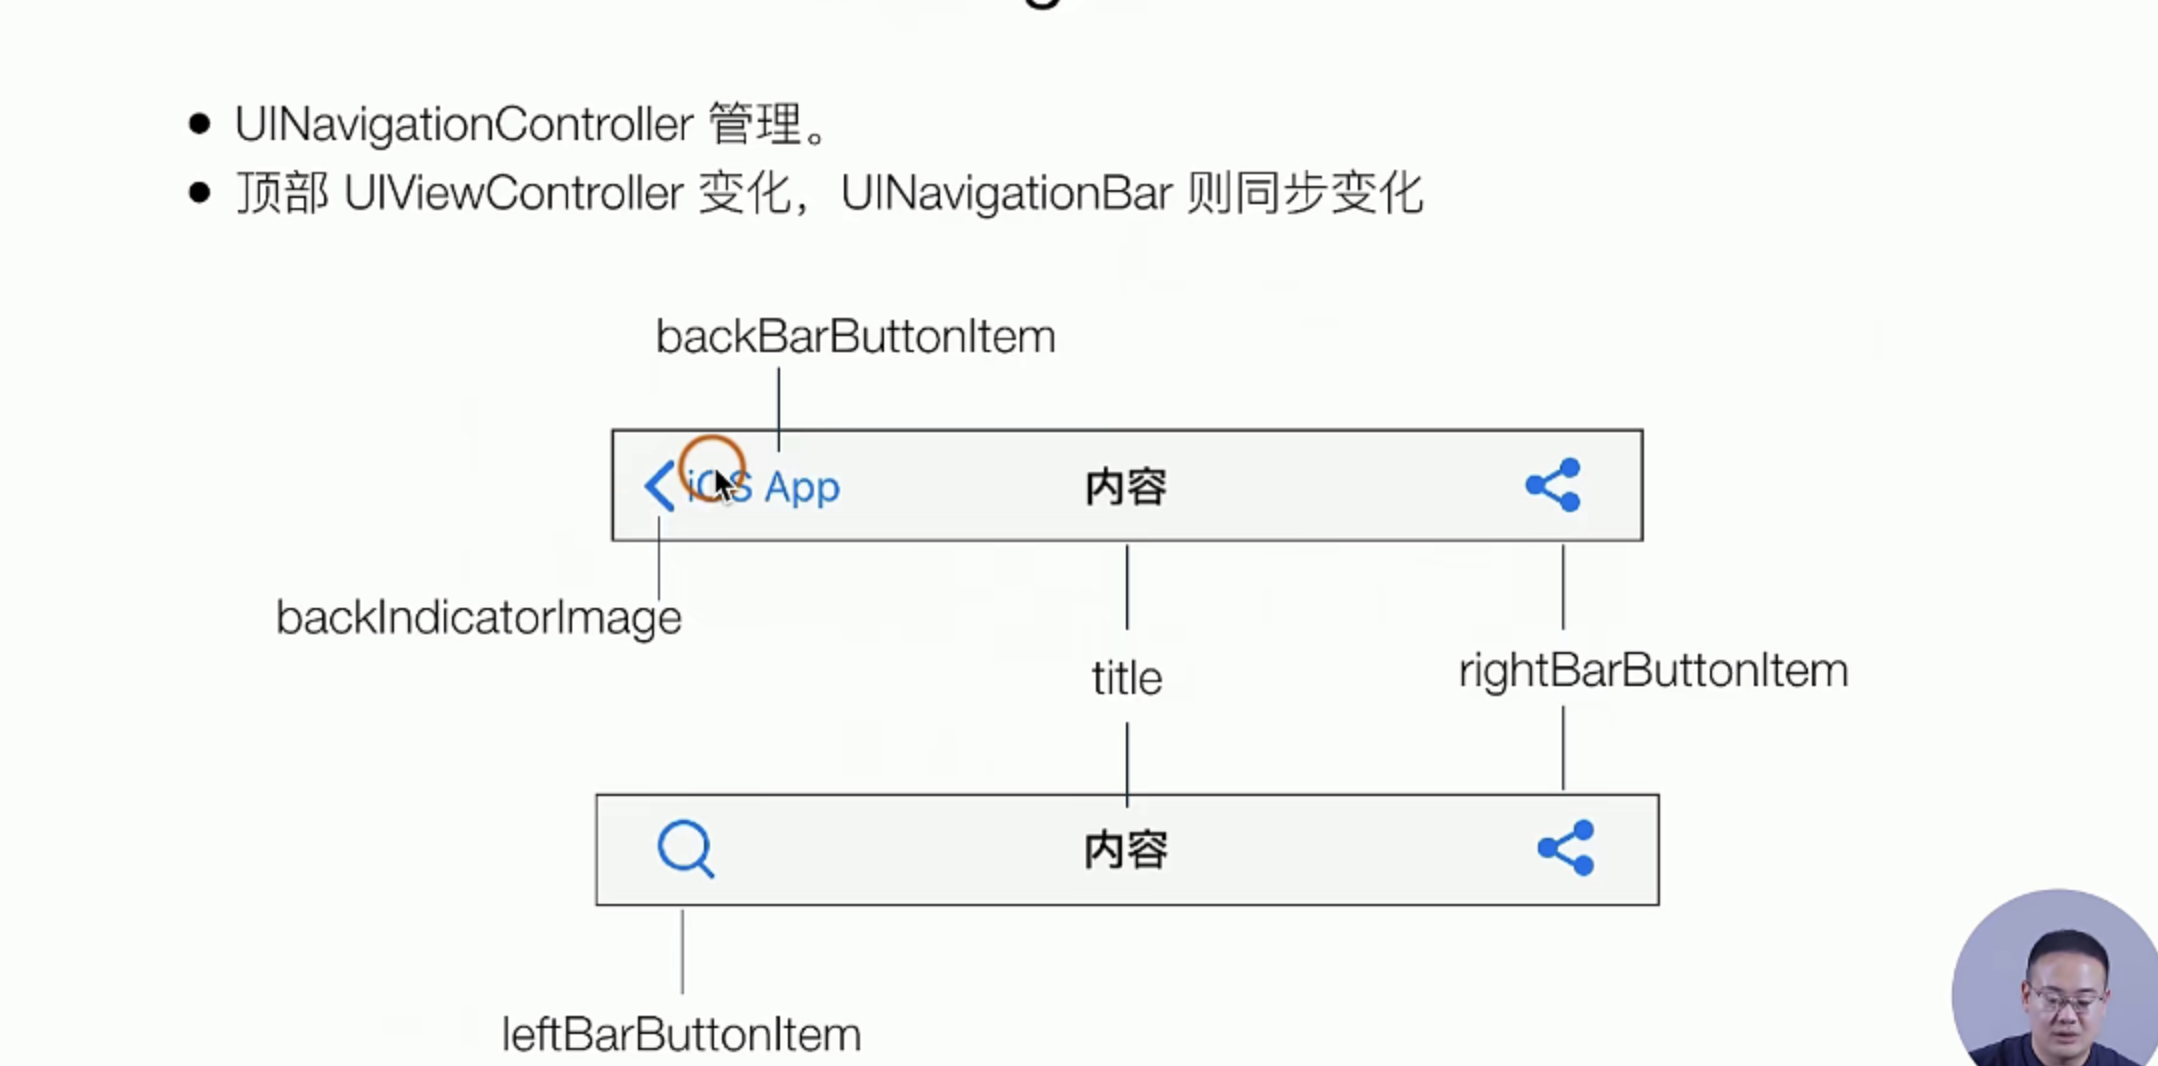
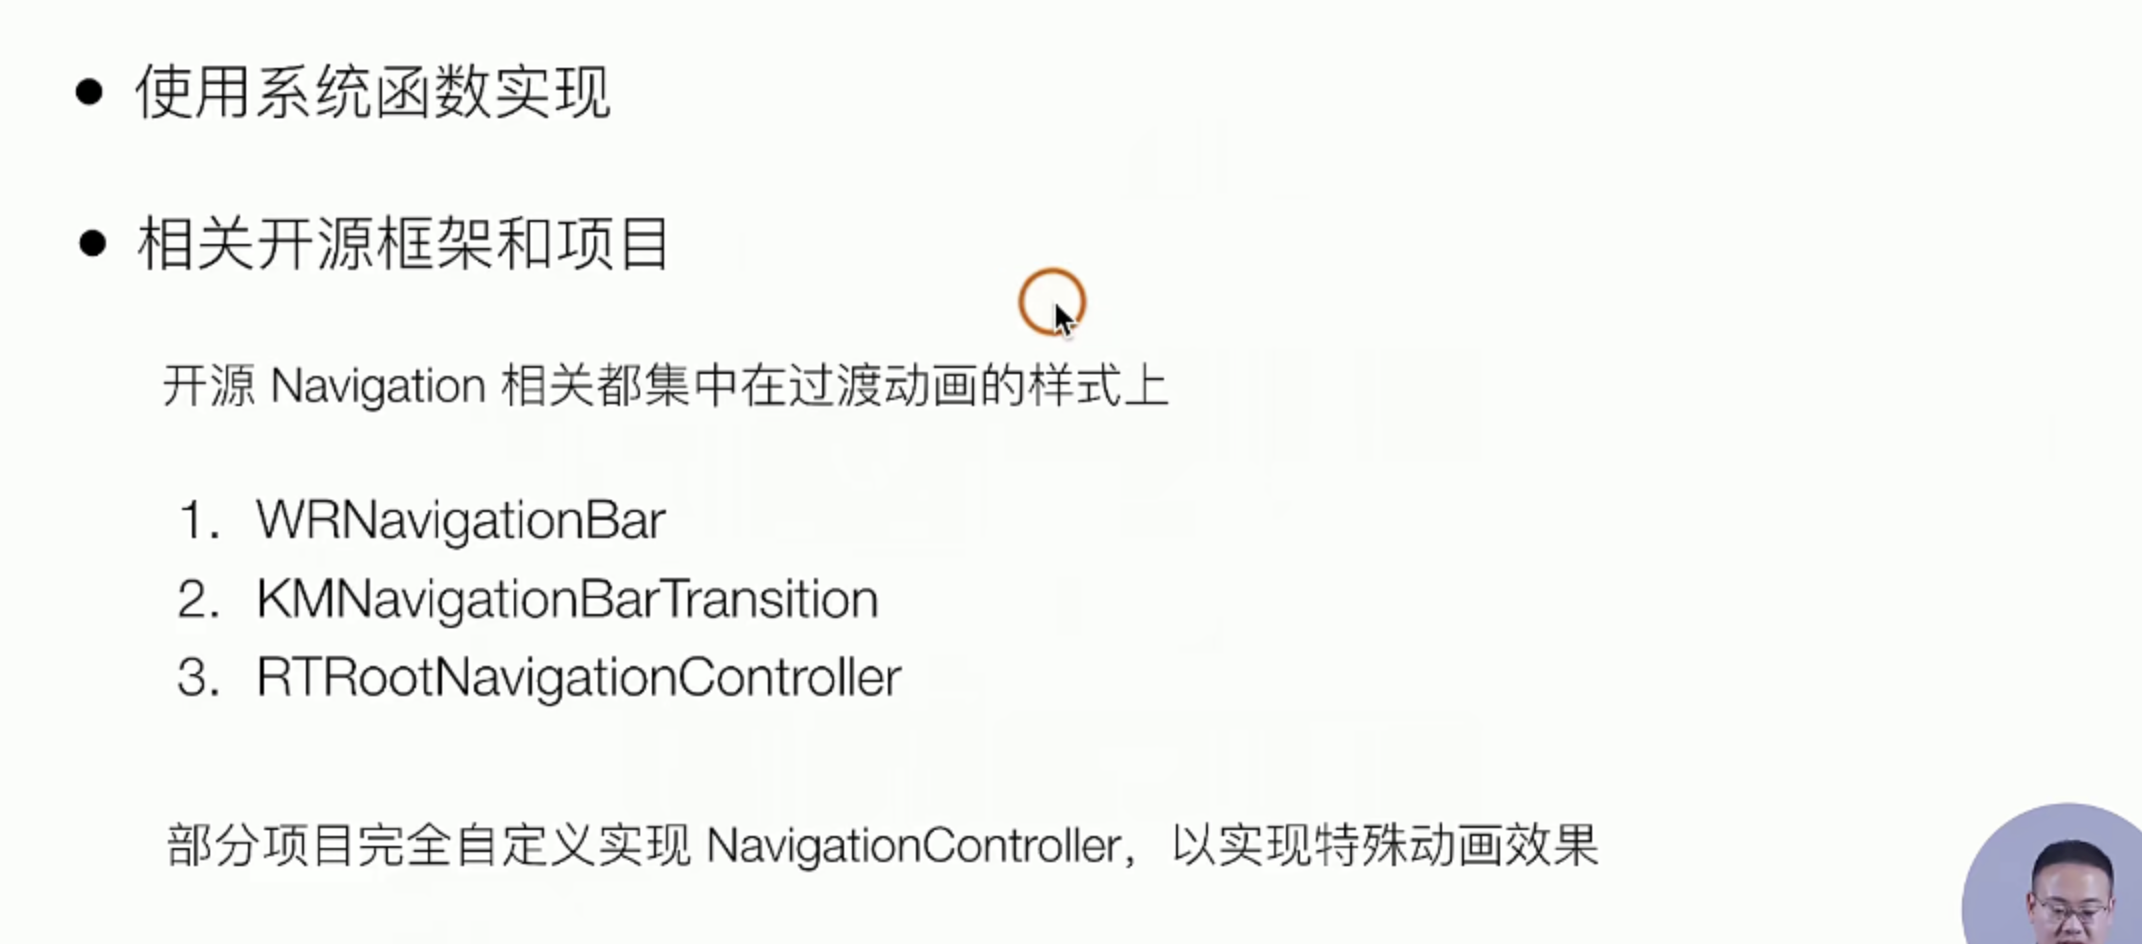
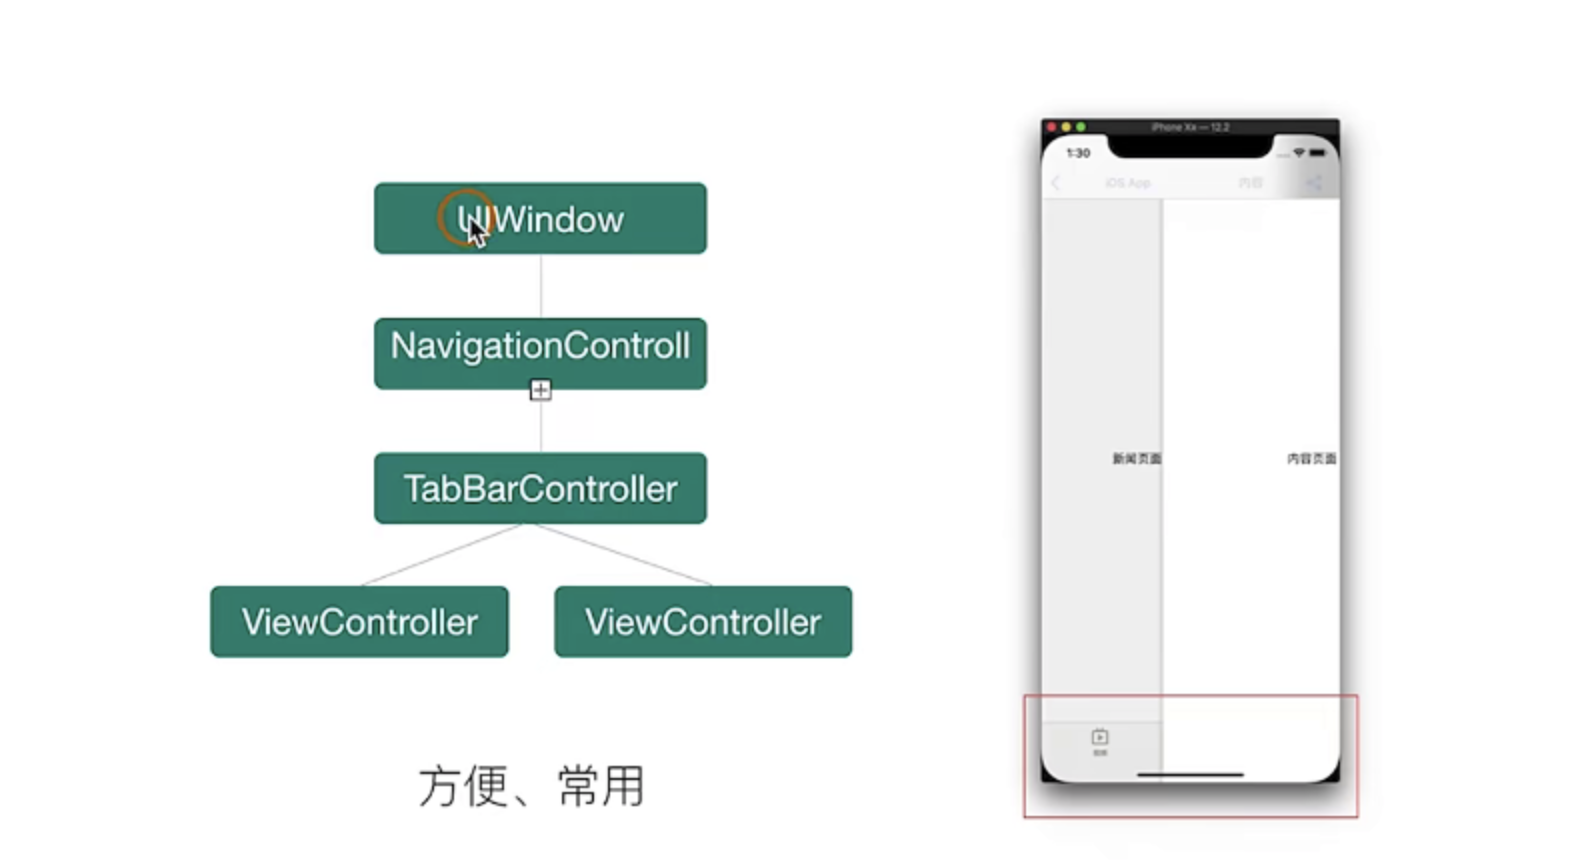
这个东西就是这个一个全局的Static,我们如何结合到上面的TabBarController上呢?这里一般有两种交互我们分别来看看
实操指南
前面的都是理论知识,接下来我们来实操 看看,实操分为下面的几个部分
- 把原来的TabBar的一项换掉
- 在新的包含Navigation的TabBar的子UIVIewController中创建UIVIew
- 设置Push事件以及,Push到的页面的详情
开始
- [x] 把原来的TabBar的一项换掉
#AppDelegate.m 文件中
// 实际上就把原来的controller1 换成navigationController就好了

// 搞一个navigationController
    ViewController *viewController = [[ViewController alloc] init];
    UINavigationController *navigationController = [[UINavigationController alloc] initWithRootViewController:viewController ];

    // 搞一个TabBar
    UITabBarController *tabbarController = [[UITabBarController alloc] init];

//    UIViewController *controller1 = [[UIViewController alloc] init];
//    controller1.view.backgroundColor = [UIColor redColor];
    navigationController.tabBarItem.title =@"新闻";
    navigationController.tabBarItem.image = [UIImage imageNamed:@"icon.bundle/home.png"];
    navigationController.tabBarItem.selectedImage = [UIImage imageNamed:@"icon.bundle/homeActive.png"];

// ++++++

    [tabbarController setViewControllers:@[navigationController,controller2,controller3,controller4]];
- [x] 在新的包含Navigation的TabBar的子UIVIewController中创建UIVIew
# ViewController.m
- (void)viewDidLoad {
    [super viewDidLoad];
    self.view.backgroundColor = [UIColor whiteColor];

    UIView *view2 = [[UIView alloc] init];
    view2.backgroundColor = [UIColor greenColor];
    view2.frame = CGRectMake(150, 150, 100, 100);
    [self.view addSubview:view2];

}
- [x] 设置Push事件以及,Push到的页面的详情
# ViewController.m

//
//  ViewController.m
//  SimpelApp
//
//  Created by 李仕增 on 2021/10/20.
//

#import "ViewController.h"

@interface ViewController ()

@end

@implementation ViewController

- (void)viewDidLoad {
    [super viewDidLoad];
    self.view.backgroundColor = [UIColor whiteColor];

    UIView *view2 = [[UIView alloc] init];
    view2.backgroundColor = [UIColor greenColor];
    view2.frame = CGRectMake(150, 150, 100, 100);
    [self.view addSubview:view2];

    // 设置点击响应的事件
    UITapGestureRecognizer *tapGesture = [[UITapGestureRecognizer alloc]initWithTarget:self action:@selector(pushControoler)];
    [view2 addGestureRecognizer:tapGesture];

}

- (void) pushControoler {

    // 设置一个新的UIView
    UIViewController *viewControoler = [[UIViewController alloc] init];
    viewControoler.view.backgroundColor = [UIColor whiteColor];
    viewControoler.navigationItem.title = @"头部";
    viewControoler.navigationItem.rightBarButtonItem = [ [UIBarButtonItem alloc] initWithTitle:@"右标题" style:UIBarButtonItemStylePlain target:self action:nil ];

    [self.navigationController pushViewController: viewControoler animated:YES];
}

@end
效果反馈
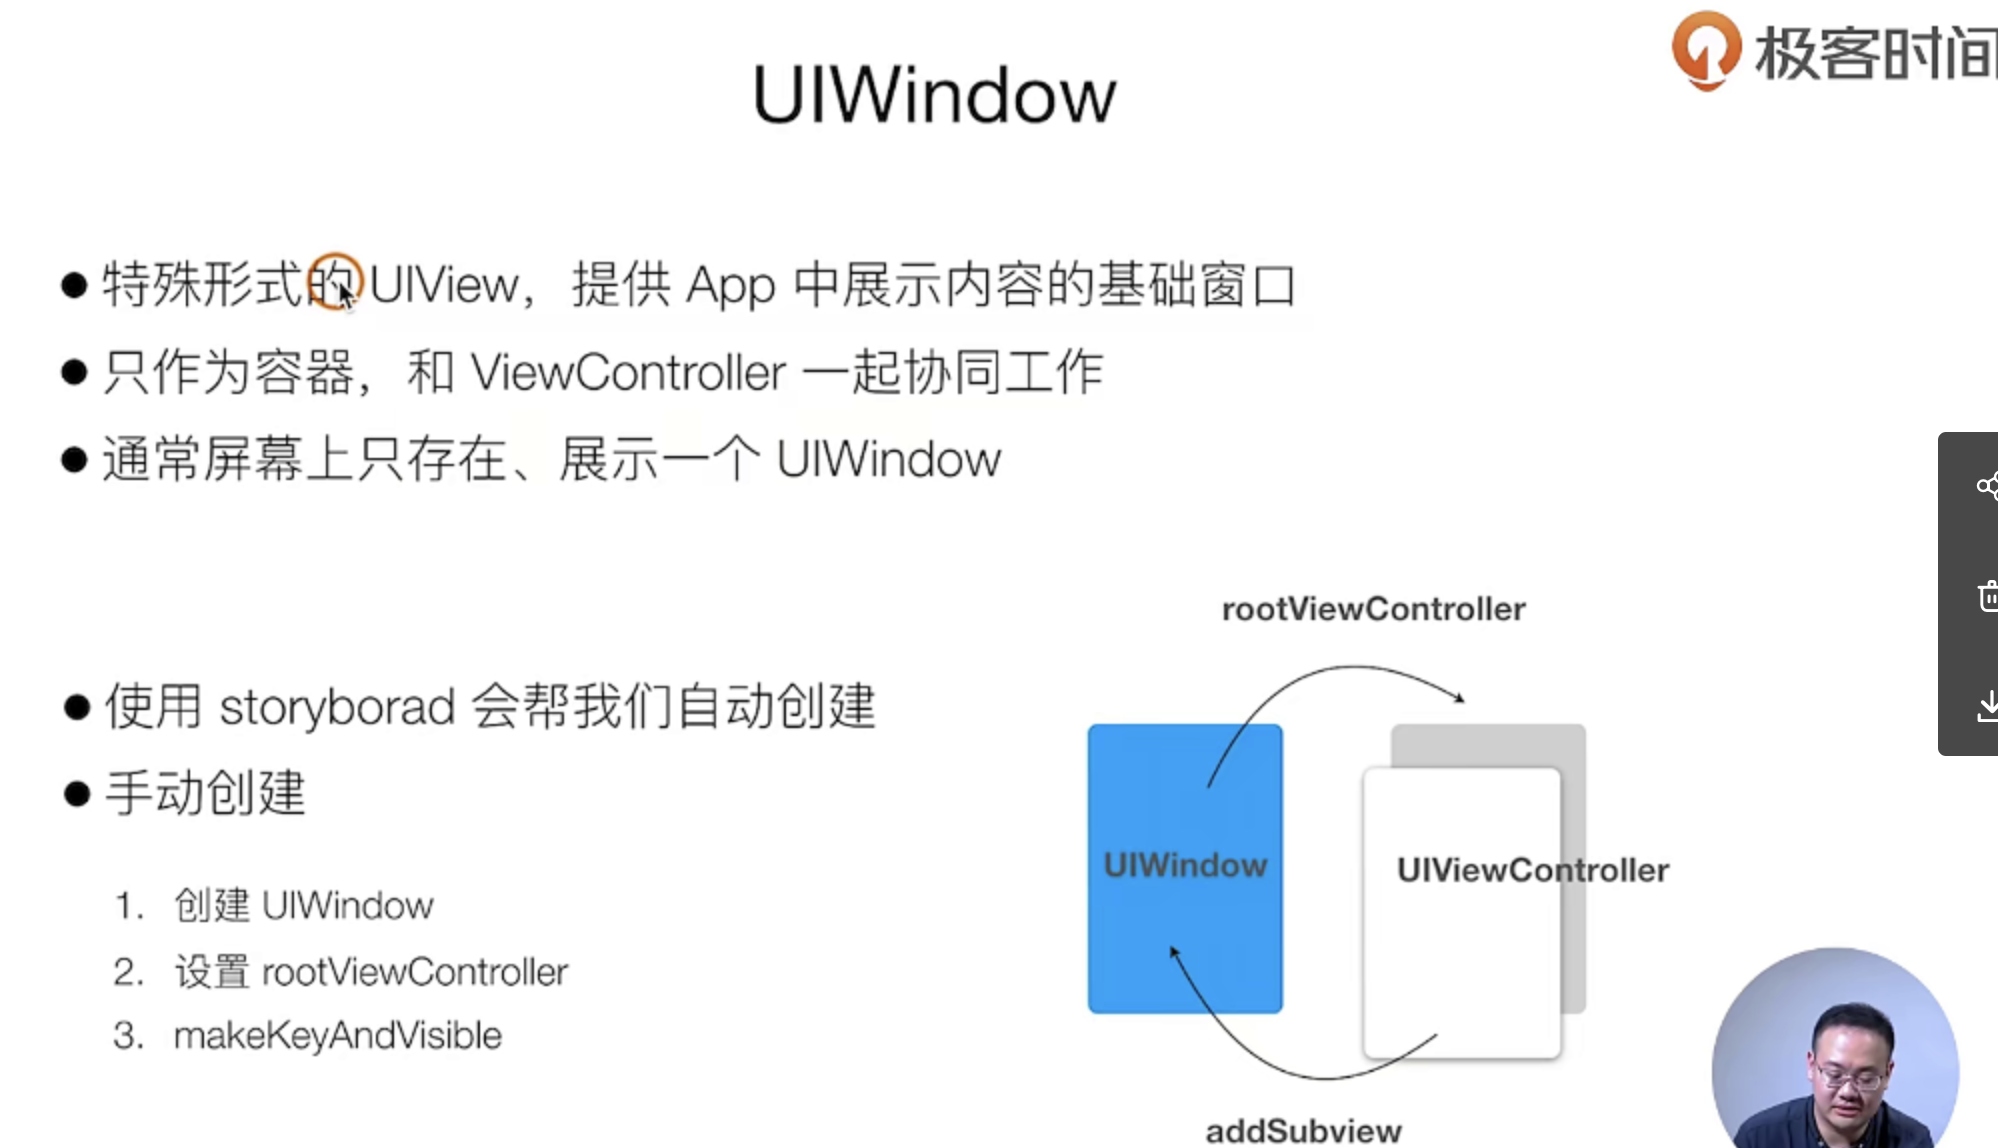
App中的窗口
实际上,这一讲讲的是如何创建一个RootUIController,以及代码层面的实现原理,由于Xcode版本的不一样,目前Xcode12要修改这个设置需要百度一下问题和解决它,上文已经给出
理论知识
实操指南
这里我们改造前面的东西把它改造成第二钟形式,主要的做法就是把层级给换一下,如果有做过这方面的同学应该都比较的熟悉
#AppDelegate.m 文件中
//  AppDelegate.m
//  SimpelApp
//
//  Created by 李仕增 on 2021/10/20.
//

#import "AppDelegate.h"
#import "ViewController.h"

@interface AppDelegate ()

@end

@implementation AppDelegate


- (BOOL)application:(UIApplication *)application didFinishLaunchingWithOptions:(NSDictionary *)launchOptions {
    self.window = [[UIWindow alloc] initWithFrame:[[UIScreen mainScreen] bounds]];

    // 搞一个navigationController
    ViewController *viewController = [[ViewController alloc] init];


    // 搞一个TabBar
    UITabBarController *tabbarController = [[UITabBarController alloc] init];

//    UIViewController *controller1 = [[UIViewController alloc] init];
    viewController.view.backgroundColor = [UIColor redColor];
    viewController.tabBarItem.title =@"新闻";
    viewController.tabBarItem.image = [UIImage imageNamed:@"icon.bundle/home.png"];
    viewController.tabBarItem.selectedImage = [UIImage imageNamed:@"icon.bundle/homeActive.png"];

    UIViewController *controller2 = [[UIViewController alloc] init];
    controller2.view.backgroundColor = [UIColor orangeColor];
    controller2.tabBarItem.title =@"资讯";
    controller2.tabBarItem.image = [UIImage imageNamed:@"icon.bundle/all.png"];
    controller2.tabBarItem.selectedImage = [UIImage imageNamed:@"icon.bundle/allActive.png"];

    UIViewController *controller3 = [[UIViewController alloc] init];
    controller3.view.backgroundColor = [UIColor grayColor];
    controller3.tabBarItem.title =@"视频";
    controller3.tabBarItem.image = [UIImage imageNamed:@"icon.bundle/video.png"];
    controller3.tabBarItem.selectedImage = [UIImage imageNamed:@"icon.bundle/videoActive.png"];

    UIViewController *controller4 = [[UIViewController alloc] init];
    controller4.view.backgroundColor = [UIColor systemPinkColor];
    controller4.tabBarItem.title =@"我的";
    controller4.tabBarItem.image = [UIImage imageNamed:@"icon.bundle/Customer.png"];
    controller4.tabBarItem.selectedImage = [UIImage imageNamed:@"icon.bundle/CustomerActive.png"];

    [tabbarController setViewControllers:@[viewController,controller2,controller3,controller4]];

    UINavigationController *navigationController = [[UINavigationController alloc] initWithRootViewController:tabbarController ];

    self.window.rootViewController = navigationController;
    [self.window makeKeyAndVisible];
    return YES;
}

// ++++++
效果反馈
delegate设计模式
这个东西实际上是一种设计模式
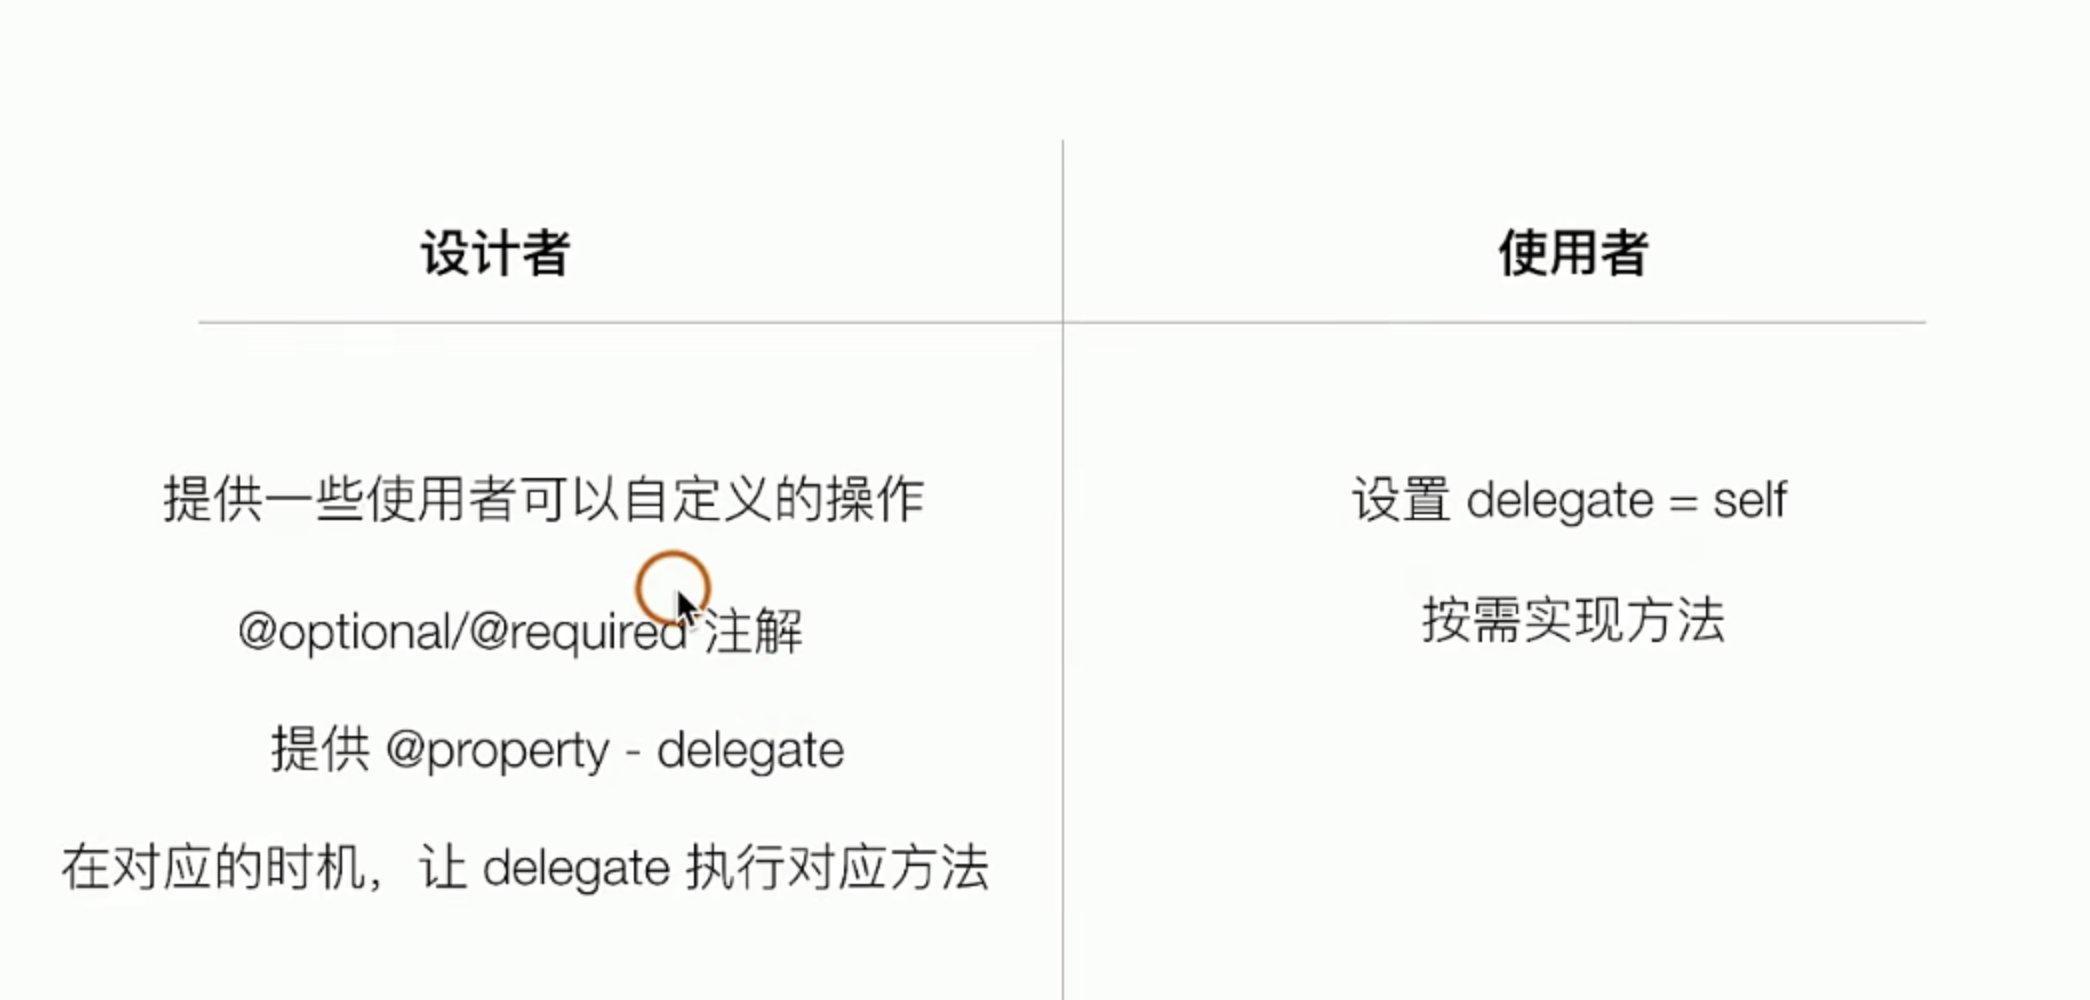
理论知识
一个是设计角度来讨论,你需要提供一组方法给别人实现,
我们再从另一个角度看,使用者的角度看看,你只需要实现方法就好了
总结一下就是下面的几个点
实操指南
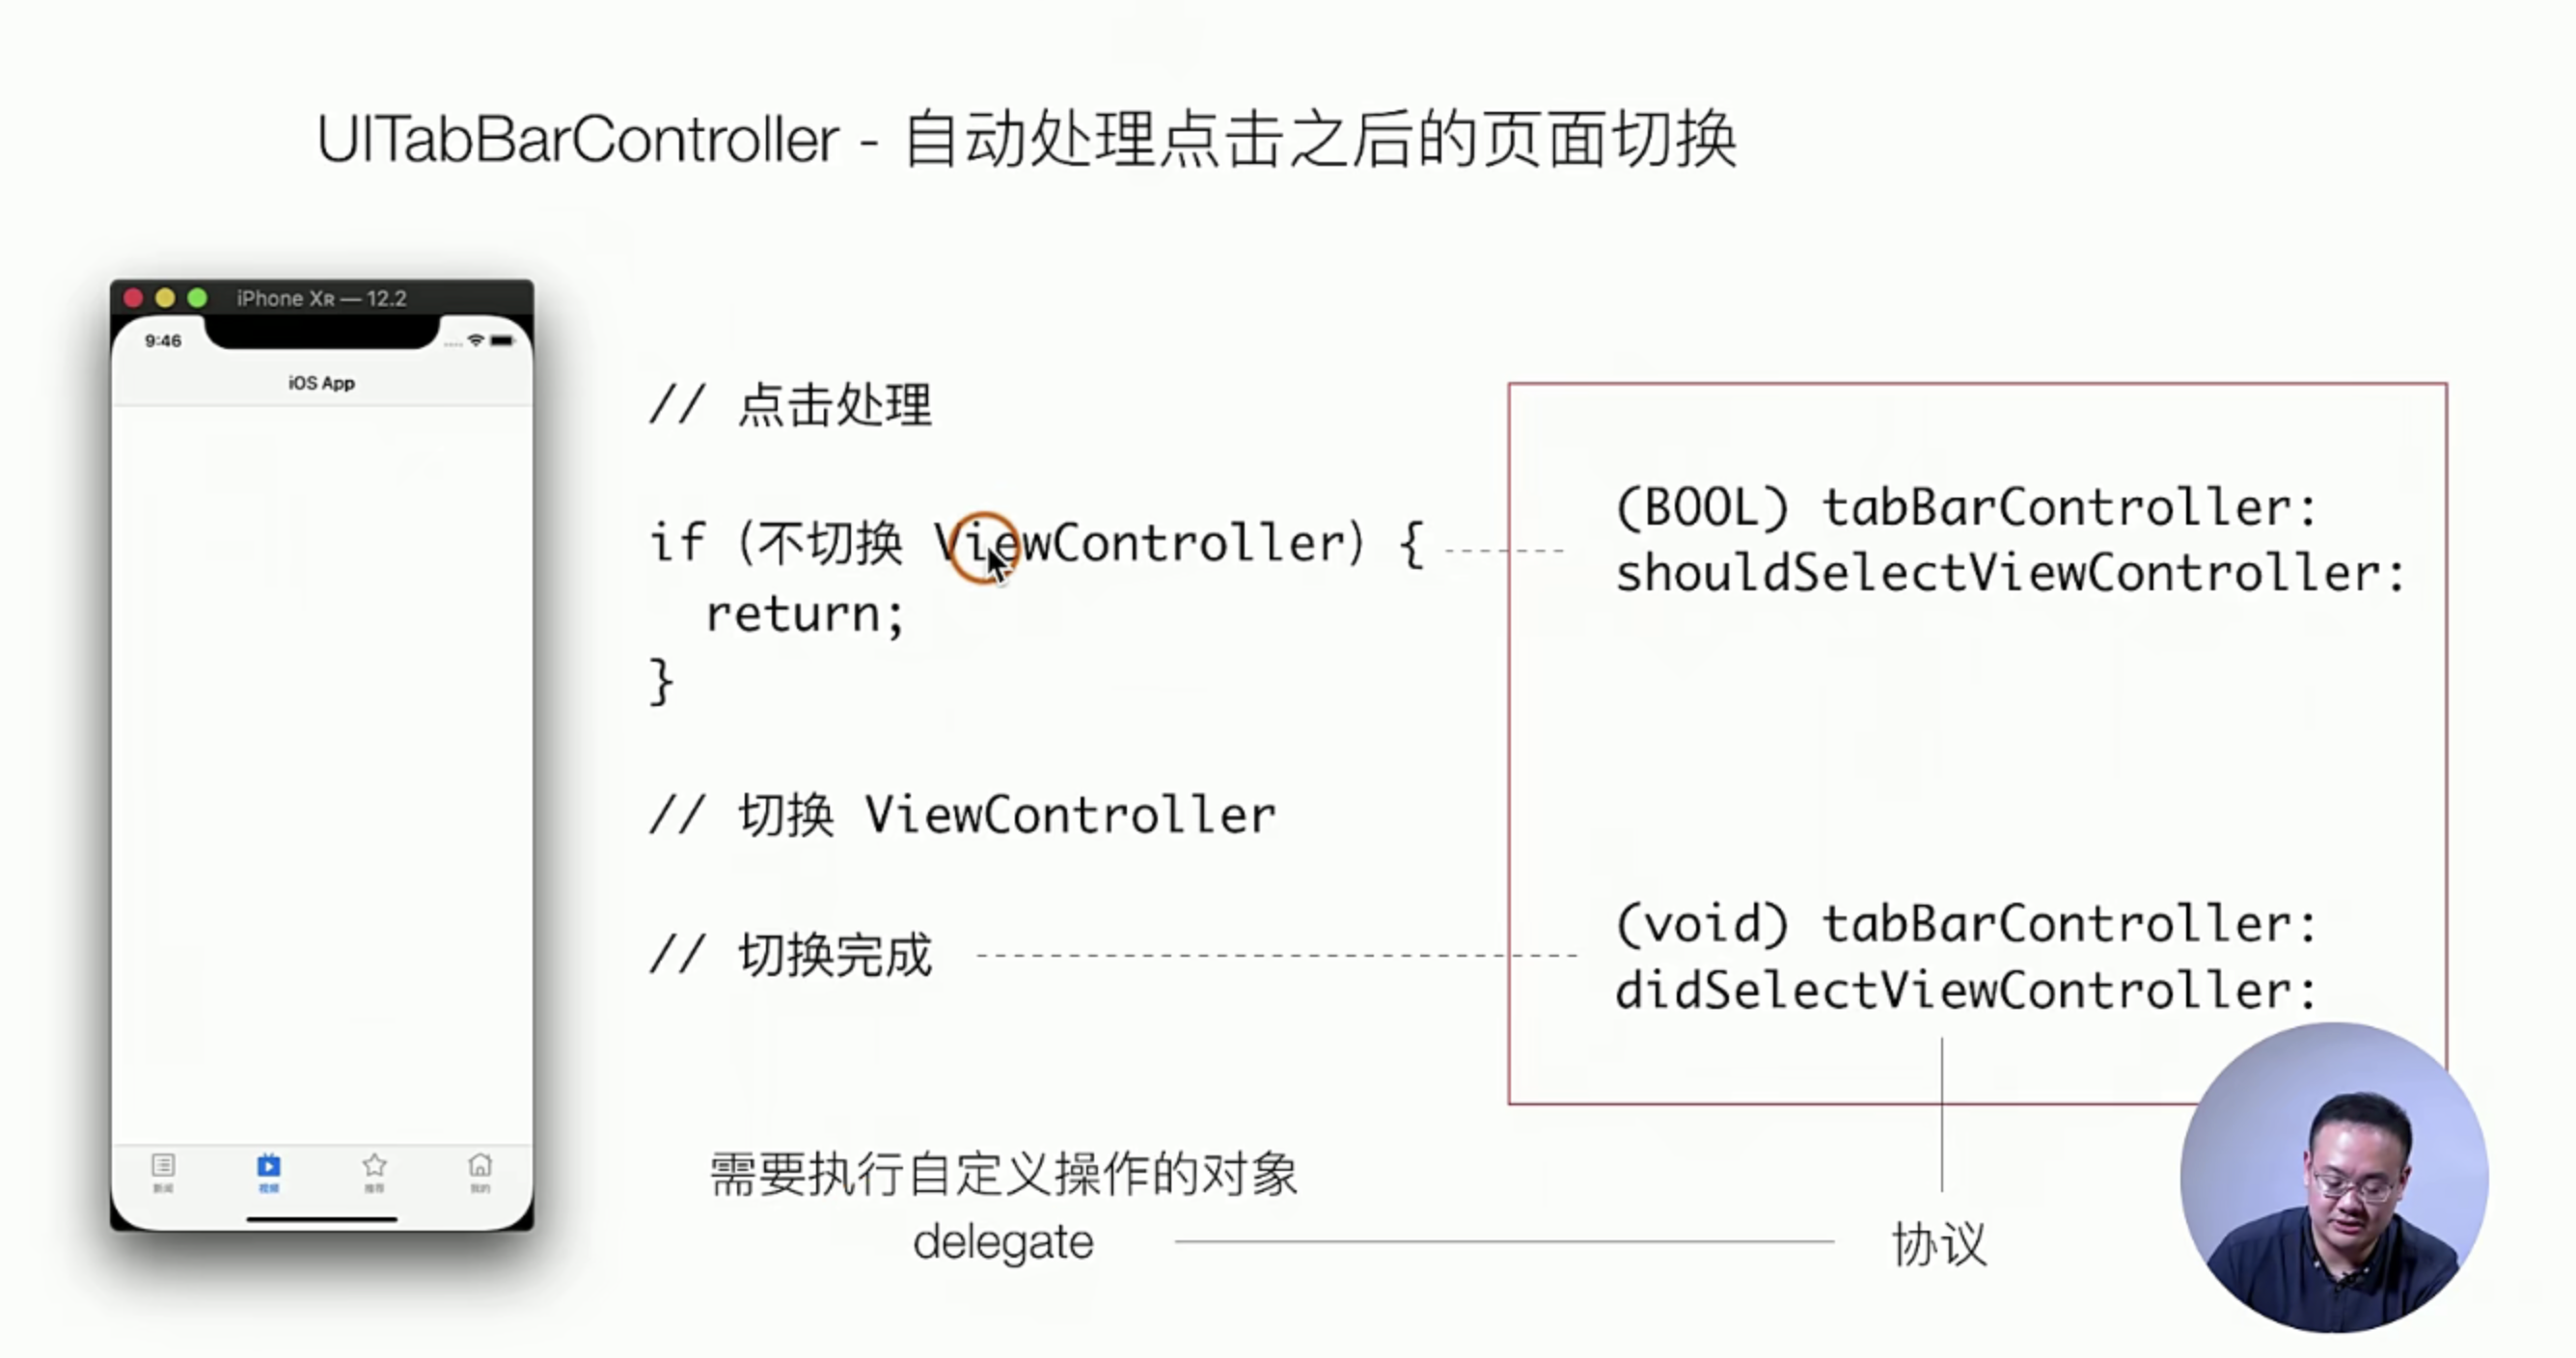
这里我们还是拿原来的代码,在Tabber切换的时候,在App这个类中去实现,监听切换的时候的方法,它主要分下面的几个步骤,从使用体验上,就像是在JS中给别的函数传递了自己的一个引用过去,并且还改变了this的指向 指到了自己本身。
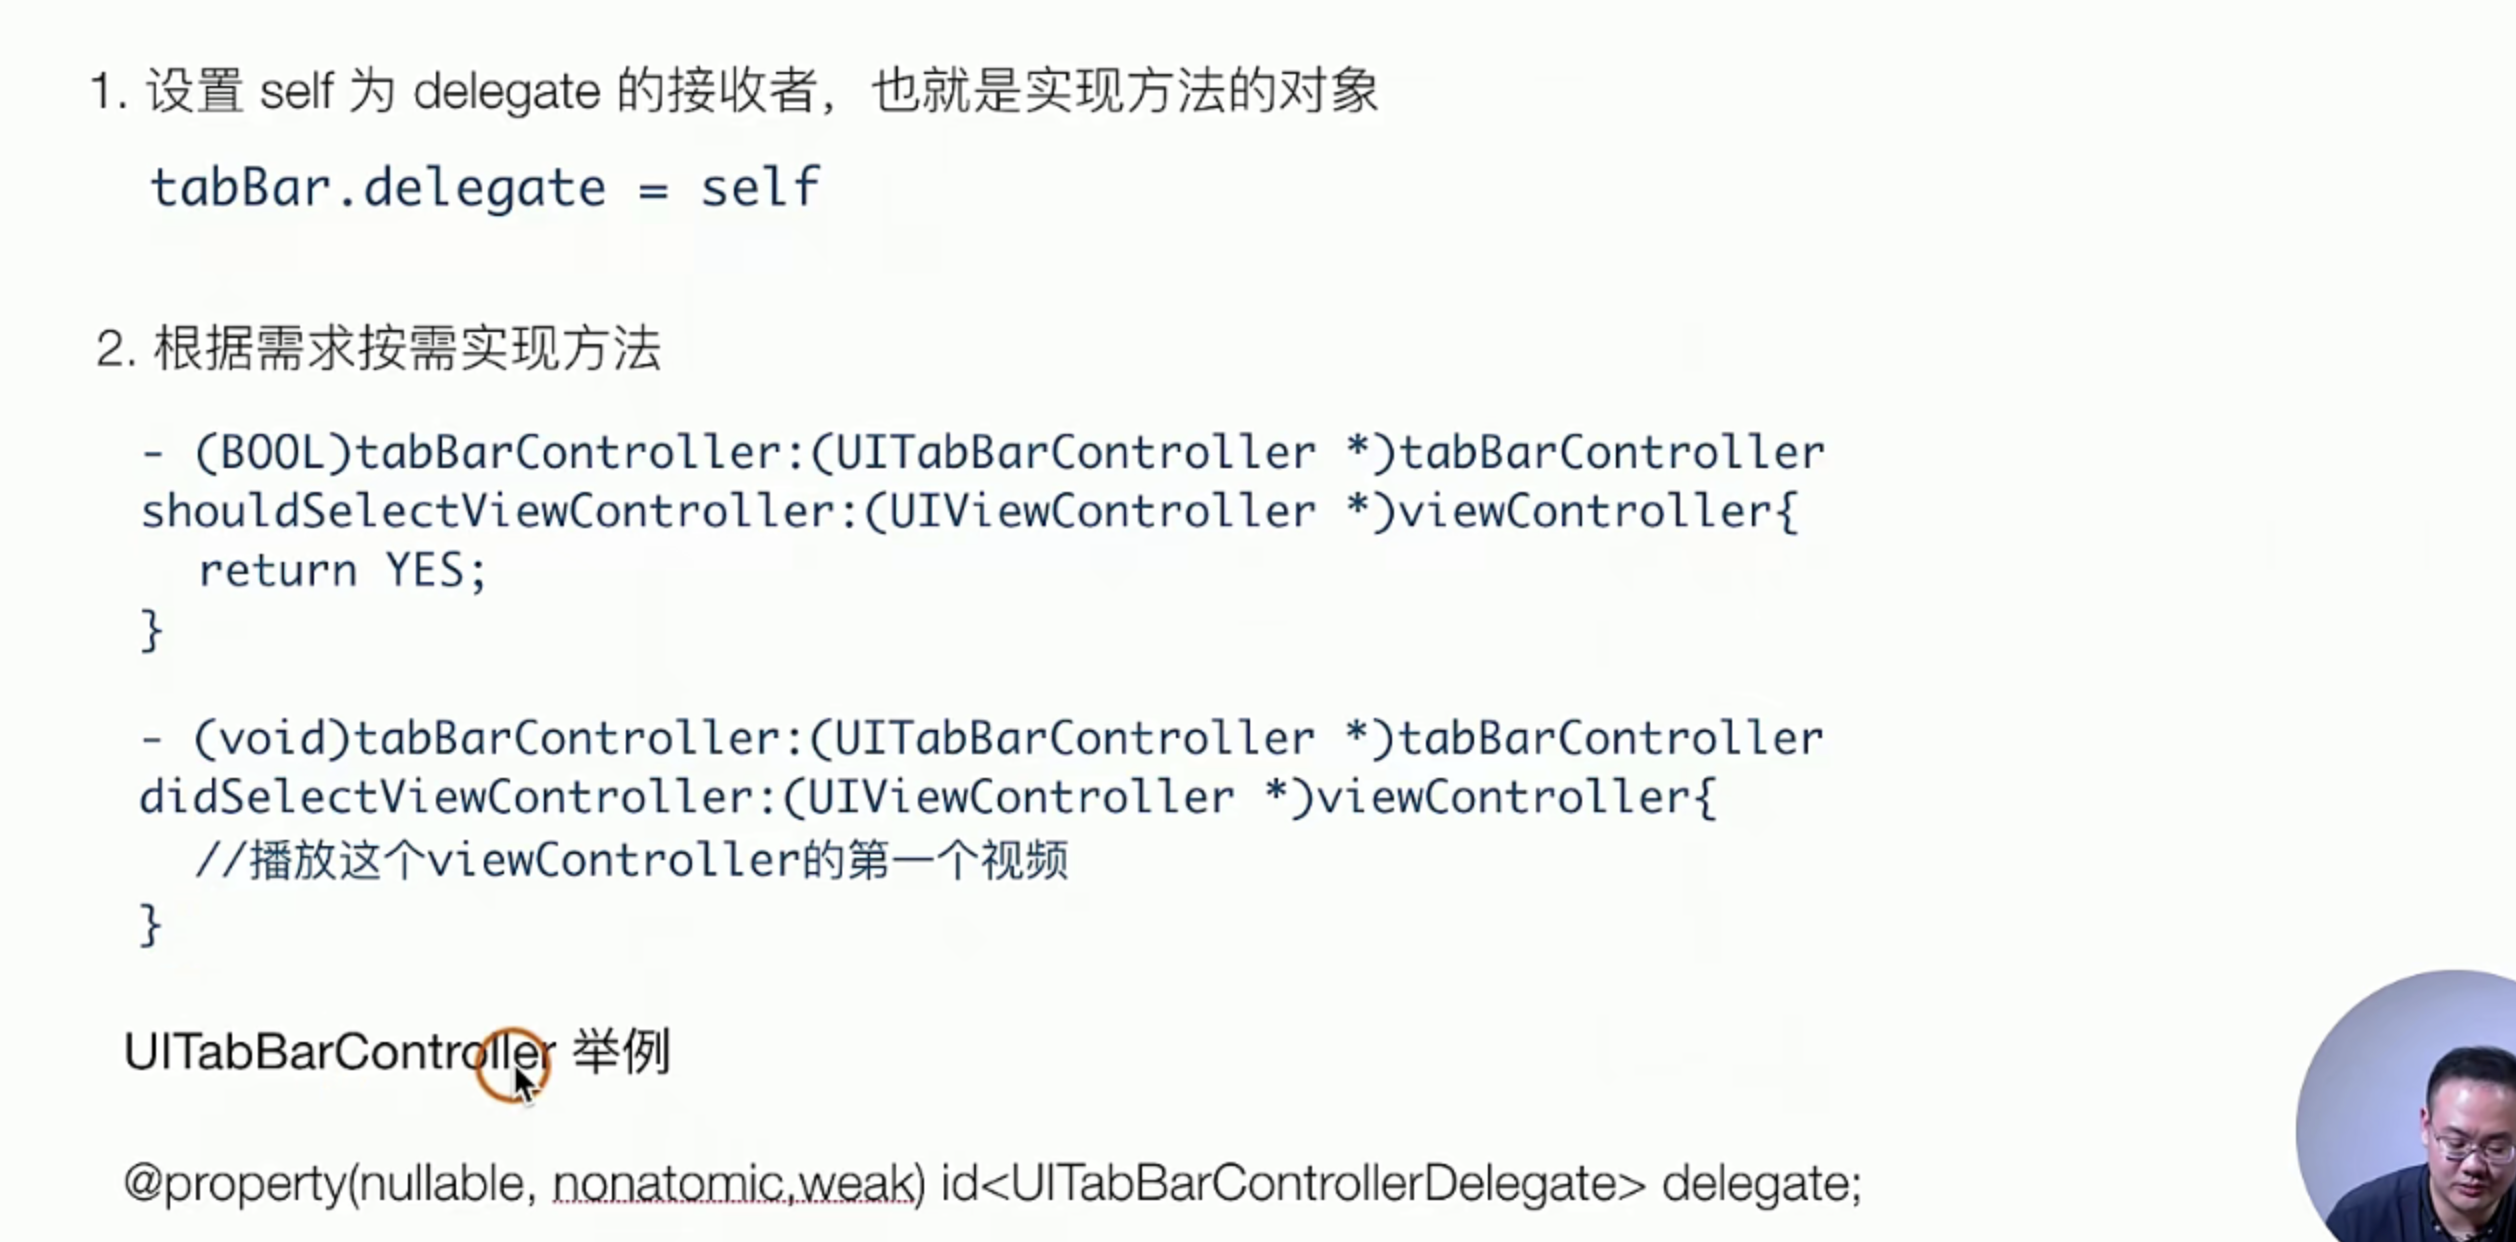
- 制定delegate
- 实现对应的方法
# Appdelegate.m

//+++++
@interface AppDelegate ()<UINavigationControllerDelegate> 1.注意 这里需要声明哈

@end
//+++++
tabbarController.delegate = self; // 实现deletgaer,模式
//+++++

// 2、实现方法 这里也需要实现
- (void)tabBarController:(UITabBarController *)tabBarController didSelectViewController:(UIViewController *)viewController {
    NSLog(@"我变化了");
};

//+++++
使用UITabView实现列表
这东西,说白了就是在使用UITabView这个Lib库
创建一个UITabView
# ViewController.m
- (void)viewDidLoad {
    [super viewDidLoad];
    self.view.backgroundColor = [UIColor whiteColor];

   // initWithFrame:self.view.bounds];
   // 这句话就是把tabView 设置成 和父容器一模一样大小😁
    UITableView *tabView = [[UITableView alloc] initWithFrame:self.view.bounds];
    [self.view addSubview: tabView];
// ++++
然后设置UITaBView
实现UITaBViewDataSource
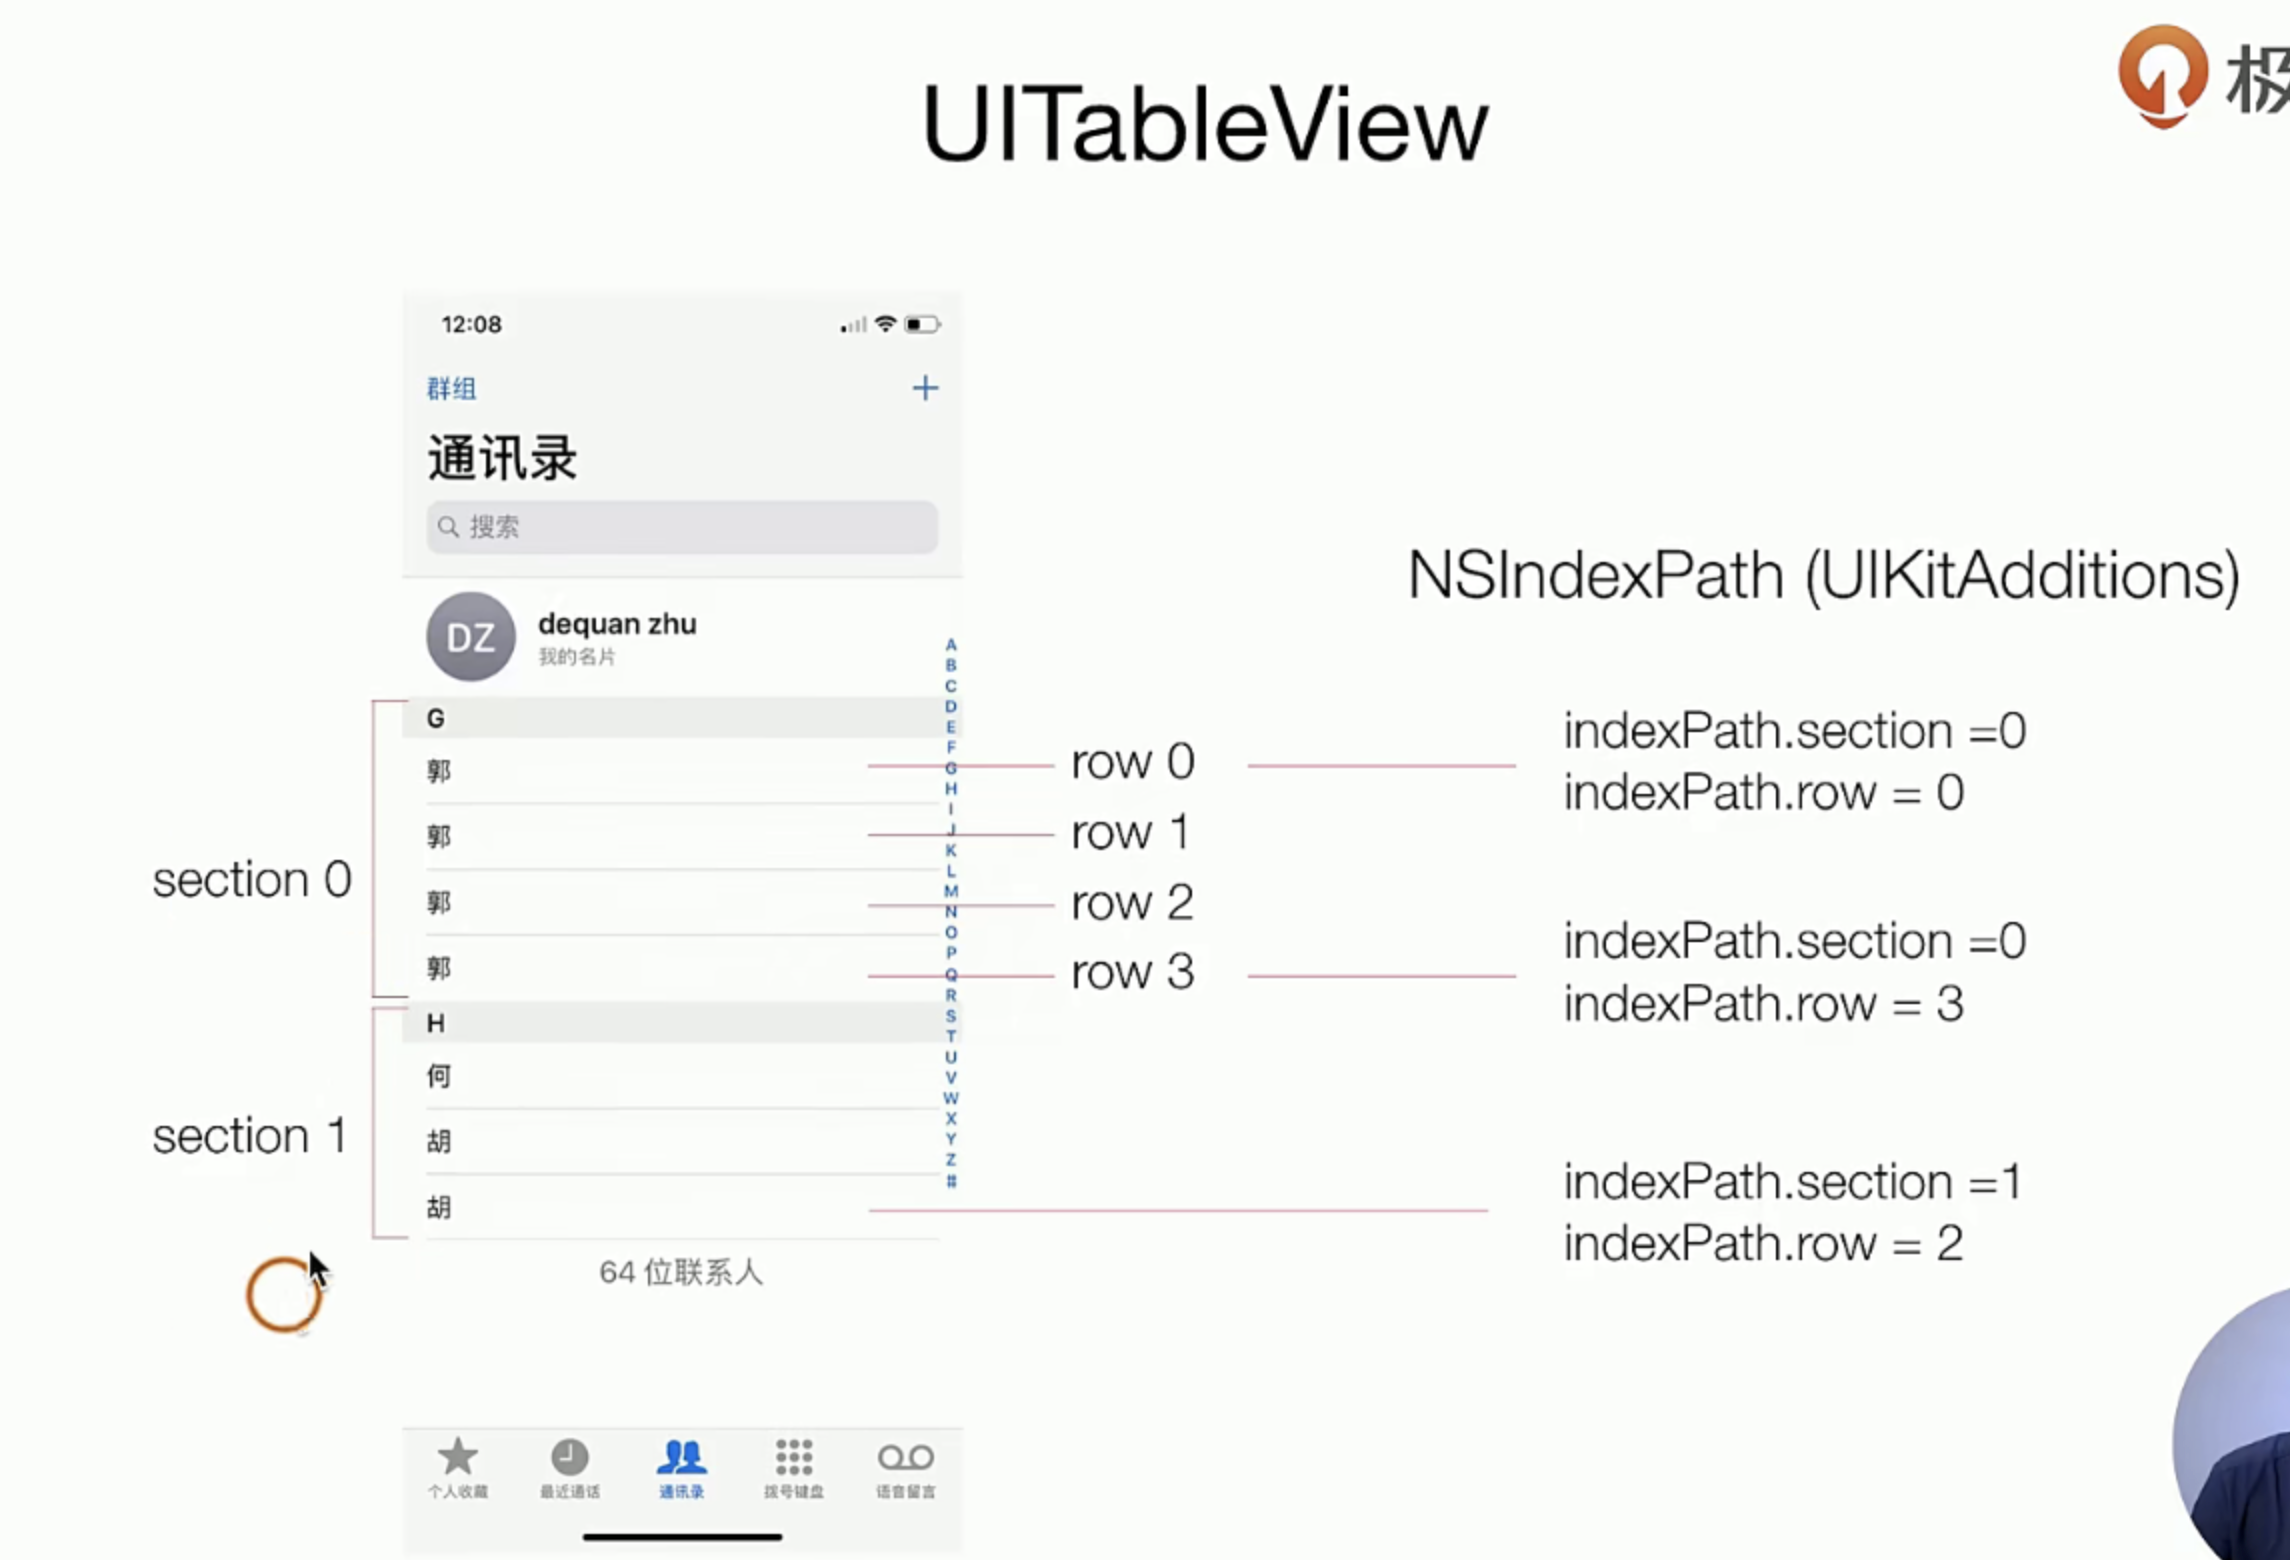
有两个东西必须呀实现的在源码里(UITaBViewDataSource的源文件) @reqiued标注的
返回多少个 第一个必须要实现的方法的含义
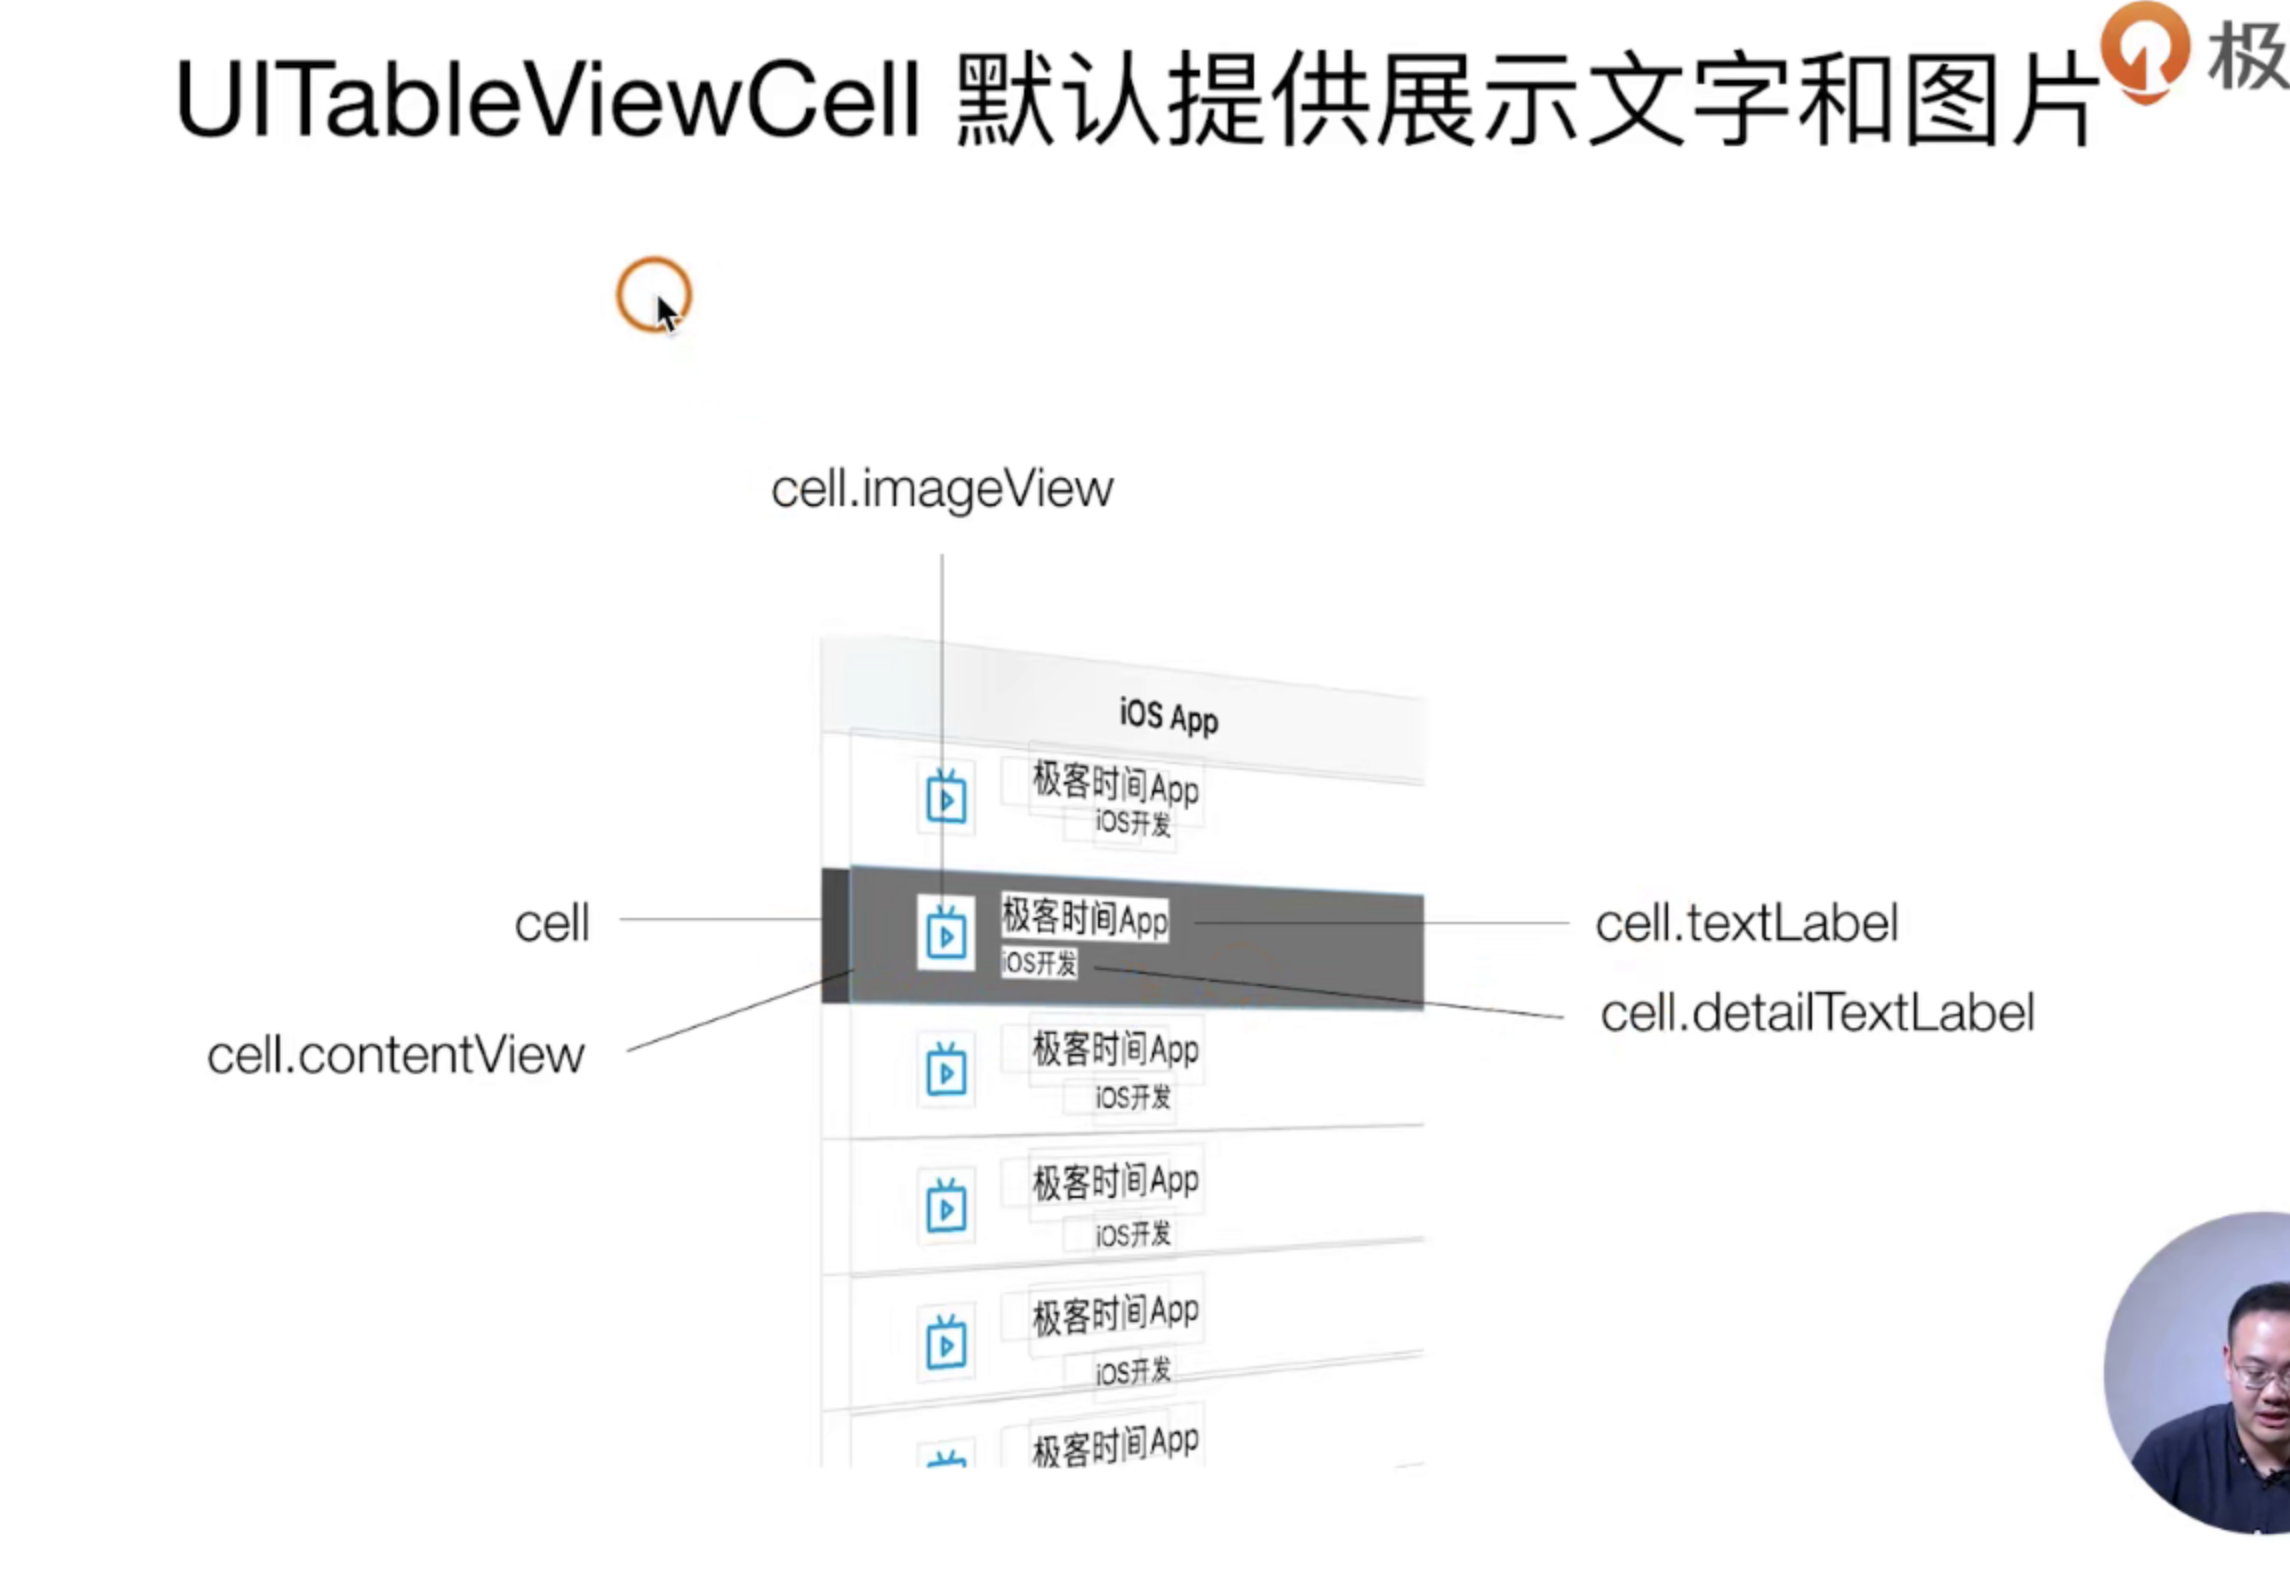
每一个cell是什么样子的? 第二个实现的方法的含义
- cell实现的时候有一个方法 witStyle 可以指定默认的cell样式 点击源代码就知道了 ,这里我们选择其中一个
基础理论:
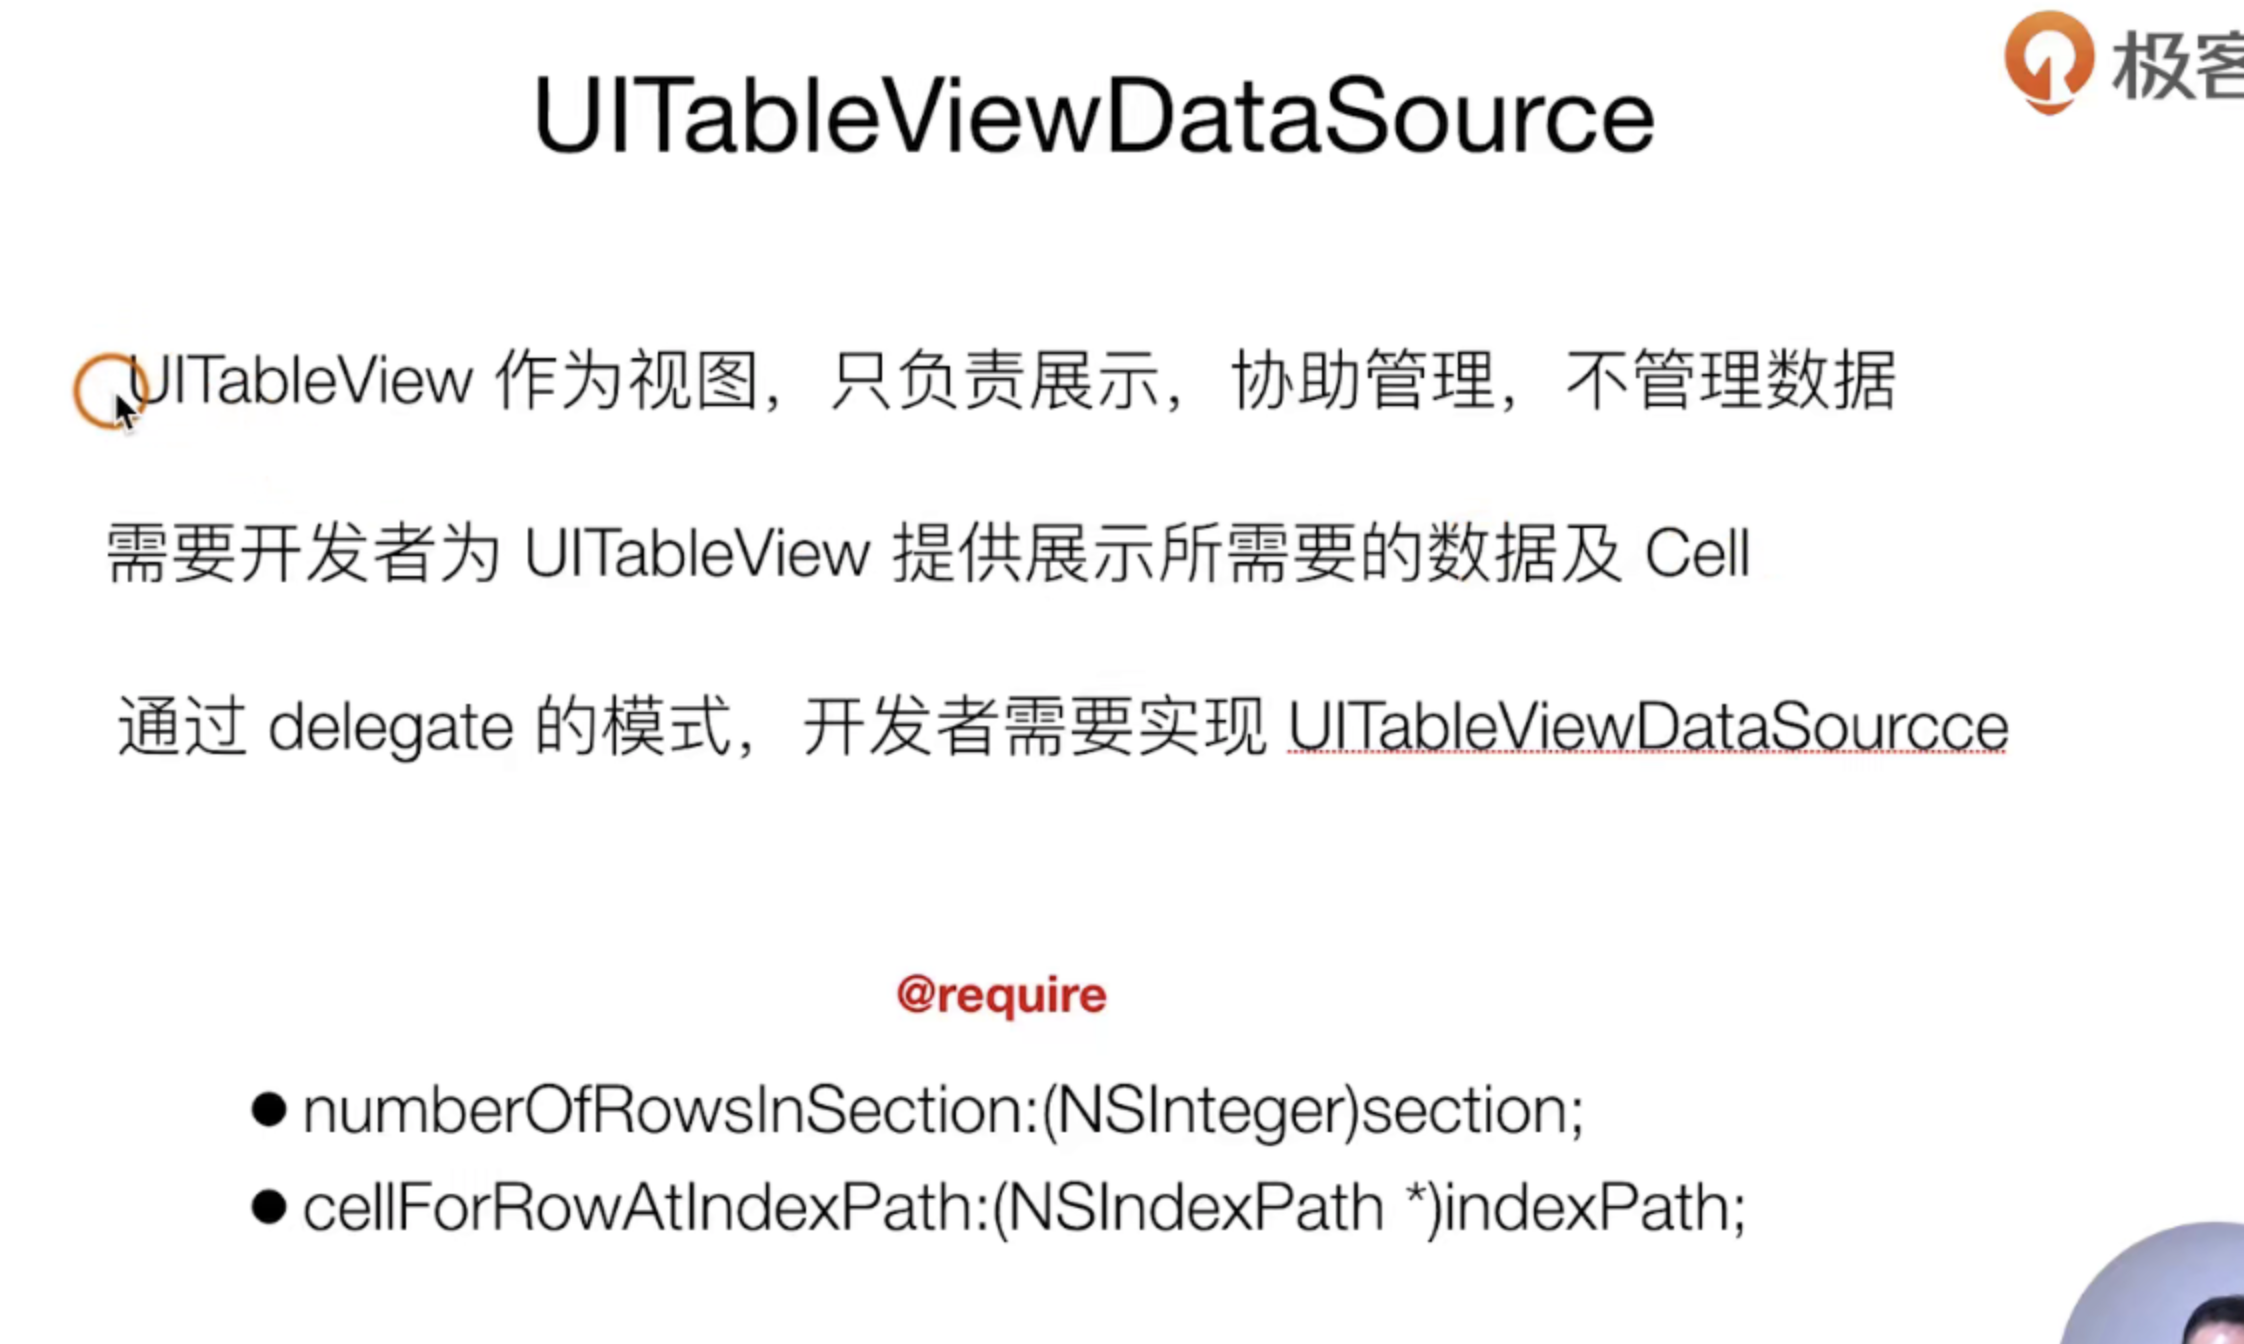
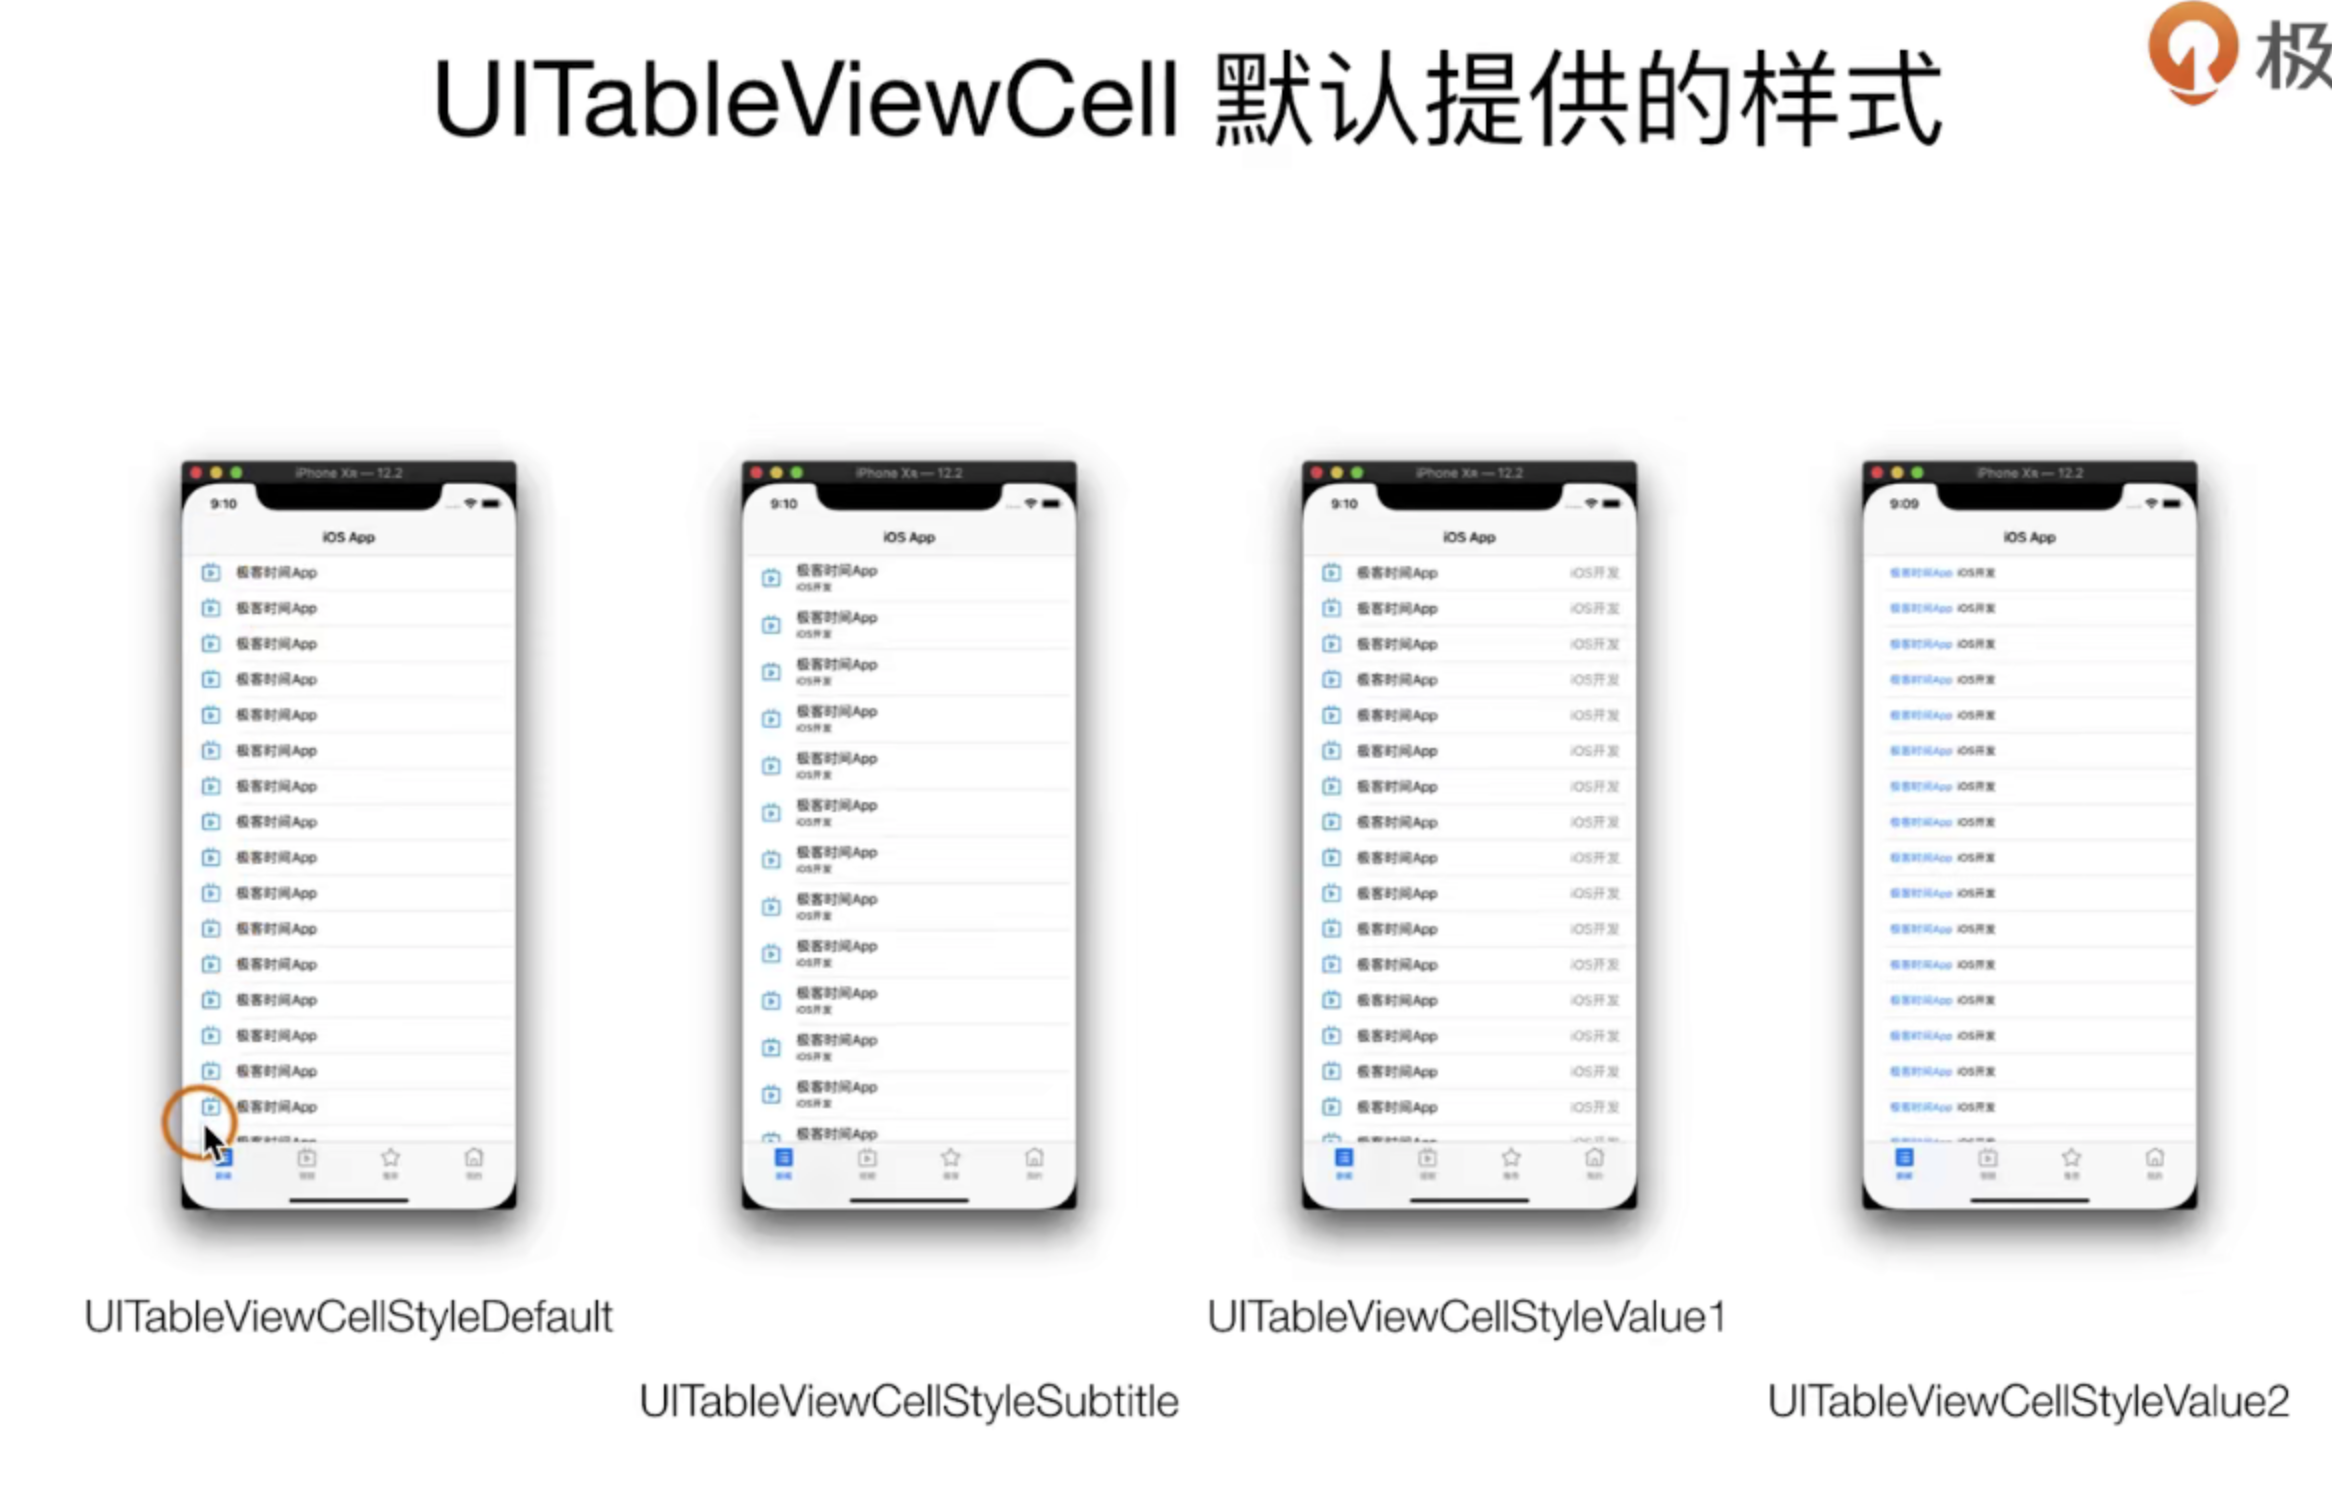
- 我们需要自己实现 UITabView上的DataSource这个delegate,来自定义渲染我们的cell
- 实现必须具备的两个方法
- 设置cell的样式
//
// ViewController.m
// SimpelApp
//
// Created by 李仕增 on 2021/10/20.
//
#import "ViewController.h"
@interface ViewController ()<UITableViewDataSource>
@end
@implementation ViewController
- (void)viewDidLoad {
[super viewDidLoad];
self.view.backgroundColor = [UIColor whiteColor];
UITableView *tabView = [[UITableView alloc] initWithFrame:self.view.bounds];
[self.view addSubview: tabView];
// 拿到UITabView的DataSource delegate
tabView.dataSource = self;
- (NSInteger)tableView:(UITableView *)tableView numberOfRowsInSection:(NSInteger)section {
return 20;
};
- (UITableViewCell *)tableView:(UITableView *)tableView cellForRowAtIndexPath:(NSIndexPath *)indexPath {
UITableViewCell *cell = [[UITableViewCell alloc] initWithStyle:UITableViewCellStyleSubtitle reuseIdentifier:@"id"];
cell.textLabel.text = @"主标题";
cell.detailTextLabel.text = @"副标题";
cell.imageView.image = [UIImage imageNamed:@"icon.bundle/video.png"];
return cell;
};
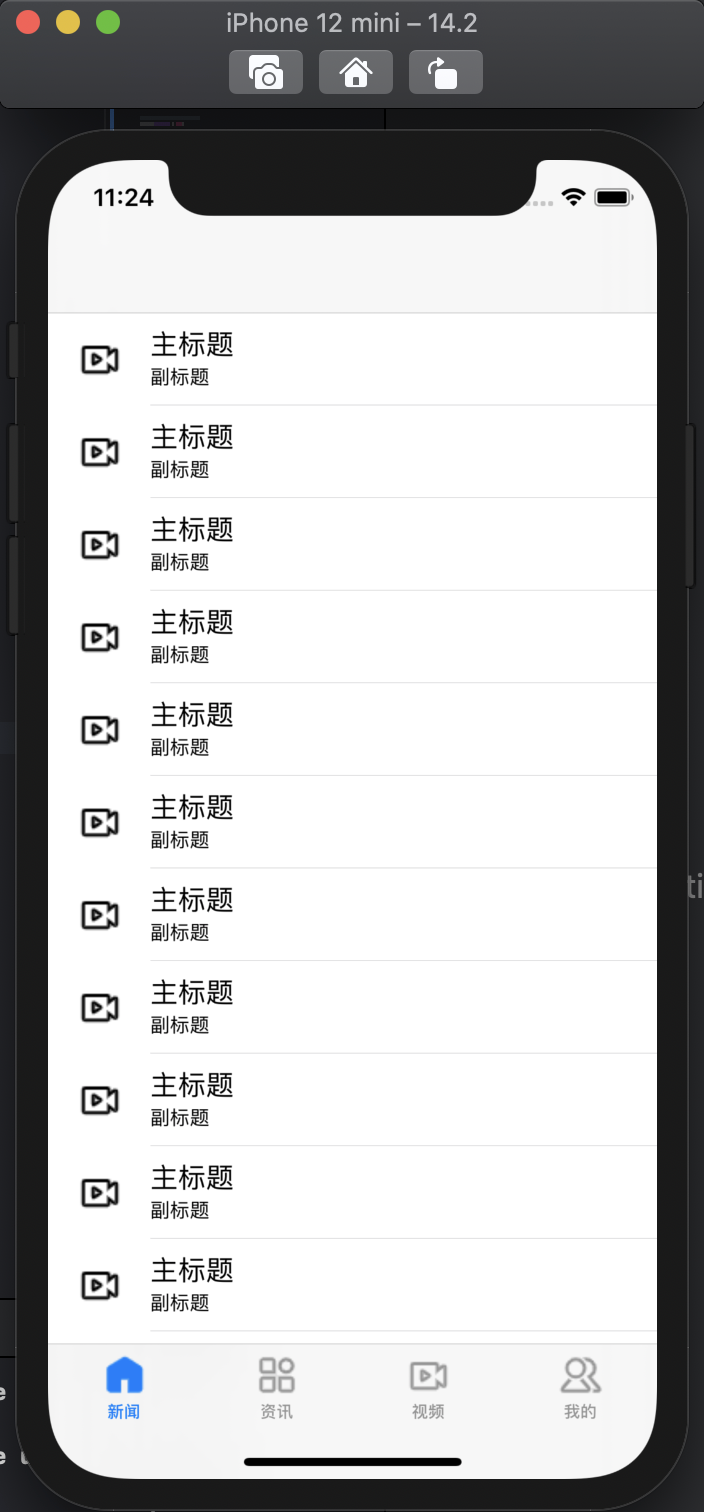
@end
最终的效果如下图
如何优化上述的列表?
先看看原理,这个是系统提供的优化手段
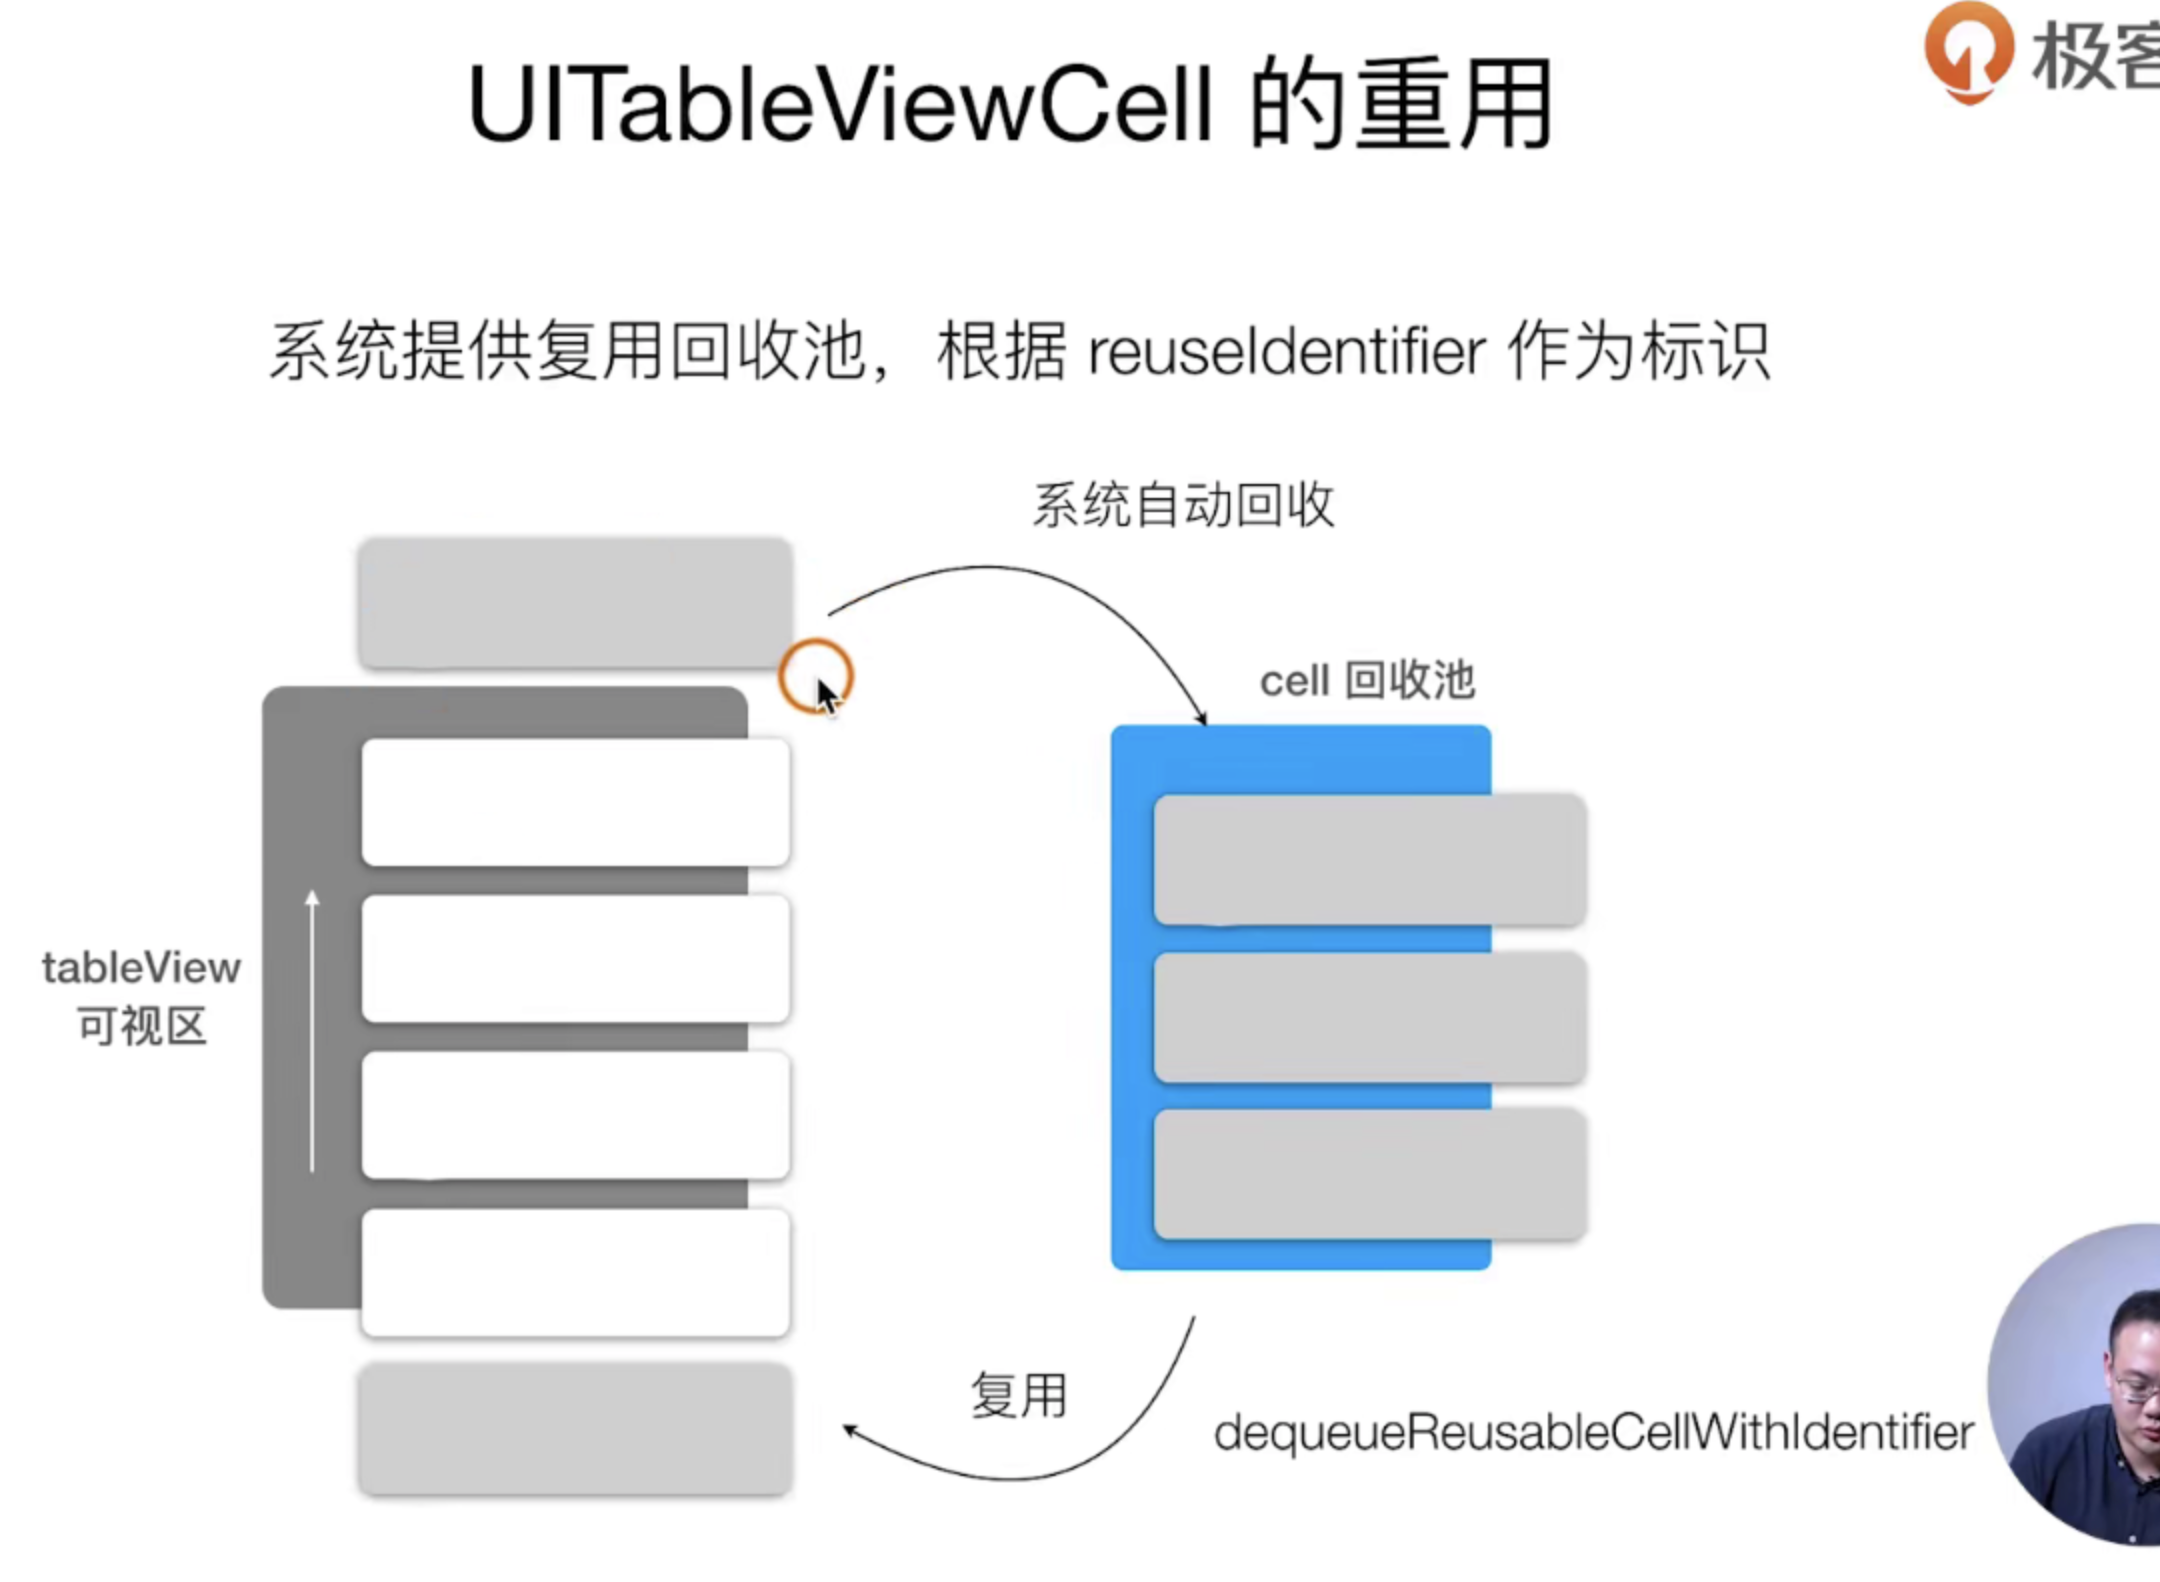
然后我们看看实现,非常的简单加两行代码就好了
//  ViewController.m

- (UITableViewCell *)tableView:(UITableView *)tableView cellForRowAtIndexPath:(NSIndexPath *)indexPath {

    UITableViewCell *cell = [tableView dequeueReusableCellWithIdentifier:@"id"];
    if ( !cell ) {
        cell = [[UITableViewCell alloc] initWithStyle:UITableViewCellStyleSubtitle reuseIdentifier:@"id"];
    }

    cell.textLabel.text = @"主标题";
    cell.detailTextLabel.text = @"副标题";
    cell.imageView.image = [UIImage imageNamed:@"icon.bundle/video.png"];
    return cell;
};
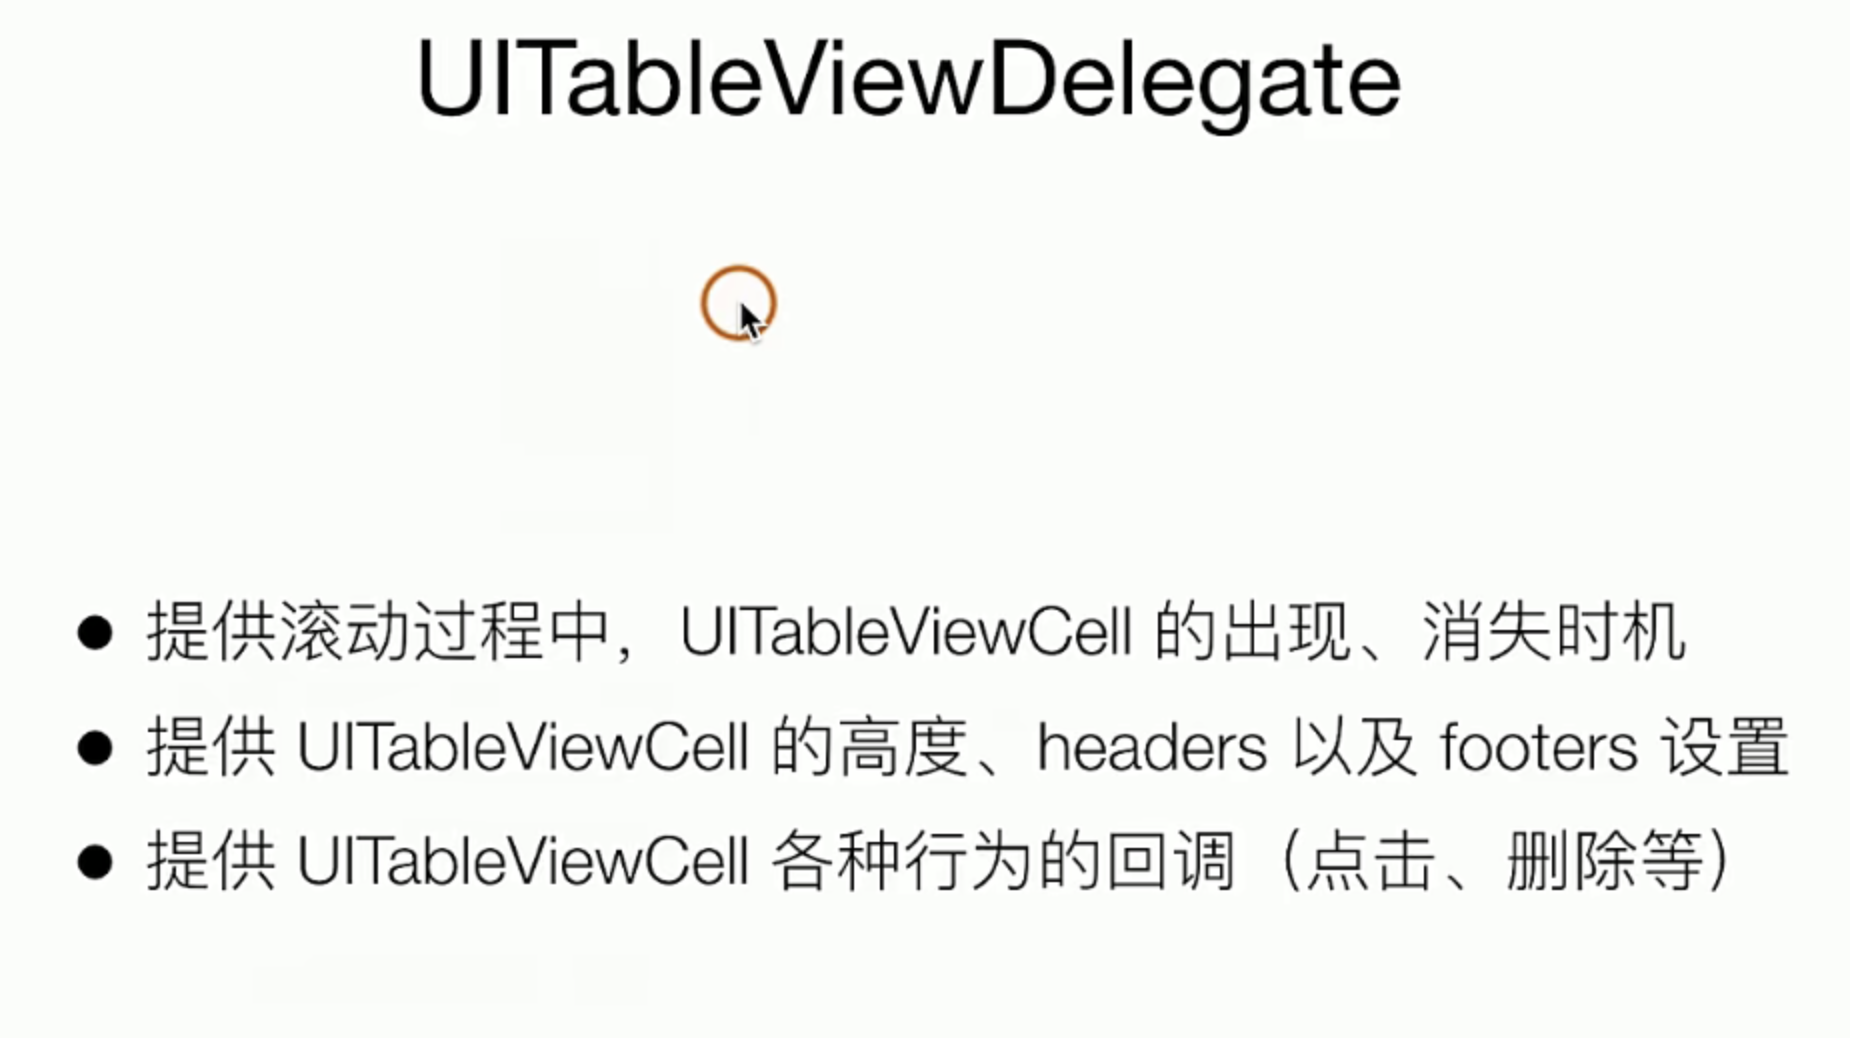
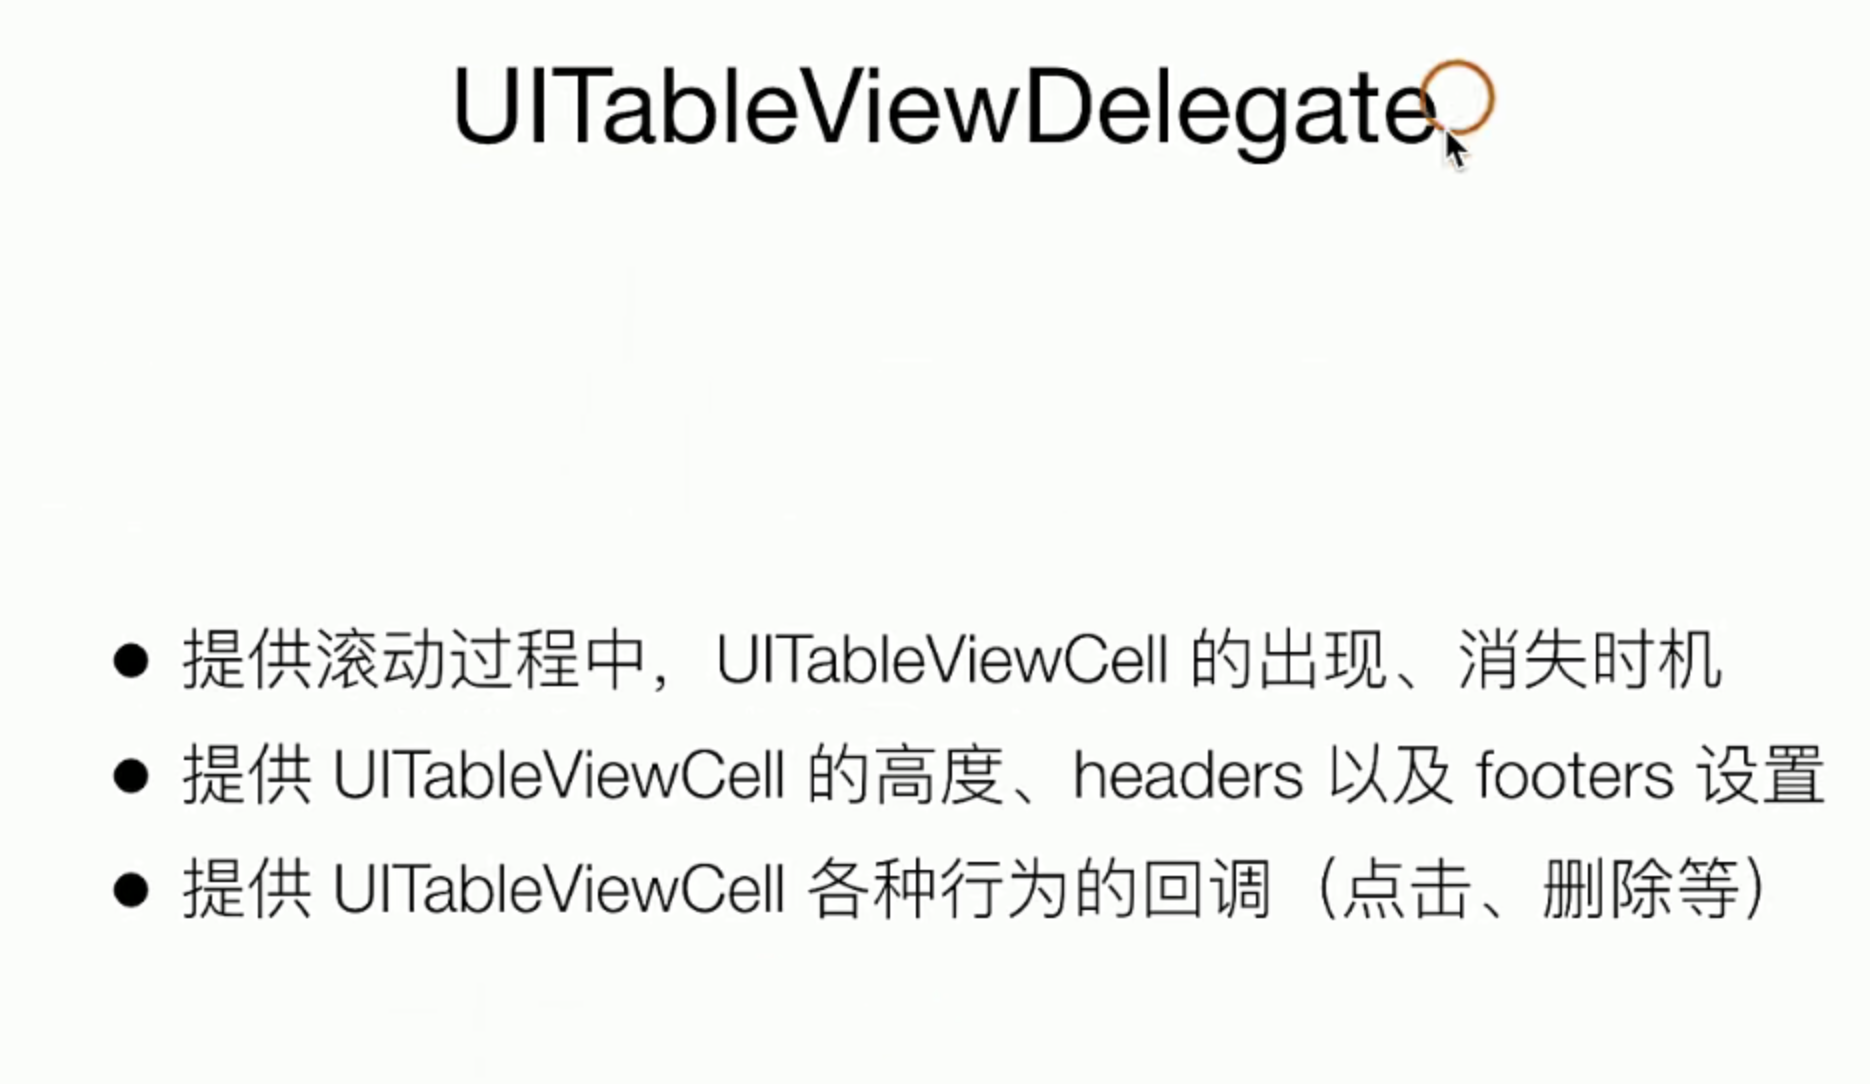
优化和完善一部分的交互体验
这里做得主要的两个功能,一个是设置cell的高度,一个是设置cell选中的动作,这些都是使用delegate的设计模式去实现的
// 加一个声明
@interface ViewController ()<UITableViewDataSource, UITableViewDelegate>

// 实现UIViewDelegate

- (void)viewDidLoad {
    [super viewDidLoad];
    self.view.backgroundColor = [UIColor whiteColor];

    UITableView *tabView = [[UITableView alloc] initWithFrame:self.view.bounds];
    [self.view addSubview: tabView];

    // 拿到UITabView的DataSource delegate
    tabView.dataSource = self;
    // 拿到UITabView的 delegate
    tabView.delegate = self;
    // +++++++


// 实现两个可选项 作用是设置高度和设置选中的action交互

- (void)tableView:(UITableView *)tableView didSelectRowAtIndexPath:(NSIndexPath *)indexPath {
        // 设置一个新的UIView
        UIViewController *viewControoler = [[UIViewController alloc] init];
        viewControoler.view.backgroundColor = [UIColor whiteColor];
        viewControoler.navigationItem.title = [NSString stringWithFormat:@"标题 - %@", @(indexPath.row)];
        [self.navigationController pushViewController: viewControoler animated:YES];
};

- (CGFloat)tableView:(UITableView *)tableView heightForRowAtIndexPath:(NSIndexPath *)indexPath {
    return  100.0;
};

// 显示一下index
- (UITableViewCell *)tableView:(UITableView *)tableView cellForRowAtIndexPath:(NSIndexPath *)indexPath {

    UITableViewCell *cell = [tableView dequeueReusableCellWithIdentifier:@"id"];
    if ( !cell ) {
        cell = [[UITableViewCell alloc] initWithStyle:UITableViewCellStyleSubtitle reuseIdentifier:@"id"];
    }

    cell.textLabel.text =  [NSString stringWithFormat:@"主标题 - %@",@(indexPath.row)];
    cell.detailTextLabel.text = @"副标题";
    cell.imageView.image = [UIImage imageNamed:@"icon.bundle/video.png"];
    return cell;
};
所有完整的代码如下
//
//  ViewController.m
//  SimpelApp
//
//  Created by 李仕增 on 2021/10/20.
//

#import "ViewController.h"

@interface ViewController ()<UITableViewDataSource, UITableViewDelegate>

@end

@implementation ViewController

- (void)viewDidLoad {
    [super viewDidLoad];
    self.view.backgroundColor = [UIColor whiteColor];

    UITableView *tabView = [[UITableView alloc] initWithFrame:self.view.bounds];
    [self.view addSubview: tabView];

    // 拿到UITabView的DataSource delegate
    tabView.dataSource = self;
    // 拿到UITabView的 delegate
    tabView.delegate = self;


//    UIView *view2 = [[UIView alloc] init];
//    view2.backgroundColor = [UIColor greenColor];
//    view2.frame = CGRectMake(150, 150, 100, 100);
//    [self.view addSubview:view2];


// 设置点击响应的事件
//    UITapGestureRecognizer *tapGesture = [[UITapGestureRecognizer alloc]initWithTarget:self action:@selector(pushControoler)];
//    [view2 addGestureRecognizer:tapGesture];

}

//- (void) pushControoler {
//
//    // 设置一个新的UIView
//    UIViewController *viewControoler = [[UIViewController alloc] init];
//    viewControoler.view.backgroundColor = [UIColor whiteColor];
//    viewControoler.navigationItem.title = @"头部";
//    viewControoler.navigationItem.rightBarButtonItem = [ [UIBarButtonItem alloc] initWithTitle:@"右标题" style:UIBarButtonItemStylePlain target:self action:nil ];
//
//    [self.navigationController pushViewController: viewControoler animated:YES];
//}


- (NSInteger)tableView:(UITableView *)tableView numberOfRowsInSection:(NSInteger)section {
    return 20;
};

- (void)tableView:(UITableView *)tableView didSelectRowAtIndexPath:(NSIndexPath *)indexPath {
        // 设置一个新的UIView
        UIViewController *viewControoler = [[UIViewController alloc] init];
        viewControoler.view.backgroundColor = [UIColor whiteColor];
        viewControoler.navigationItem.title = [NSString stringWithFormat:@"标题 - %@", @(indexPath.row)];
        [self.navigationController pushViewController: viewControoler animated:YES];
};

- (CGFloat)tableView:(UITableView *)tableView heightForRowAtIndexPath:(NSIndexPath *)indexPath {
    return  100.0;
};

- (UITableViewCell *)tableView:(UITableView *)tableView cellForRowAtIndexPath:(NSIndexPath *)indexPath {

    UITableViewCell *cell = [tableView dequeueReusableCellWithIdentifier:@"id"];
    if ( !cell ) {
        cell = [[UITableViewCell alloc] initWithStyle:UITableViewCellStyleSubtitle reuseIdentifier:@"id"];
    }

    cell.textLabel.text =  [NSString stringWithFormat:@"主标题 - %@",@(indexPath.row)];
    cell.detailTextLabel.text = @"副标题";
    cell.imageView.image = [UIImage imageNamed:@"icon.bundle/video.png"];
    return cell;
};


@end
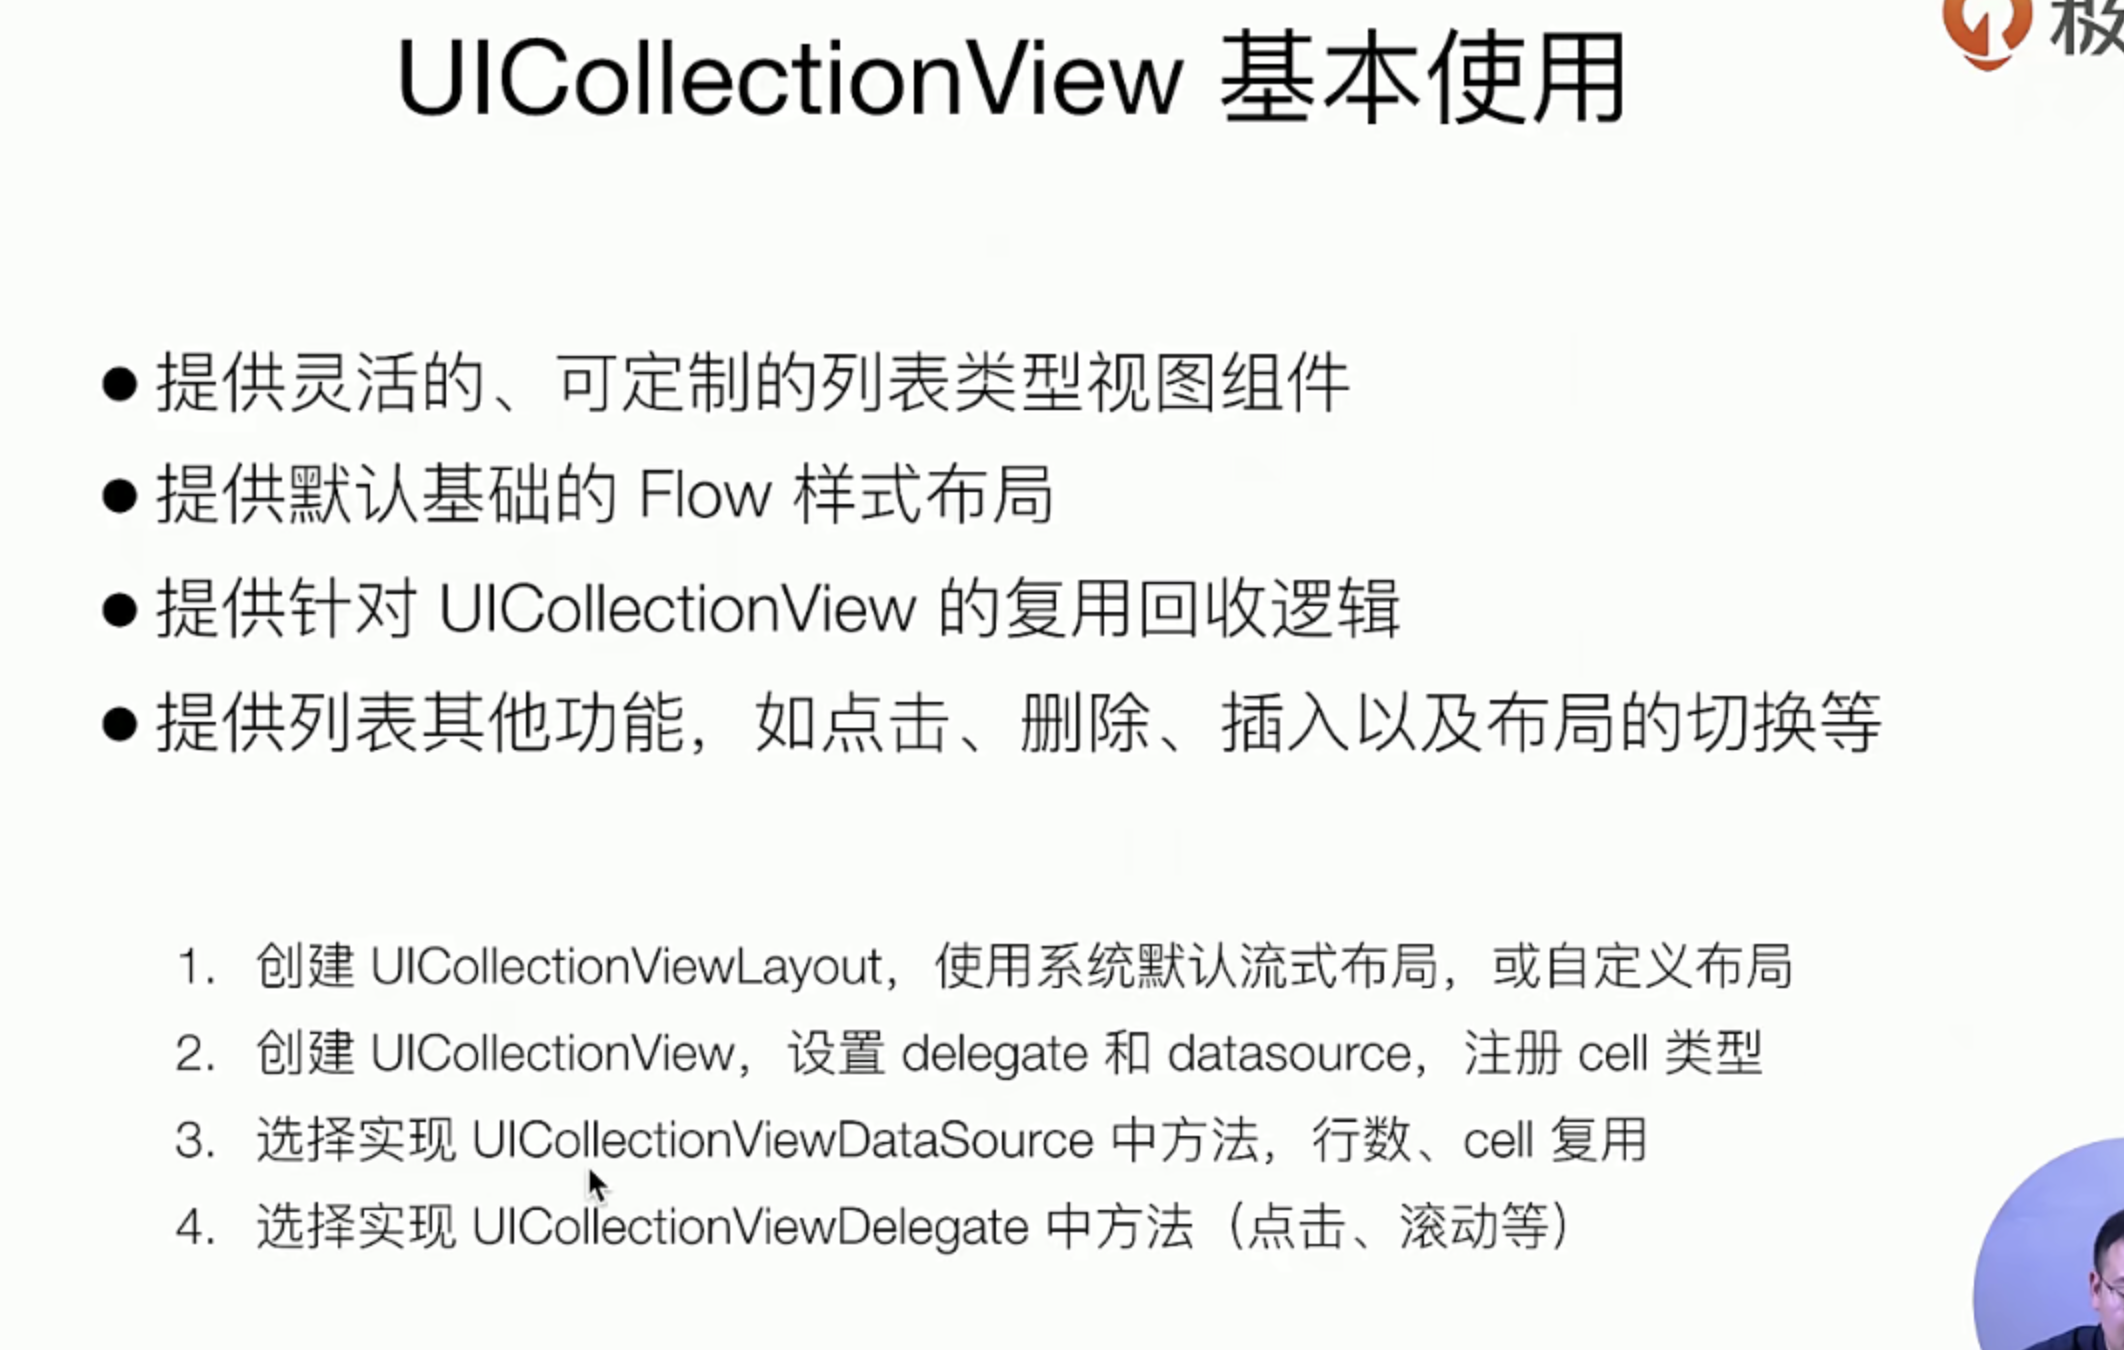
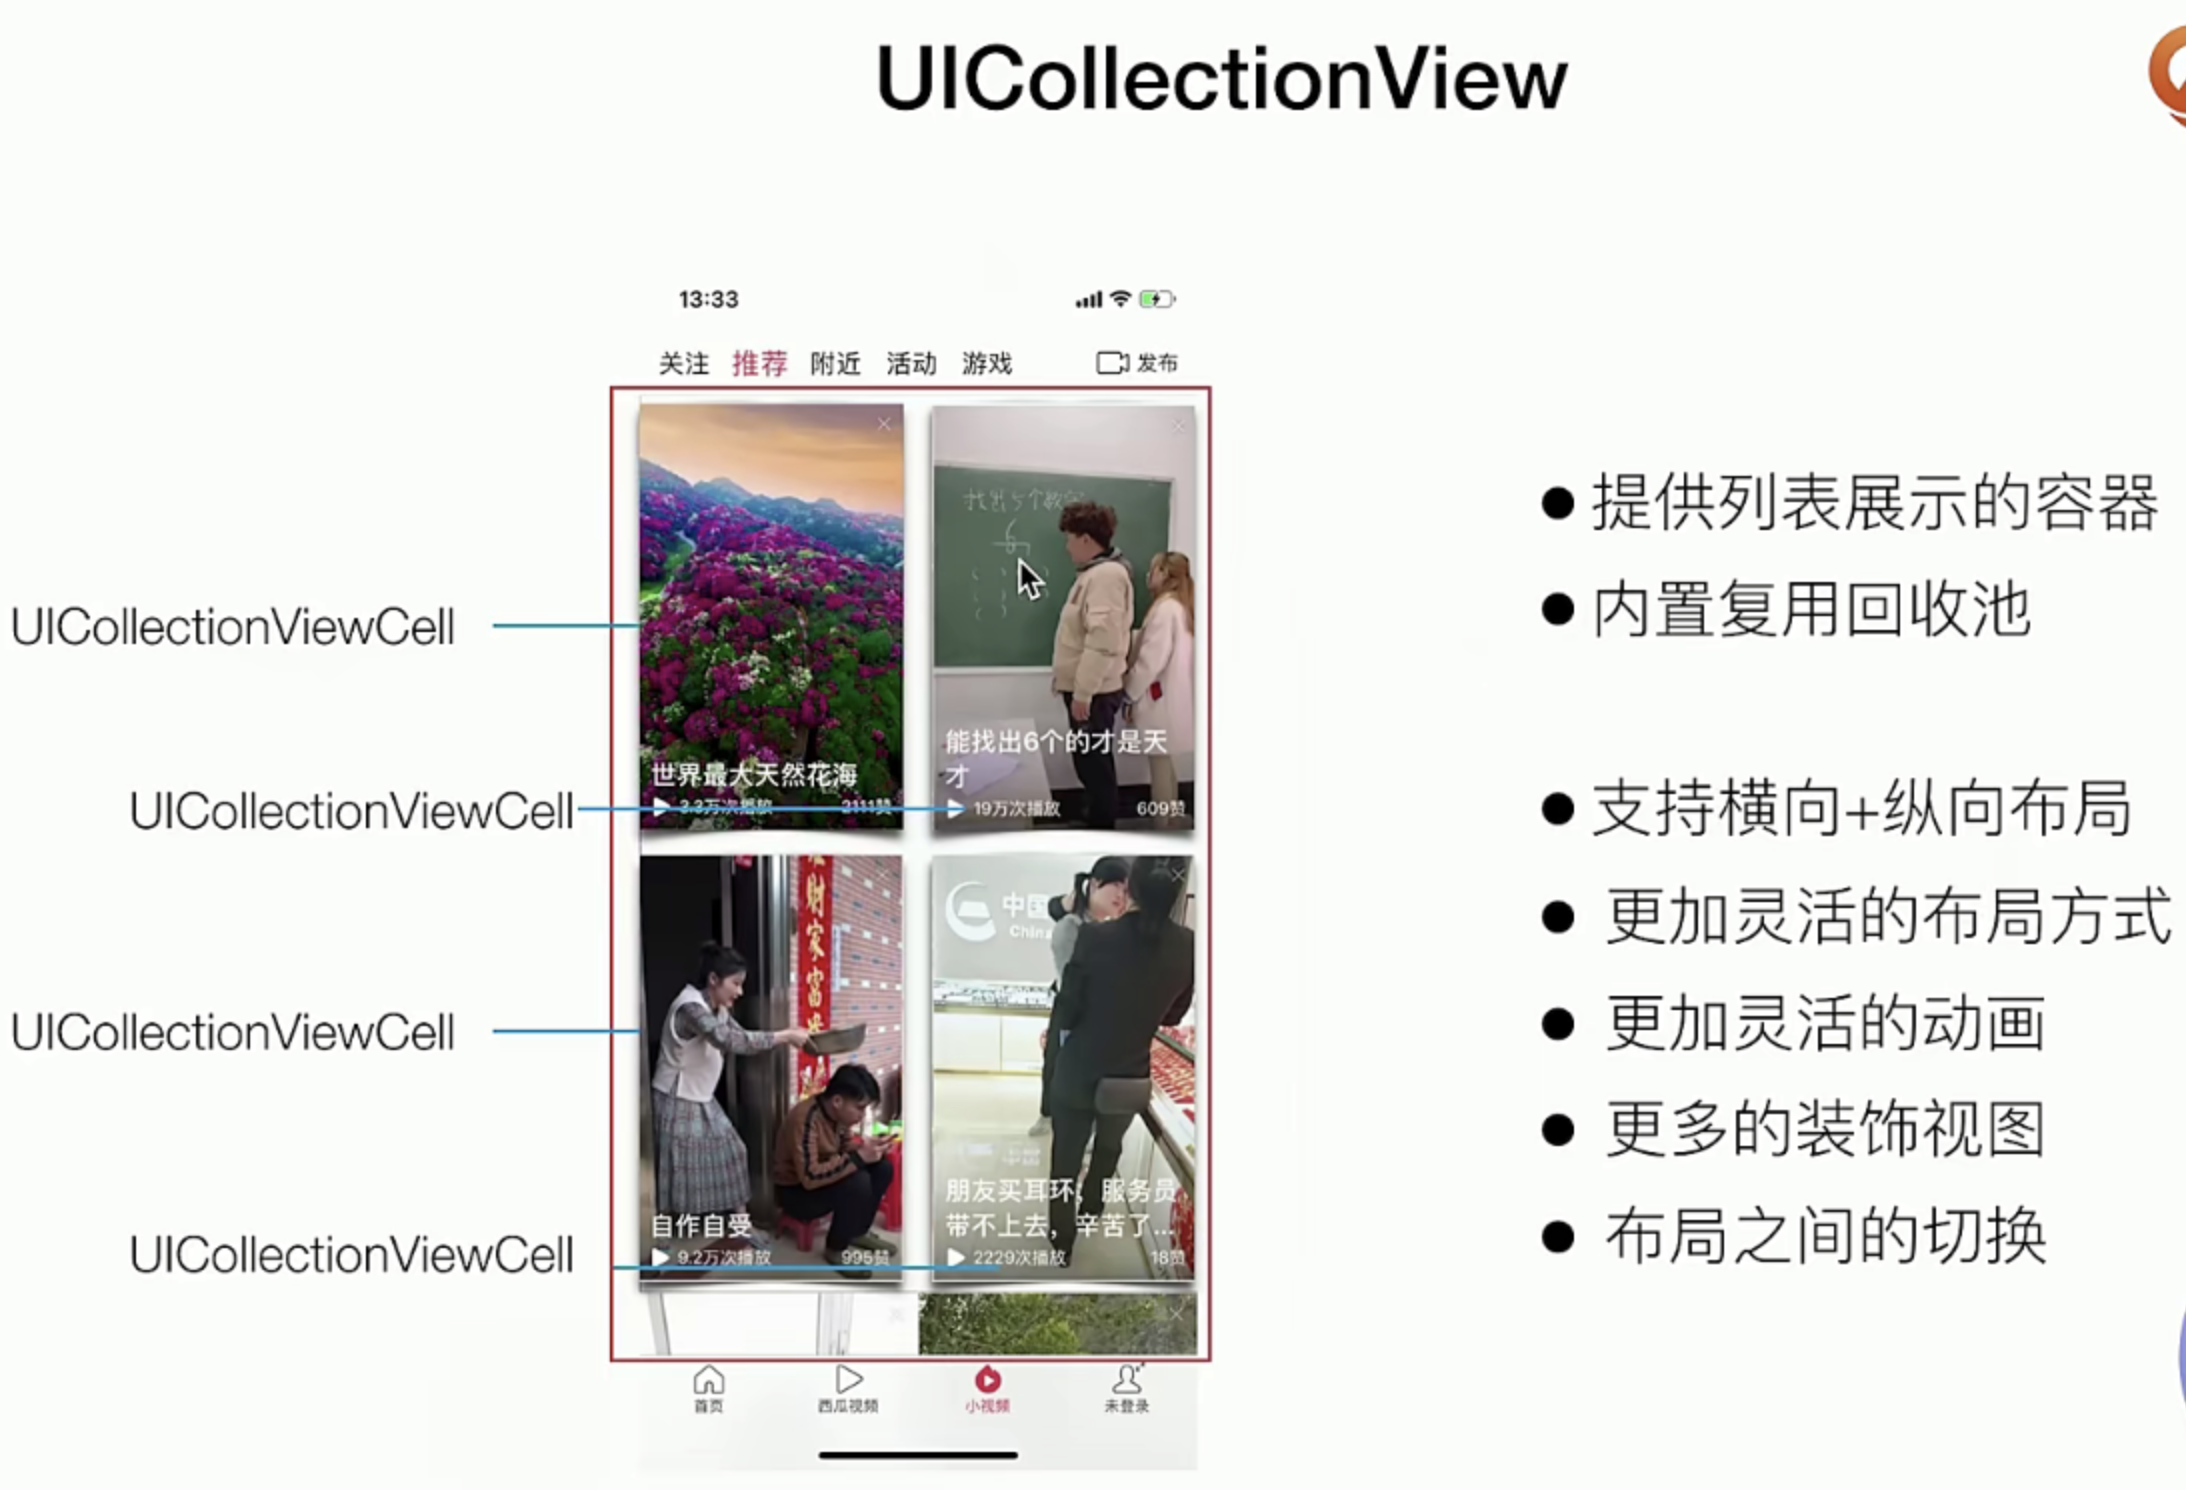
UIControlView实现瀑布流列表
这个是UITabView升级版!,
理论知识

实战指南
这里的指南主要是知道如何从0开始创建一个UICellctionView,
-
首先我们要改造一下我们之前的项目,把TabView的Video列表收敛进来
具体的操作 使用xcode新建一个Cocapad文件,然后进行下面的操作
// AppDelate.m

#import "AppDelegate.h"
#import "ViewController.h"
#import "CGVideoViewController.h"

@interface AppDelegate ()<UINavigationControllerDelegate>

@end

@implementation AppDelegate


- (BOOL)application:(UIApplication *)application didFinishLaunchingWithOptions:(NSDictionary *)launchOptions {
    self.window = [[UIWindow alloc] initWithFrame:[[UIScreen mainScreen] bounds]];

    // 搞一个navigationController
    ViewController *viewController = [[ViewController alloc] init];


    // 搞一个TabBar
    UITabBarController *tabbarController = [[UITabBarController alloc] init];

//    UIViewController *controller1 = [[UIViewController alloc] init];
    viewController.view.backgroundColor = [UIColor redColor];
    viewController.tabBarItem.title =@"新闻";
    viewController.tabBarItem.image = [UIImage imageNamed:@"icon.bundle/home.png"];
    viewController.tabBarItem.selectedImage = [UIImage imageNamed:@"icon.bundle/homeActive.png"];

//    UIViewController *controller2 = [[UIViewController alloc] init];
//    controller2.view.backgroundColor = [UIColor orangeColor];
//    controller2.tabBarItem.title =@"资讯";
//    controller2.tabBarItem.image = [UIImage imageNamed:@"icon.bundle/all.png"];
//    controller2.tabBarItem.selectedImage = [UIImage imageNamed:@"icon.bundle/allActive.png"];

//    把它收敛出去
    CGVideoViewController *videoController = [[CGVideoViewController alloc ] init];

 // +++++++


//  CGVideoViewController.m
//  SimpelApp
//
//  Created by 李仕增 on 2021/10/22.
//

#import "CGVideoViewController.h"

@interface CGVideoViewController ()

@end
@implementation CGVideoViewController

- (instancetype) init {
    self = [super init];
    if (self) {
        self.view.backgroundColor = [UIColor orangeColor];
        self.tabBarItem.title =@"资讯";
        self.tabBarItem.image = [UIImage imageNamed:@"icon.bundle/all.png"];
        self.tabBarItem.selectedImage = [UIImage imageNamed:@"icon.bundle/allActive.png"];
    }
    return  self;
};

- (void)viewDidLoad {
    [super viewDidLoad];

    //
}

@end
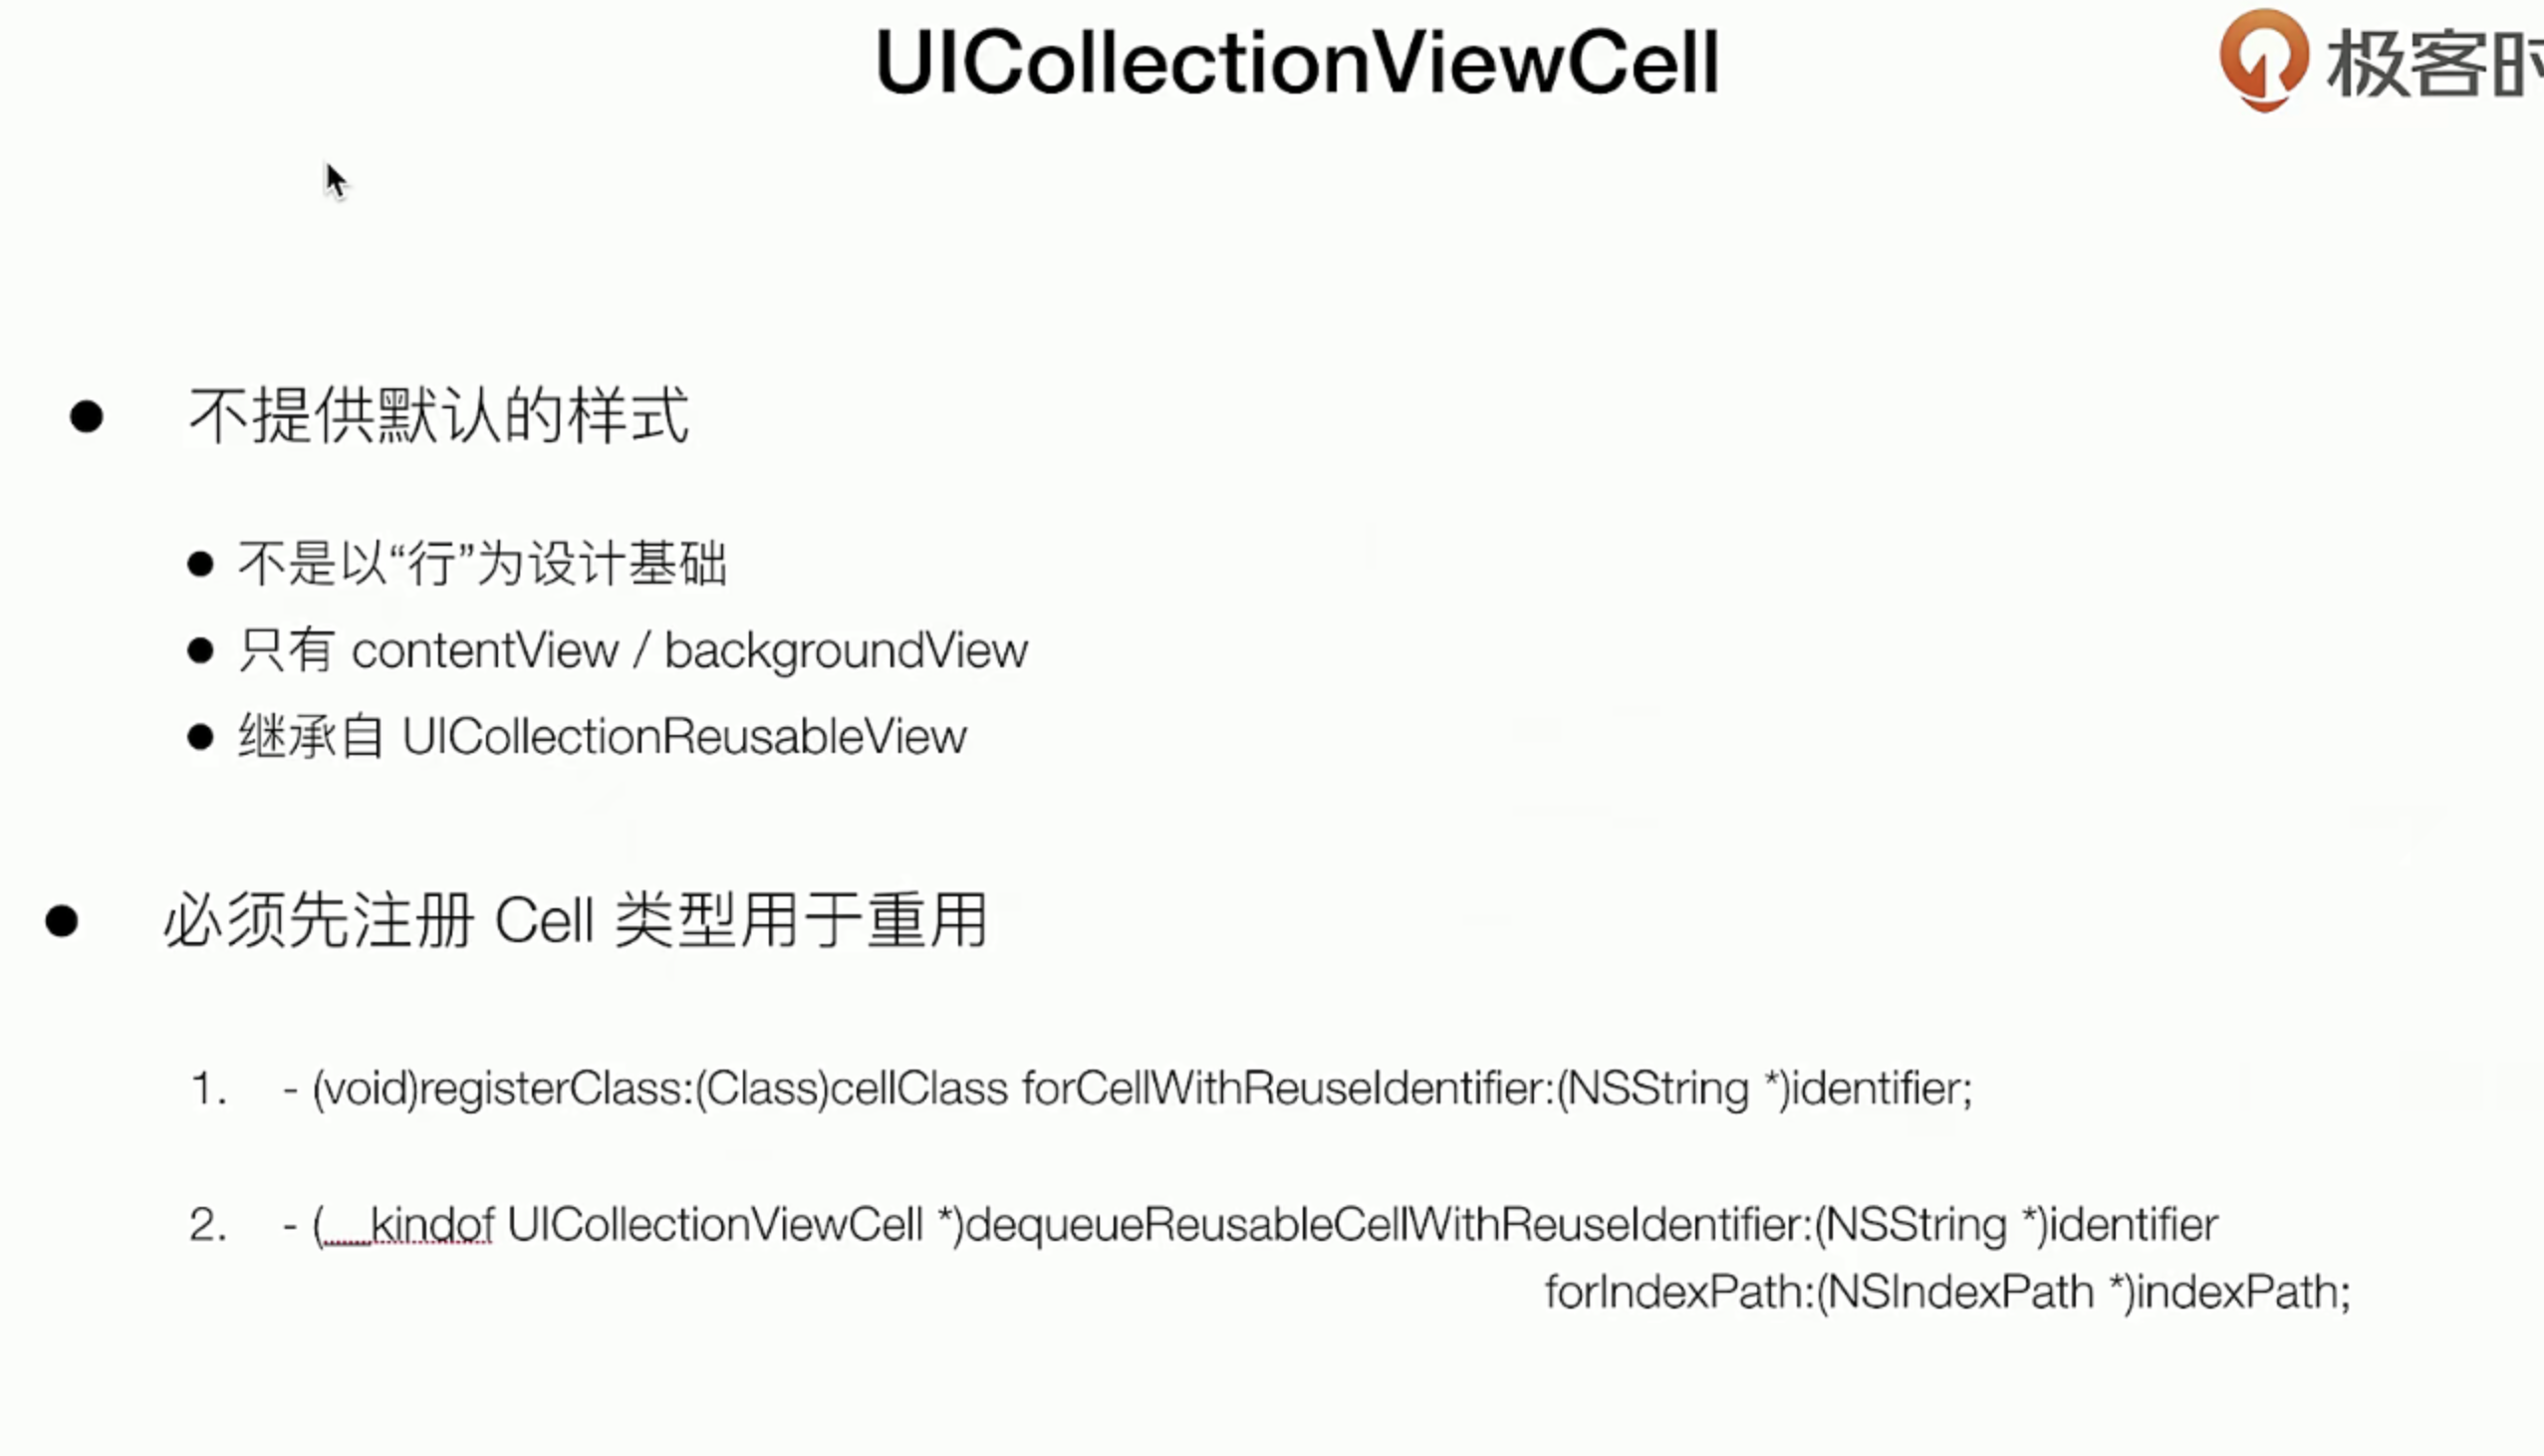
- 和UITabView一样,但是区别就是需要先创建一个layout 和注册一个可重用的cell
//
//  CGVideoViewController.m
//  SimpelApp
//
//  Created by 李仕增 on 2021/10/22.
//

#import "CGVideoViewController.h"

@interface CGVideoViewController ()<UICollectionViewDelegate,UICollectionViewDataSource>

@end
@implementation CGVideoViewController

- (instancetype) init {
    self = [super init];
    if (self) {
        self.view.backgroundColor = [UIColor orangeColor];
        self.tabBarItem.title =@"资讯";
        self.tabBarItem.image = [UIImage imageNamed:@"icon.bundle/all.png"];
        self.tabBarItem.selectedImage = [UIImage imageNamed:@"icon.bundle/allActive.png"];
    }
    return  self;
};

- (void)viewDidLoad {
    [super viewDidLoad];

    UICollectionViewFlowLayout *flowLayout  = [[UICollectionViewFlowLayout alloc] init];

    UICollectionView *collectionViee = [[UICollectionView alloc] initWithFrame:self.view.bounds collectionViewLayout:flowLayout];


    collectionViee.delegate =self;
    collectionViee.dataSource =self;

    [collectionViee registerClass:[UICollectionViewCell class] forCellWithReuseIdentifier:@"UICollectionViewCell"];
    [self.view addSubview:collectionViee];
};


- (NSInteger)collectionView:(UICollectionView *)collectionView numberOfItemsInSection:(NSInteger)section {
    return 200;
};


- (__kindof UICollectionViewCell *)collectionView:(UICollectionView *)collectionView cellForItemAtIndexPath:(NSIndexPath *)indexPath{
    // 默认的大小是50 * 50的大小哈
    UICollectionViewCell *cell = [collectionView dequeueReusableCellWithReuseIdentifier:@"UICollectionViewCell" forIndexPath:indexPath];
    cell.backgroundColor = [UIColor systemPinkColor];
    return cell;
};


@end
行与行之前的itemCell设置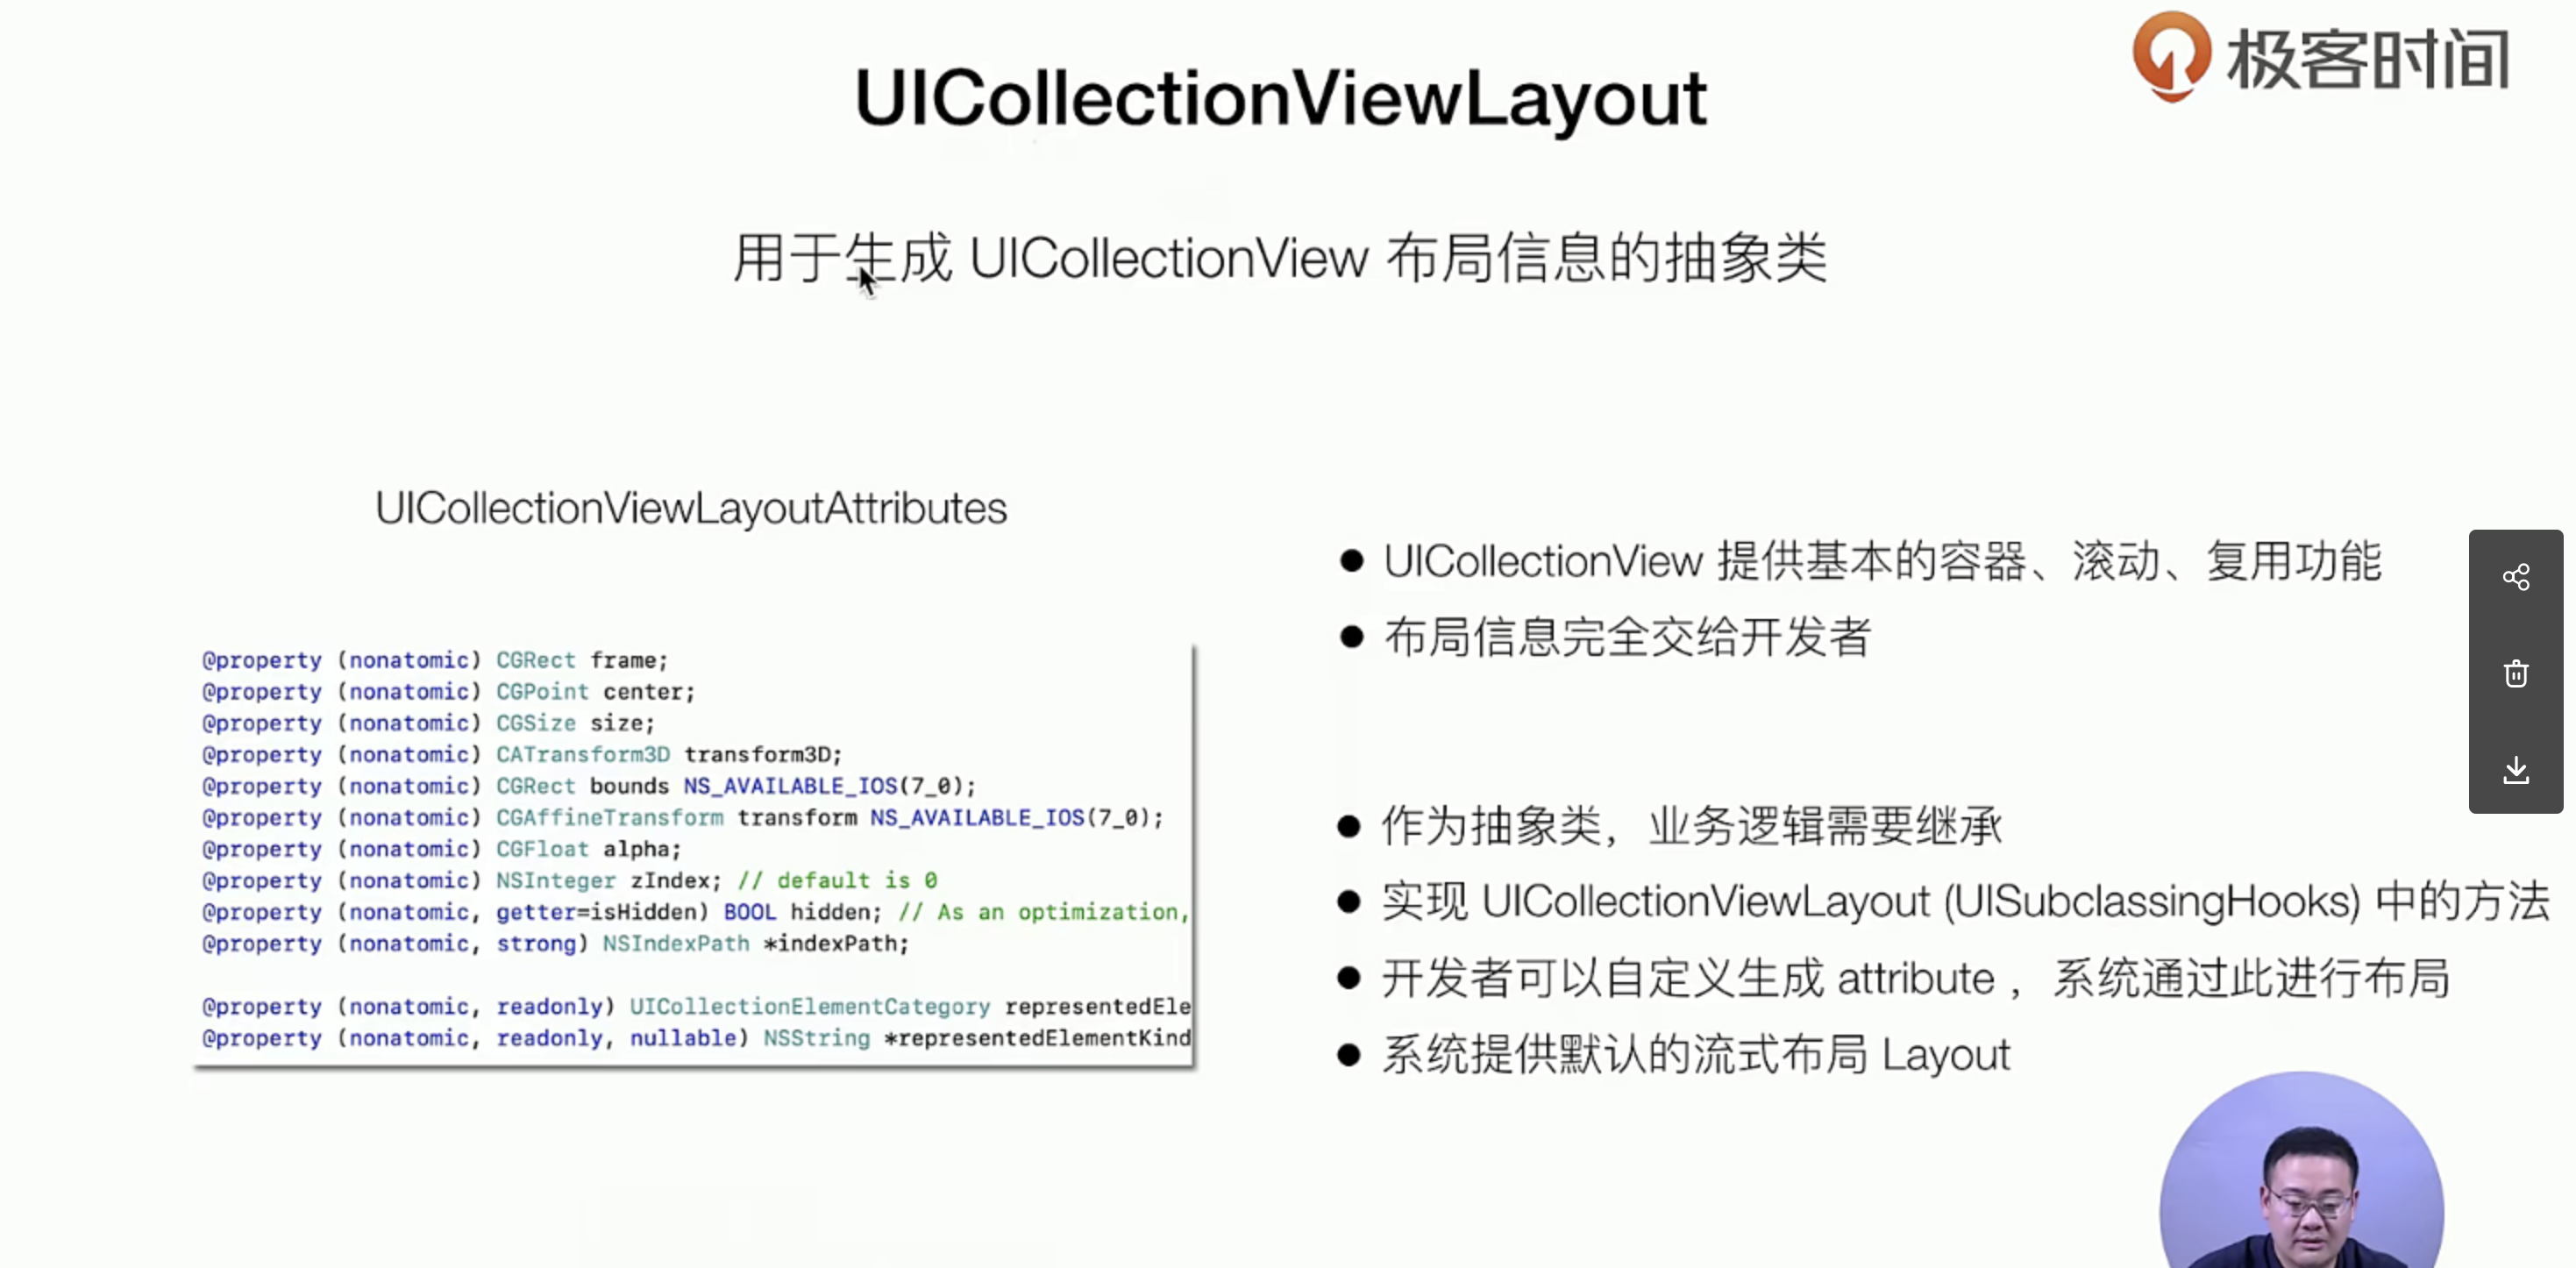
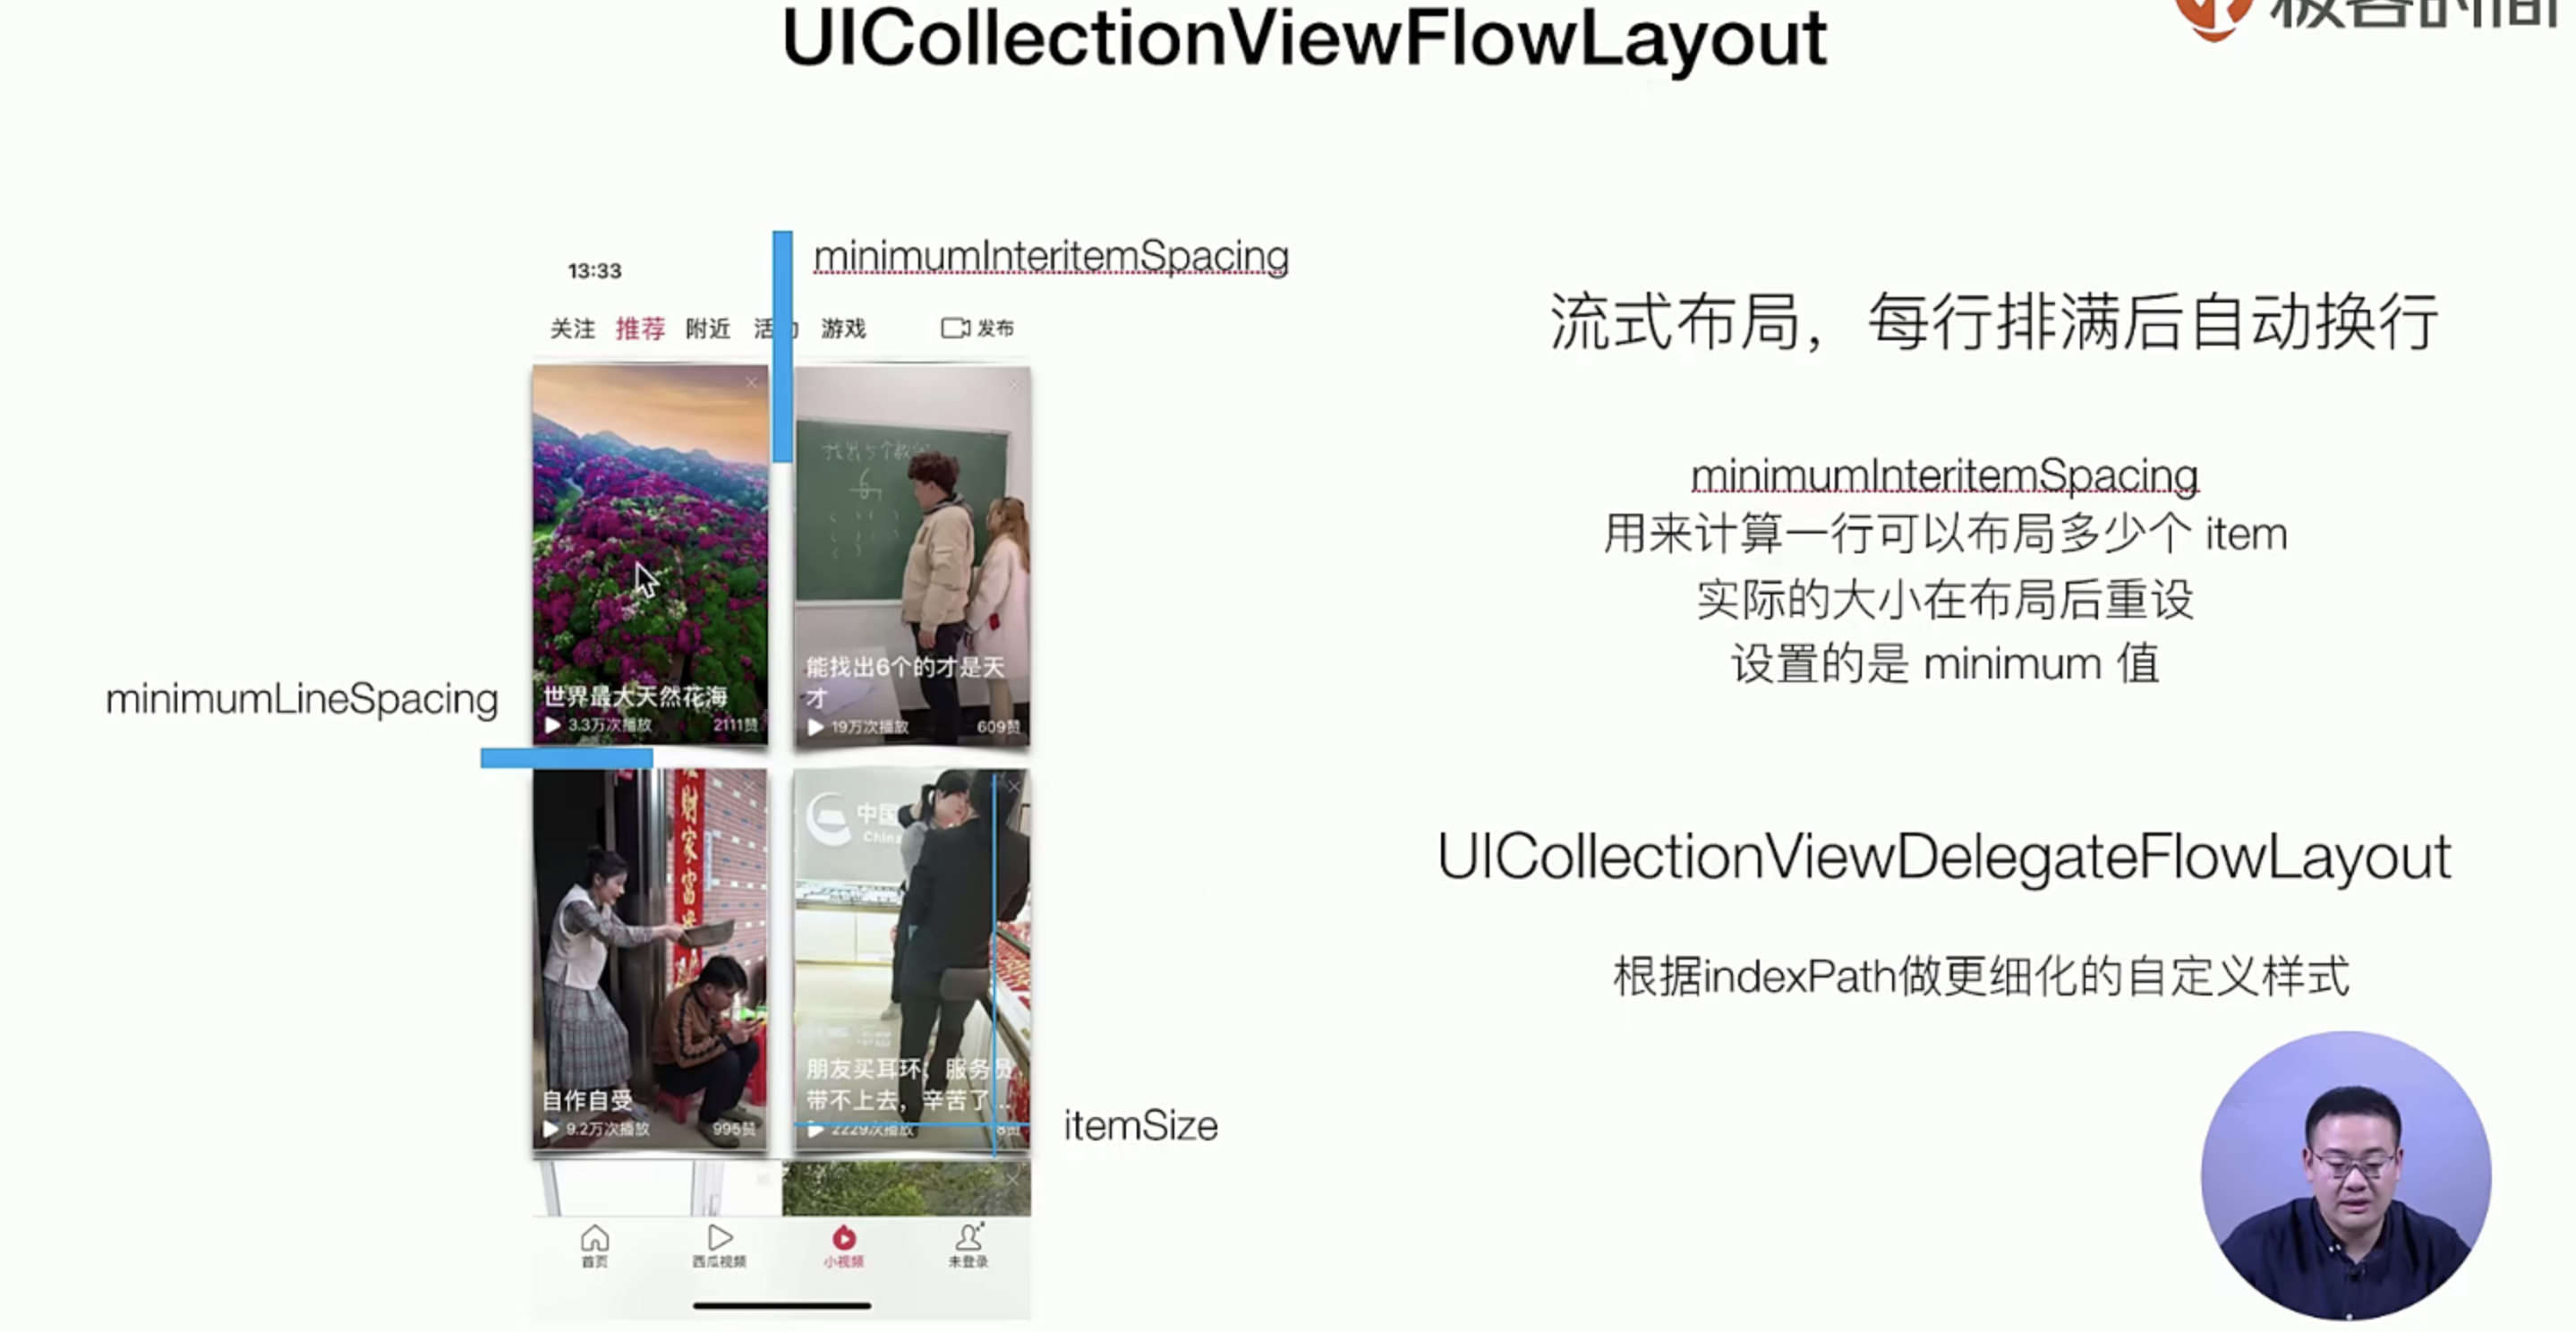
这里比较的撤,系统会给你自动的计算一行放不放得下3个或者5个,如果放不下3个但是又有空间怎么办?中间的minumlintemSpcaiinig会自动的撑大这一行
// =++++
- (void)viewDidLoad {
    [super viewDidLoad];

    UICollectionViewFlowLayout *flowLayout  = [[UICollectionViewFlowLayout alloc] init];  // 更加骚气的 定制可以去看看源代码它有是一个delegate出来的 有些options的方法实现就好了
    flowLayout.minimumLineSpacing = 10;
    flowLayout.minimumInteritemSpacing = 10;
    flowLayout.itemSize = CGSizeMake((self.view.frame.size.width - 10)/2, 300);


//++++++

- (CGSize)collectionView:(UICollectionView *)collectionView layout:(UICollectionViewLayout*)collectionViewLayout sizeForItemAtIndexPath:(NSIndexPath *)indexPath {
    if( indexPath.item % 3 == 0  ) {
        return  CGSizeMake(self.view.frame.size.width, 100);
    }else {
        return  CGSizeMake(( self.view.frame.size.width - 20 ) / 2,  300);
    }
};