本文概要和目录
DANGER
重要提醒!:请不要照着文章照抄,建议你先阅读通篇,了解全貌之后再去实践。
话接上文,本文主要是围绕“完善” 这点出发,把我们之前的项目完善起来。本文的内容比较长,万字长文 需要各位老板 慢慢阅读 友情提醒本文很长~
首先我们上一下本文章的将要涉及到的东西
- [ ] 配置管理
- [ ] 日志收集和记录(中间价、 拦截器)
- [ ] 异常过滤(拦截器)
- [ ] 请求参数校验 (Dto)
- [ ] jwt验证方案
重要!!关于请求流转的全流程
这是一个非常重要的话题,我们需要了解 一个api请求进来之后,在Nest中到底是如何流转的,因为Nest提供了许多概念,如果你不了解整个流转过程,那么对后续的学习是不利的。
https://docs.nestjs.com/faq/request-lifecycle
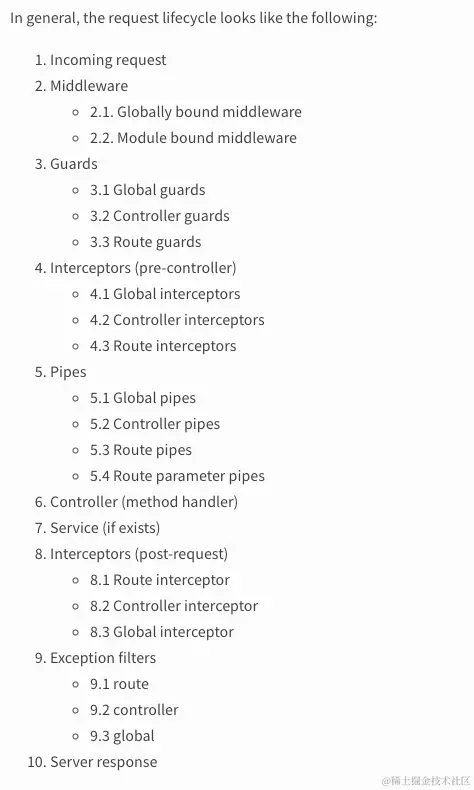
可以看我的另一篇文章说明:https://juejin.cn/post/7230012114600886309
配置管理
如果你看我们之前的代码你不难发现,我们把很多的东西都写死在来代码里,比如这里的数据库配置, 这并不是个好主意,现在我们需要把他们都 抽离出来统一管理,
@Module({
  imports: [
    TypeOrmModule.forRoot({
      type: 'mysql',
      host: 192.168.1.1,
      port: 3306,
      username: root,
      password: root,
      database: /*youer DatabeseName*/,
      entities: [__dirname + '/**/*.entity{.ts,.js}'], // 扫描本项目中.entity.ts或者.entity.js的文件  可以看看我的目录结构,当然你可以自己构建自己的 目录结构
      synchronize: true,
    }),
  ],
  providers: [AppService],
})
export class AppModule {}
理论知识
实际上如果用Nest前面的那些定义来说,应用中的所有配置项都应该交给一个Service统一管理和控制,并且这个Service能读取外部的.yaml或者其他配置文件。接下来我们将一步一步 的实现它。 这也是我们之前学习过的Module 和Provider的深度实战
实践指南
我们并不需要自己动动手写一个Module 我们有现成的轮子 @nestjs/config,
- 构造基础文件夹结构 和 基础配置文件 .env
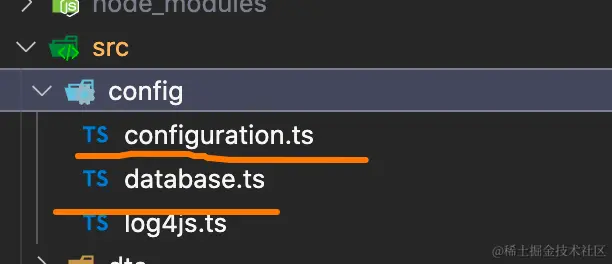 我们只取 这两个文件,让我们看看里面都写了些啥
configuration.ts
import { registerAs } from '@nestjs/config';

// 默认会合并 根目录下的.env文件 process.env 不会覆盖
export default registerAs('app_global', () => ({
  port: process.env.APP_PROT,
  upload_prefix: process.env.UPLOAD_URL_PRE,
  upload_url_dir: process.env.UPLOAD_URL_DIR,
}));
database.ts
import { registerAs } from '@nestjs/config';

export default registerAs('database', () => ({
  host: process.env.DATABASE_HOST, // 这部分会和从env中进行合并
  port: process.env.DATABASE_PORT,
  username: process.env.DATABASE_NAME,
  password: process.env.DATABASE_PWD,
  database: process.env.DATABASE_LIB,
}));
.env 文件的作用 在前面我们代码注释中我们已经详细了解
APP_PROT = 3000

DATABASE_HOST =  192.168.101.10
DATABASE_PORT =  3306
DATABASE_NAME =  root
DATABASE_PWD =  rootroot
DATABASE_LIB =  node_blog

UPLOAD_URL_PRE = 0
UPLOAD_URL_PRE_DIR = uploads
特别注意:假设我们今后的服务器需要自动从部署平台载入一些全局变量我们如何设置呢?这个也比较的坑哈。具体的操作步骤如下
    "start:dev": "nest start --watch  XXXX=XXXX",
    // 这样做是不行的。因为nest是一个运行时的东西,如果你这样做nest启动前变量就获取完了,就轮不到你去设置了你应该这样修改
    "start:dev": "cross-env DATABASE_HOST=000 nest start --watch",

    // 这里是前置项目哈 你要先cross-env 才能 用 cross-env DATABASE_HOST=000
     yarn add cross-env
     yarn cross-env DATABASE_HOST=000 nest start --watch
ConfigModule 进行依赖注入 提供给全局使用
现在我们去AppModule 全局注入 ConfigModule
tsimport App_globalConfig from './config/configuration'; import DatabaseConfig from './config/database'; @Module({ imports: [ ScheduleModule.forRoot(), ConfigModule.forRoot({ // 这个注意哈,我们之前说动态modudle的时候说过这个内容forRoot isGlobal: true, load: [App_globalConfig, DatabaseConfig], }), -------下面还有好多代码TypeOrmModule 使用如何使用?这里面的配置?
对于配置我们用两种使用形式 函数式使用 和 结合NextJS中的动态模块注入
// 函数式用法 在main.ts中
import App_configuration from './config/configuration';

async function bootstrap() {
  const app = await NestFactory.create<NestExpressApplication>(AppModule);
  // 启动程序
  await app.listen(App_configuration().port);
}

// 和nestjs中概念(DynamicModuledo动态模块)结合起来,在app.moudles
@Module({
  imports: [
    ConfigModule.forRoot({
      isGlobal: true,
      load: [App_globalConfig, DatabaseConfig],
    }),
    TypeOrmModule.forRootAsync({
      imports: [ConfigModule],
      useFactory: async (configService: ConfigService) => {
        return {
          type: 'mysql',
          host: configService.get('database.host'), // 和nestjs中的概念结合起来
          port: Number(DatabaseConfig().port), // 单纯的使用函数式写法也ok
          username: DatabaseConfig().username,
          password: DatabaseConfig().password,
          database: DatabaseConfig().database,
          entities: [__dirname + '/**/*.entity{.ts,.js}'], // 扫描本项目中.entity.ts或者.entity.js的文件
          synchronize: true,
        };
      },
      inject: [ConfigService],
    }),
  ],
  providers: [AppService],
})
以上就是最基础的用法来,上面的例子 TypeOrmModule.forRootAsync 在源码的实现细节使用到了 在上篇文章中的 动态模块 的知识点,这里不赘述。
日志收集和记录(中间价middleware、 拦截器interceptor、过滤器filter)
日志收集是最为常见的后端服务的基础功能里,我将使用 Nestjs中的两个技术点 中间价 +拦截器 ,以及Nodejs中流行的log处理器log4js 来实现。最后的实现出来的效果是 ,错误日志和请求日志都会被写入到本地日志文件和控制台中。后续我们还会写一个job定时的把日志清理 以及转存
理论知识
Nestjs的中间件 middleware
nest中的拦截器和Express中基本保持一致, 中间件是在路由处理程序 之前 调用的函数。 中间件函数可以访问请求和响应对象,以及应用程序请求响应周期中的 next() 中间件函数。
- 让我们创建一个中间件
//logger.middleware.ts
import { Injectable, NestMiddleware } from '@nestjs/common';
import { Request, Response, NextFunction } from 'express';

@Injectable()  // 如你所见它是一个 Provider
export class LoggerMiddleware implements NestMiddleware {
  use(req: Request, res: Response, next: NextFunction) {
    console.log('Request...');
    next();
  }
}- 如果使用? 中间件是需要在模块中设置的
import { Module, NestModule, MiddlewareConsumer } from '@nestjs/common';
import { LoggerMiddleware } from './common/middleware/logger.middleware';
import { CatsModule } from './cats/cats.module';

// 使用的时候和Provider保持一致
// 使用 Provider 的方法非常简单 这里不详细说明了,之前文章队Provider由详细的说明

// 也可以使用 直接把它丢给 constructor 处理
@Module({
  imports: [CatsModule],
})
export class AppModule implements NestModule {
// configure是基于 NestModule的实现的,我们实现它,然后重写了这个方法并且把拦截器丢了进去(中间件是需要在模块中设置的)

  configure(consumer: MiddlewareConsumer) {
    consumer
//      .apply(LoggerMiddleware)
//      .forRoutes({ path: 'cats', method: RequestMethod.GET }); // 你需要给那个路由那个方啊,应用这个中间件? 一般的你也可以传递 指定路由的 Controller 进去。
        .apply(cors(), helmet(), logger) // 我们也可以传递函数作为中间价 只要它next就好了
        .exclude( { path: 'cats', method: RequestMethod.GET }, { path: 'cats', method: RequestMethod.POST }, 'cats/(.*)', )
        .forRoutes(CatsController);

  }
}

export function logger(req, res, next) {
  console.log(`Request...`);
  next();
};

// 要想在全局使用 你可以在main中直接use
const app = await NestFactory.create(AppModule);
app.use(logger);
await app.listen(3000);
Nestjs中的 过滤器 filter
Nest中过滤器一般是指 异常处理 过滤器,他们开箱即用,返回一些指定的JSON信息
- 基础异常类 使用
// HttpException是Nest内置的一个基础过滤器,使用它我们可以到一些 美观的内容返回 .比如下面的例子

@Get()
async findAll() {
// 构造函数有两个必要的参数来决定响应: 一是返回体,二是Http状态吗
  throw new HttpException('Forbidden', HttpStatus.FORBIDDEN);
}


// 它将会返回如下内容
{
  "statusCode": 403,
  "message": "Forbidden"
}

// ----------------------------------------------------------------------------------------
// 这样也是可以的error会被返回
@Get()
async findAll() {
  throw new HttpException({
    status: HttpStatus.FORBIDDEN,
    error: 'This is a custom message',
  }, HttpStatus.FORBIDDEN);
}

// 它会返回如下内容
{
  "status": 403,
  "error": "This is a custom message"
}- 自定义异常
forbidden.exception.ts
// 定义 其实只是继承 HttpException
export class ForbiddenException extends HttpException {
  constructor() {
    super('Forbidden', HttpStatus.FORBIDDEN);
  }
}
// 使用
@Get()
async findAll() {
  throw new ForbiddenException();
}- 异常过滤
http-exception.filter.ts
// 很多时候我们 需要把异常过滤掉 ,然后返回 对客户端 友好的 message
import { ExceptionFilter, Catch, ArgumentsHost, HttpException } from '@nestjs/common';
import { Request, Response } from 'express';

//@Catch() 装饰器绑定所需的元数据到异常过滤器上。它告诉 Nest这个特定的过滤器正在寻找
// HttpException 而不是其他的。在实践中,@Catch() 可以传递多个参数,所以你可以通过逗号分
// 隔来为多个类型的异常设置过滤器。
@Catch(HttpException)
export class HttpExceptionFilter implements ExceptionFilter {
// 实现了这个接口 ExceptionFilter 就要重写 这个方法
  catch(exception: HttpException, host: ArgumentsHost) {
  // ArgumentsHost叫做参数主机,它是一个实用的工具 这里我们使用 它的一个方法来获取上下文ctx
    const ctx = host.switchToHttp();
    const response = ctx.getResponse<Response>();
    const request = ctx.getRequest<Request>();
    const status = exception.getStatus();

    response
      .status(status)
      .json({
        statusCode: status,
        timestamp: new Date().toISOString(),
        path: request.url,
      });
  }
}

// 一般来说 像上面的这个过滤器全局处理异常的,都应该作为全局使用 main
app.useGlobalFilters(new AllExceptionsFilter());- 如何绑定它
我们可以把 这些过滤器 绑定在指定的请求体上比如下面的用法
@Post()
// @UseFilters(new HttpExceptionFilter()) // 建议不用new 对内存有影响
@UseFilters(HttpExceptionFilter()) // nest会为我们自动实例化它
async create(@Body() createCatDto: CreateCatDto) {
  throw new ForbiddenException();
}
Nestjs中的拦截器 Interceptor 注意此内容阅读前提要求你对rxjs由一定的了解
rxjs 官方 . Interceptor 也是在Nest中比较重要的概念,它由很多功能,这些功能受面向切面编程(AOP)技术的启发。它们可以:
- 在函数执行之前/之后绑定额外的逻辑
- 转换从函数返回的结果
- 转换从函数抛出的异常
- 扩展基本函数行为
- 根据所选条件完全重写函数 (例如, 缓存目的)
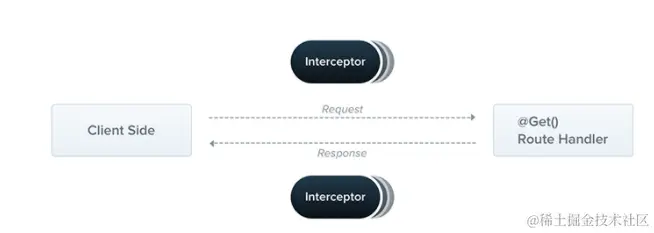
- 基础概念理解 我们通过几个代码来了解里面的基础概念
@Injectable()
export class TransformInterceptor implements NestInterceptor {
// 有两个参数
// 1. 上下文 context,实际上上它也是 来自我们之前说的 ArgumentsHost的扩展;
// 2. CallHandler 如果你不调用那么这个拦截器就没有什么用哈,CallHandler是一个包装执行流的对象,因此推迟了最终的处理程序执行。
  intercept(context: ExecutionContext, next: CallHandler): Observable<any> {
    console.log('Before...');
    const now = Date.now();
    return next  // 这里做的工作就哈中间价有点类似
      .handle()
      .pipe(
        tap(() => console.log(`After... ${Date.now() - now}ms`)),
      );

  }
}- 如何使用它?
通过前面的内容学习,我们已经能够定义了一个 Interceptor 现在我们看看如何绑定到具体业务代码上,当然如你所见它也是一个Provider 你可以像使用 Provider一样使用它,
// nest提供了一个装饰器 方便了我们的使用
@UseInterceptors(LoggingInterceptor)
export class CatsController {}

// 也可以全局使用
app.useGlobalInterceptors(new LoggingInterceptor());
上面的内容只是最基础的使用,rxjs 为我们提供了更多的可能性。使用这些特性你能写过更加“花里胡哨”的代码。
实践指导
上面我们搞了怎么多的理论知识铺垫,让我们现在开始实战
- 首先我们需要构造下面的文件夹结构
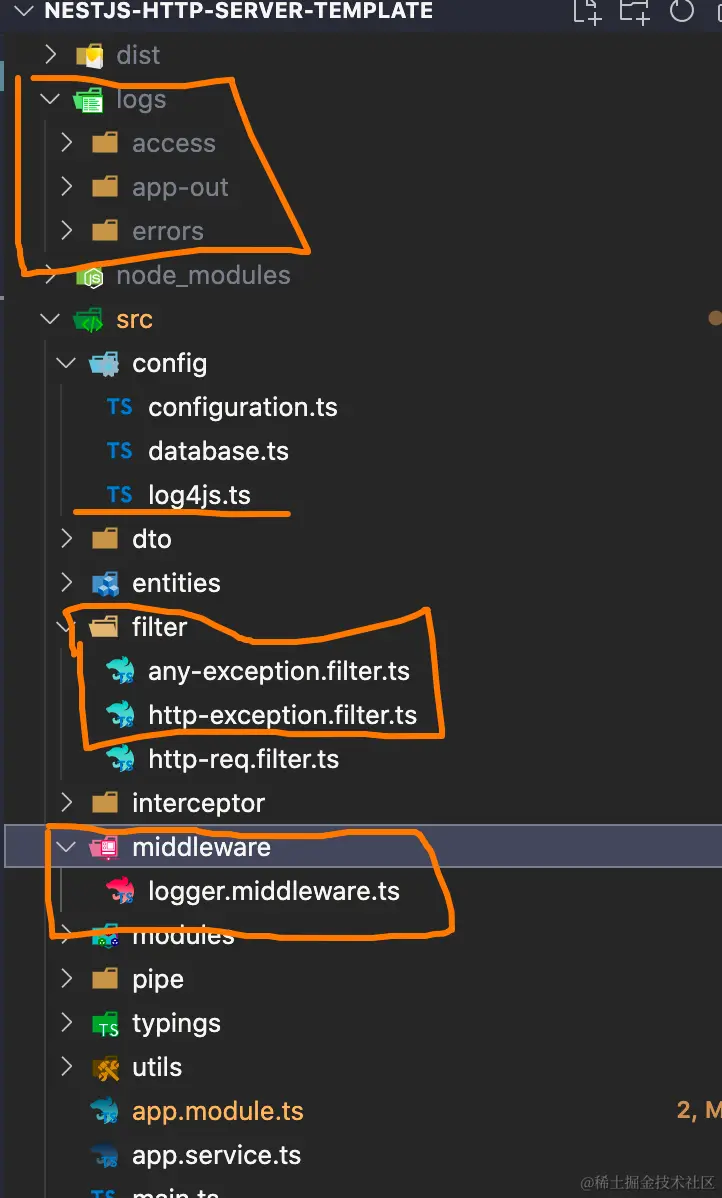
- 构建log4js.ts它主要是log4js的一些配置
// config/log4js.ts

import * as path from 'path';
const baseLogPath = path.resolve(__dirname, '../../logs'); // 日志要写入哪个目录

const log4jsConfig = {
  appenders: {
    console: {
      type: 'console', // 会打印到控制台
    },
    access: {
      type: 'dateFile', // 会写入文件,并按照日期分类
      filename: `${baseLogPath}/access/access.log`, // 日志文件名,会命名为:access.20200320.log
      alwaysIncludePattern: true,
      pattern: 'yyyyMMdd',
      daysToKeep: 60,
      numBackups: 3,
      category: 'http',
      keepFileExt: true, // 是否保留文件后缀
    },
    app: {
      type: 'dateFile',
      filename: `${baseLogPath}/app-out/app.log`,
      alwaysIncludePattern: true,
      layout: {
        type: 'pattern',
        pattern:
          '{"date":"%d","level":"%p","category":"%c","host":"%h","pid":"%z","data":\'%m\'}',
      },
      // 日志文件按日期(天)切割
      pattern: 'yyyyMMdd',
      daysToKeep: 60,
      // maxLogSize: 10485760,
      numBackups: 3,
      keepFileExt: true,
    },
    errorFile: {
      type: 'dateFile',
      filename: `${baseLogPath}/errors/error.log`,
      alwaysIncludePattern: true,
      layout: {
        type: 'pattern',
        pattern:
          '{"date":"%d","level":"%p","category":"%c","host":"%h","pid":"%z","data":\'%m\'}',
      },
      // 日志文件按日期(天)切割
      pattern: 'yyyyMMdd',
      daysToKeep: 60,
      // maxLogSize: 10485760,
      numBackups: 3,
      keepFileExt: true,
    },
    errors: {
      type: 'logLevelFilter',
      level: 'ERROR',
      appender: 'errorFile',
    },
  },
  categories: {
    default: {
      appenders: ['console', 'app', 'errors'],
      level: 'DEBUG',
    },
    info: { appenders: ['console', 'app', 'errors'], level: 'info' },
    access: { appenders: ['console', 'app', 'errors'], level: 'info' },
    http: { appenders: ['access'], level: 'DEBUG' },
  },
  pm2: true, // 使用 pm2 来管理项目时,打开
  pm2InstanceVar: 'INSTANCE_ID', // 会根据 pm2 分配的 id 进行区分,以免各进程在写日志时造成冲突
};

export default log4jsConfig;- 然后是构建两个过滤器 一个是所有的异常过滤,一个是http的异常过滤。
// src/filter/any-exception.filter.ts
/**
 * 捕获所有异常
 */
import {
  ExceptionFilter,
  Catch,
  ArgumentsHost,
  HttpException,
  HttpStatus,
} from '@nestjs/common';
import { Logger } from '../utils/log4js';

@Catch()
export class AllExceptionsFilter implements ExceptionFilter {
  catch(exception: unknown, host: ArgumentsHost) {
    const ctx = host.switchToHttp();
    const response = ctx.getResponse();
    const request = ctx.getRequest();

    const status =
      exception instanceof HttpException
        ? exception.getStatus()
        : HttpStatus.INTERNAL_SERVER_ERROR;

    const logFormat = ` <<<<<<<<<<<<<<<<<<<<<<<<<<<<<<<<<<<<<<<<<<<<<<<<<<<<<<<<<<<<<<<<
    Request original url: ${request.originalUrl}
    Method: ${request.method}
    IP: ${request.ip}
    Status code: ${status}
    Response: ${exception} \n  <<<<<<<<<<<<<<<<<<<<<<<<<<<<<<<<<<<<<<<<<<<<<<<<<<<<<<<<<<<<<<<<
    `;
    Logger.error(logFormat);
    response.status(status).json({
      statusCode: status,
      msg: `Service Error: ${exception}`,
    });
  }
}

// src/filter/http-exception.filter.ts
import {
  ExceptionFilter,
  Catch,
  ArgumentsHost,
  HttpException,
} from '@nestjs/common';
import { Request, Response } from 'express';
import { Logger } from '../utils/log4js';

@Catch(HttpException)
export class HttpExceptionFilter implements ExceptionFilter {
  catch(exception: HttpException, host: ArgumentsHost) {
    const ctx = host.switchToHttp();
    const response = ctx.getResponse<Response>();
    const request = ctx.getRequest<Request>();
    const status = exception.getStatus();

    const logFormat = ` <<<<<<<<<<<<<<<<<<<<<<<<<<<<<<<<<<<<<<<<<<<<<<<<<<<<<<<<<<<<<<<<
    Request original url: ${request.originalUrl}
    Method: ${request.method}
    IP: ${request.ip}
    Status code: ${status}
    Response: ${exception.toString()} \n  <<<<<<<<<<<<<<<<<<<<<<<<<<<<<<<<<<<<<<<<<<<<<<<<<<<<<<<<<<<<<<<<
    `;
    Logger.info(logFormat);
    response.status(status).json({
      statusCode: status,
      error: exception.message,
      msg: `${status >= 500 ? 'Service Error' : 'Client Error'}`,
    });
  }
}- 除此之外 我们还需要中间间这里把http的请求给抓到,以便于我们分析
import { Injectable, NestMiddleware } from '@nestjs/common';
import { Request, Response } from 'express';
import { Logger } from '../utils/log4js';

@Injectable()
export class LoggerMiddleware implements NestMiddleware {
  use(req: Request, res: Response, next: () => void) {
    const code = res.statusCode; // 响应状态码
    next();
    // 组装日志信息
    const logFormat = `Method: ${req.method} \n Request original url: ${req.originalUrl} \n IP: ${req.ip} \n Status code: ${code} \n`;
    // 根据状态码,进行日志类型区分
    if (code >= 500) {
      Logger.error(logFormat);
    } else if (code >= 400) {
      Logger.warn(logFormat);
    } else {
      Logger.access(logFormat);
      Logger.log(logFormat);
    }
  }
}

// 函数式中间件
export function logger(req: Request, res: Response, next: () => any) {
  const code = res.statusCode; // 响应状态码
  next();
  // 组装日志信息
  const logFormat = ` >>>>>>>>>>>>>>>>>>>>>>>>>>>>>>>>>>>>>>>>>>>>>>>>>>>>>>>>>>>>>>>>
    Request original url: ${req.originalUrl}
    Method: ${req.method}
    IP: ${req.ip}
    Status code: ${code}
    Parmas: ${JSON.stringify(req.params)}
    Query: ${JSON.stringify(req.query)}
    Body: ${JSON.stringify(
      req.body,
    )} \n  >>>>>>>>>>>>>>>>>>>>>>>>>>>>>>>>>>>>>>>>>>>>>>>>>>>>>>>>>>>>>>>>
  `;
  // 根据状态码,进行日志类型区分
  if (code >= 500) {
    Logger.error(logFormat);
  } else if (code >= 400) {
    Logger.warn(logFormat);
  } else {
    Logger.access(logFormat);
    Logger.log(logFormat);
  }
}- 我们给req加点东西
transform.interceptor.ts
// 全局 拦截器 用来收集日志
import {
  CallHandler,
  ExecutionContext,
  Injectable,
  NestInterceptor,
} from '@nestjs/common';
import { Observable } from 'rxjs';
import { map } from 'rxjs/operators';
import { Logger } from '../utils/log4js';

@Injectable()
export class TransformInterceptor implements NestInterceptor {
  intercept(context: ExecutionContext, next: CallHandler): Observable<any> {
    const req = context.getArgByIndex(1).req;
    return next.handle().pipe(
      map((data) => {
        const logFormat = ` <<<<<<<<<<<<<<<<<<<<<<<<<<<<<<<<<<<<<<<<<<<<<<<<<<<<<<<<<<<<<<<<
    Request original url: ${req.originalUrl}
    Method: ${req.method}
    IP: ${req.ip}
    User: ${JSON.stringify(req.user)}
    Response data:\n ${JSON.stringify(data.body)}
    <<<<<<<<<<<<<<<<<<<<<<<<<<<<<<<<<<<<<<<<<<<<<<<<<<<<<<<<<<<<<<<<`;
        Logger.info(logFormat);
        Logger.access(logFormat);
        return data;
      }),
    );
  }
}- 在utils中我们需要写点工具函数🔧
// src/utils/log4js.ts
import * as Path from 'path';
import * as Log4js from 'log4js';
import * as Util from 'util';
import * as Moment from 'moment'; // 处理时间的工具
import * as StackTrace from 'stacktrace-js';
import Chalk from 'chalk';
import config from '../config/log4js';

// 日志级别
export enum LoggerLevel {
  ALL = 'ALL',
  MARK = 'MARK',
  TRACE = 'TRACE',
  DEBUG = 'DEBUG',
  INFO = 'INFO',
  WARN = 'WARN',
  ERROR = 'ERROR',
  FATAL = 'FATAL',
  OFF = 'OFF',
}

// 内容跟踪类
export class ContextTrace {
  constructor(
    public readonly context: string,
    public readonly path?: string,
    public readonly lineNumber?: number,
    public readonly columnNumber?: number,
  ) {}
}

Log4js.addLayout('Awesome-nest', (logConfig: any) => {
  return (logEvent: Log4js.LoggingEvent): string => {
    let moduleName = '';
    let position = '';

    // 日志组装
    const messageList: string[] = [];
    logEvent.data.forEach((value: any) => {
      if (value instanceof ContextTrace) {
        moduleName = value.context;
        // 显示触发日志的坐标(行,列)
        if (value.lineNumber && value.columnNumber) {
          position = `${value.lineNumber}, ${value.columnNumber}`;
        }
        return;
      }

      if (typeof value !== 'string') {
        value = Util.inspect(value, false, 3, true);
      }

      messageList.push(value);
    });

    // 日志组成部分
    const messageOutput: string = messageList.join(' ');
    const positionOutput: string = position ? ` [${position}]` : '';
    const typeOutput = `[${logConfig.type}] ${logEvent.pid.toString()}   - `;
    const dateOutput = `${Moment(logEvent.startTime).format(
      'YYYY-MM-DD HH:mm:ss',
    )}`;
    const moduleOutput: string = moduleName
      ? `[${moduleName}] `
      : '[LoggerService] ';
    let levelOutput = `[${logEvent.level}] ${messageOutput}`;

    // 根据日志级别,用不同颜色区分
    switch (logEvent.level.toString()) {
      case LoggerLevel.DEBUG:
        levelOutput = Chalk.green(levelOutput);
        break;
      case LoggerLevel.INFO:
        levelOutput = Chalk.cyan(levelOutput);
        break;
      case LoggerLevel.WARN:
        levelOutput = Chalk.yellow(levelOutput);
        break;
      case LoggerLevel.ERROR:
        levelOutput = Chalk.red(levelOutput);
        break;
      case LoggerLevel.FATAL:
        levelOutput = Chalk.hex('#DD4C35')(levelOutput);
        break;
      default:
        levelOutput = Chalk.grey(levelOutput);
        break;
    }

    return `${Chalk.green(typeOutput)}${dateOutput}  ${Chalk.yellow(
      moduleOutput,
    )}${levelOutput}${positionOutput}`;
  };
});

// 注入配置
Log4js.configure(config);

// 实例化
const logger = Log4js.getLogger();
logger.level = LoggerLevel.TRACE;

export class Logger {
  static trace(...args) {
    logger.trace(Logger.getStackTrace(), ...args);
  }

  static debug(...args) {
    logger.debug(Logger.getStackTrace(), ...args);
  }

  static log(...args) {
    logger.info(Logger.getStackTrace(), ...args);
  }

  static info(...args) {
    logger.info(Logger.getStackTrace(), ...args);
  }

  static warn(...args) {
    logger.warn(Logger.getStackTrace(), ...args);
  }

  static warning(...args) {
    logger.warn(Logger.getStackTrace(), ...args);
  }

  static error(...args) {
    logger.error(Logger.getStackTrace(), ...args);
  }

  static fatal(...args) {
    logger.fatal(Logger.getStackTrace(), ...args);
  }

  static access(...args) {
    const loggerCustom = Log4js.getLogger('http');
    loggerCustom.info(Logger.getStackTrace(), ...args);
  }

  // 日志追踪,可以追溯到哪个文件、第几行第几列
  static getStackTrace(deep = 2): string {
    const stackList: StackTrace.StackFrame[] = StackTrace.getSync();
    const stackInfo: StackTrace.StackFrame = stackList[deep];

    const lineNumber: number = stackInfo.lineNumber;
    const columnNumber: number = stackInfo.columnNumber;
    const fileName: string = stackInfo.fileName;
    const basename: string = Path.basename(fileName);
    return `${basename}(line: ${lineNumber}, column: ${columnNumber}): \n`;
  }
}

// 这个文件,不但可以单独调用,也可以做成中间件使用。- 最后的环境去使用它
// 我们会在main中全局的使用他们
  //日志相关
  app.use(logger); // 所有请求都打印日志  logger ?
  app.useGlobalInterceptors(new TransformInterceptor()); // 使用全局拦截器 收集日志

  // 错误异常捕获 和 过滤处理
  app.useGlobalFilters(new AllExceptionsFilter());
  app.useGlobalFilters(new HttpExceptionFilter()); // 全局统一异常返回体
以上就是 中间价 + 过滤器 + 拦截器实现的日志记录,有点复杂 需要多读几遍
请求参数校验 (Dto)
什么是Dto Dto全称:数据传输对象,我们使用Dto可以很大程度在请求参数校验上做一些自动化的验证功能,这就是Dto的用意
- 新建一个文件夹
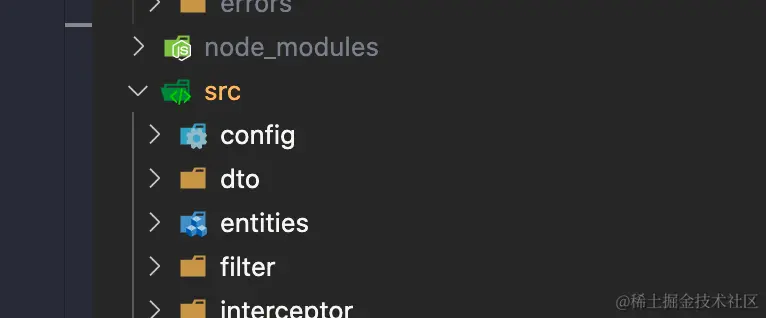
- 在里面写入如下内容
// class-validator是一个Dto的库,提供了一些便捷的装饰器 来完成Dto的一些功能 比如@IsNotEmpty
import { IsNotEmpty, IsNumber } from 'class-validator';

// dto (Data Transfer Object) 数据传输对象
export class UserInfoDTO {
  @IsNotEmpty({ message: '用户名不允许为空' })
  username: string;


  @IsNotEmpty({ message: '密码不允许为空' })
  password: string;


  @IsNotEmpty({ message: '更新创建时间必选' })
  @IsNumber()
  update_time: number;


  @IsNotEmpty({ message: '创建时间必选' })
  create_time: number;


  @IsNotEmpty({ message: '状态必填' })
  state: number;
}- 然后我们在请求的头的时候这样做
// user.controller.ts
  @Post()
  @UsePipes(new ValidationPipe())
  async createUser(@Body() userInfo: UserInfoDTO) {
    const value = await this.userService.create(userInfo);
    return value;
  }
// 如此一来,只要你的验证不通过,就可以得到返回
{
    "statusCode": 400,
    "error": "Validation failed: 状态必填",
    "msg": "Client Error"
}

// 2022/3/29 日补充一点没有说明白的是这个
// @UsePipes(new ValidationPipe()) 这个知识点涉及自定义的Pipe
// src/pipe/Validation.pipe.ts
import {
  ArgumentMetadata,
  Injectable,
  PipeTransform,
  BadRequestException,
} from '@nestjs/common';
import { validate } from 'class-validator';
import { plainToClass } from 'class-transformer';
import { Logger } from '../utils/log4js';

// PipeTransform需哟被实现 且重写 transform方法
@Injectable()
export class ValidationPipe implements PipeTransform {
  async transform(value: any, { metatype }: ArgumentMetadata) {
    console.log(`value:`, value, 'metatype: ', metatype);
    if (!metatype || !this.toValidate(metatype)) {
      // 如果没有传入验证规则,则不验证,直接返回数据
      return value;
    }
    // 将对象转换为 Class 来验证
    const object = plainToClass(metatype, value);
    const errors = await validate(object);
    if (errors.length > 0) {
      const msg = Object.values(errors[0].constraints)[0]; // 只需要取第一个错误信息并返回即可
      Logger.error(`Validation failed: ${msg}`);
      throw new BadRequestException(`Validation failed: ${msg}`);
    }
    return value;
  }
  private toValidate(metatype: any): boolean {
    const types: any[] = [String, Boolean, Number, Array, Object];
    return !types.includes(metatype);
  }
}
这里挖了一个坑,还记得我们之前定义的entities实体吗?它有的时候会和我们的Dto不兼容,这个时候我们就需要使用 自定义验证这个特性了,具体的做法,请看后续文章
jwt验证方案
安全验证老生常谈了,在Nestjs也是非常必要的,我们得有一套良好的设计来处理这件事情,接下来我们来谈谈他们,当然了安全不仅仅是jwt,它涵盖了很多 比如权限 加密散列,CSRF,限速等...
理论知识
路有守卫 + 自定义装饰器
路由守卫在Nestjs中是实现了CanActivate接口的Provider
- 基础概念
import { Injectable, CanActivate, ExecutionContext } from '@nestjs/common';
import { Observable } from 'rxjs';

@Injectable()
export class AuthGuard implements CanActivate {
  canActivate(
    context: ExecutionContext,
  ): boolean | Promise<boolean> | Observable<boolean> {
  // ExecutionContext 也是从 ArgumentsHost 扩展来的
    const request = context.switchToHttp().getRequest();// 这个能获取到req
    return validateRequest(request);// 如果返回 false Nest会忽略但前处理,true就放行
    // 注意 false的时候实际上会触发这个代码
    throw new UnauthorizedException();
    // 也就是说你将会得到下面的res
    {
      "statusCode": 403,
      "message": "Forbidden resource"
    }
  }
}


export interface ExecutionContext extends ArgumentsHost {
  getClass<T = any>(): Type<T>; // 这个可以获取指定controller 的类型
  getHandler(): Function; // 这个是获取具体的但前程序 执行方法的引用,换句话说假设你现在 目标是
  // catController上的crate方法,那么 getHandler 就能获取到 这个方法
}- 如何绑定,如何做角色验证Role
// 首先我们定义一个 路由守卫
import { Injectable, CanActivate, ExecutionContext } from '@nestjs/common';
import { Observable } from 'rxjs';

@Injectable()
export class RolesGuard implements CanActivate {
  canActivate(
    context: ExecutionContext,
  ): boolean | Promise<boolean> | Observable<boolean> {
    return true;  // 目前它永远都是被放行的
  }
}

// 使用它
@Controller('cats')
@UseGuards(RolesGuard)
export class CatsController {}

// 全局使用
app.useGlobalGuards(new RolesGuard());
特别说明 对于混合应用程序,useGlobalGuards() 方法不会为网关和微服务设置守卫。对于“标准”(非混合)微服务应用程序,useGlobalGuards()在全局安装守卫。
- 功能改进 反射器和自定义装饰器
@SetMetadata('roles', ['admin']) 是nest提供的装饰器可以把这些值 附加到req上,SetMetadata就是一种反射器, 例如


@Post()
@SetMetadata('roles', ['admin'])
async create(@Body() createCatDto: CreateCatDto) {
  this.catsService.create(createCatDto);
}

// 但是不推荐,推荐的做法是自定义装饰器
export const Roles = (...roles: string[]) => SetMetadata('roles', roles);

// 然后去使用
@Post()
@Roles(“admin”)
async create(@Body() createCatDto: CreateCatDto) {
  this.catsService.create(createCatDto);
}

// 顺便把 原来的方啊改掉
@Injectable()
export class RolesGuard implements CanActivate {
  constructor(private reflector: Reflector) {}

  canActivate(context: ExecutionContext): boolean {
    const roles = this.reflector.get<string[]>('roles', context.getHandler());
    if (!roles) {
      return true;
    }
    const request = context.switchToHttp().getRequest();
    const user = request.user;
    return matchRoles(roles, user.roles);
  }
}
Nestjs中的认证方案
passport是 被广泛使用的Nodejs验权库,它比较复杂我们直接上代码
使用bcrypt加密
// 这个文件在utils下,主要是对用户的密码进行加而后存储到数据库中
import * as bcrypt from 'bcrypt';

const saltRounds = 10;

export function encryptPassword(password: string): string {
  const salt = bcrypt.genSaltSync(saltRounds);
  return bcrypt.hashSync(password, salt);
}

export function comparePassword(
  password: string,
  oldPassword: string,
): boolean {
  return bcrypt.compareSync(password, oldPassword);
}
具体的方案
实战
- 构建基础的文件夹结构, 在这里为把auth相关的都都内聚到一个module中去了
 它包含了三件套 和一个常量文件,两个认证策略
- 代码逻辑
// coontroller
@Controller('auth')
export class AuthController {
  constructor(private authService: AuthService) {}

  // 开始验证和加密
  // console.log('JWT验证 - Step 1: 用户请求登录');
  @Post('login')
  async login(@Body() loginParams: any) {
    const value = await this.authService.loginSingToken(loginParams);
    return value;
  }
}

// module
@Module({
  imports: [
    PassportModule.register({ defaultStrategy: 'jwt' }), // 设置默认的策略
    JwtModule.register({
      secret: jwtConstants.secret, // 就是成常量里来的
      signOptions: { expiresIn: '8h' }, // token 过期时效
    }),
    UserModule,
  ],
  controllers: [AuthController],
  providers: [AuthService, LocalStrategy, JwtStrategy, CacheService],
  exports: [AuthService],
})
export class AuthModule {}

// service
@Injectable()
export class AuthService {
  constructor(
    private readonly userService: UserService,
    private readonly jwtService: JwtService,
  ) {}

  async loginSingToken(loginParams: any) {
    const authResult = await this.validateUser(
      loginParams.username,
      loginParams.password,
    );
    switch (authResult.code) {
      case 1:
        return this.certificate(authResult.user);
      case 2:
        return {
          code: 600,
          msg: `账号或密码不正确`,
        };
      default:
        return {
          code: 600,
          msg: `查无此人`,
        };
    }
  }

  // JWT验证 - Step 2: 校验用户信息
  async validateUser(
    username: string,
    password: string,
  ): Promise<{ code: number; user: User | null }> {
    // console.log('JWT验证 - Step 2: 校验用户信息');
    const user = await this.userService.findOne(username);

    if (user) {
      // 通过密码盐,加密传参,再与数据库里的比较,判断是否相等
      const isOk = comparePassword(password, user.password);
      if (isOk) {
        // 密码正确
        return {
          code: 1,
          user,
        };
      } else {
        // 密码错误
        return {
          code: 2,
          user: null,
        };
      }
    }
    // 查无此人
    return {
      code: 401,
      user: null,
    };
  }

  // JWT验证 - Step 3: 处理 jwt 签证
  async certificate(user: User) {
    const payload = {
      username: user.username,
      sub: user.id,
    };
    console.log('JWT验证 - Step 3: 处理 jwt 签证');
    try {
      const token = this.jwtService.sign(payload);
      return {
        code: 200,
        data: {
          token,
        },
        msg: `登录成功`,
      };
    } catch (error) {
      return {
        code: 600,
        msg: `账号或密码错误`,
      };
    }
  }
}


// src/logical/auth/constats.ts
export const jwtConstants = {
  secret: 'shinobi7414', // 秘钥
};


// src/logical/auth/jwt.strategy.ts
import { ExtractJwt, Strategy } from 'passport-jwt';
import { PassportStrategy } from '@nestjs/passport';
import { Injectable, UnauthorizedException } from '@nestjs/common';
import { jwtConstants } from './constants';
import { Request } from 'express';
import { CacheService } from '../cache/cache.service';

@Injectable()  // 实现了 PassportStrategy 接口 把jwtStrategy 作为参数传递
export class JwtStrategy extends PassportStrategy(Strategy) {
  constructor(private readonly CacheService: CacheService) {
    super({
      jwtFromRequest: ExtractJwt.fromAuthHeaderAsBearerToken(),
      ignoreExpiration: false,
      secretOrKey: jwtConstants.secret,
      passReqToCallback: true,
    });
  }

  // JWT验证 - Step 4: 被守卫调用
  async validate(req: Request, payload: any) {
    const originToken = ExtractJwt.fromAuthHeaderAsBearerToken()(req);
    //     originToken 就是从 req中 Header 能够获取到你的 token字段
    return {
      username: payload.username,
    };
  }
}


// src/logical/auth/local.strategy.ts
import { Strategy } from 'passport-local';
import { PassportStrategy } from '@nestjs/passport';
import { Injectable, UnauthorizedException } from '@nestjs/common';
import { AuthService } from './auth.service';

@Injectable()
export class LocalStrategy extends PassportStrategy(Strategy) {
  constructor(private readonly authService: AuthService) {
    super();
  }

  async validate(username: string, password: string): Promise<any> {
    // 本地local的策略于jwt关系不大,
    console.log('你要调用我哈------------');
    const user = await this.authService.validateUser(username, password);
    if (!user) {
      throw new UnauthorizedException();
    }
    return user;
  }
}- 上述全都是定义,下面是使用
// 我们在tags module中使用它
----省略部分代码-----
  @UseGuards(AuthGuard('jwt'))  // jwt策略
  @Get('/tags')
  async getAll() {
    const value = await this.tagService.getAll();
    return value;
  }

  @UseGuards(AuthGuard('local')) //  本地侧露
  @Post()
  async createTag(@Body() tagInfo: Tag) {
    const value = await this.tagService.create(tagInfo);
    return value;
  }
----省略部分代码-----
以上就是鉴权的所有逻辑了
下章内容我们将会继续完成下面的内容
- 统一返回体定义
- 上传文件
- 请求转发
- 定时Job
- 上swagger
- 利用redis做单点登录
- 如何做微服务?通信架构如何设计?
- Nest到底咋运行的?